Signing document with Autenti service
Applies to version: 2025 R1 and above; author: Lily Adamowicz, Michał Bednarczyk
Related documentation
A detailed description of the functionalities mentioned herein and their configuration can be found in the following sections of the WEBCON Help:
This article applies to the Autenti integration add-in available from version 2025 R1.
The add-in described in this article is no longer supported.
Introduction
In WEBCON, support for digital signatures is implemented using dedicated actions based on the Software Development Kit (SDK). This mechanism enables secure and seamless execution of document signing operations within workflows.
Integration add-ins are currently available for the following external electronic signature service providers:
This article concerns integration with the Autenti platform. It discusses the document signing process and the configuration of an example workflow that includes sending a document for signature, handling actions performed while awaiting signature completion, and then downloading the signed document.
The integration enables sending a document containing attachments indicated on a workflow instance for signature, and then redirecting the user to the Autenti web application, either via email or through a link available directly on the form. The document signing process takes place in Autenti. Once completed, the signed document can be automatically attached back to the workflow instance.
License requirements
To use the integration between WEBCON and Autenti, an appropriate integration license must be purchased. Contact your Autenti representative directly for details. Communication with the Autenti platform is handled through a system account, which is used to send documents for signature. Individuals signing the documents do not need an Autenti account or a WEBCON license.
Description of the process
The Autenti platform provides various mechanisms for handling documents submitted for signature. These include, among others:
- creating a document in the system,
- uploading a document file for signature,
- checking the document status and the signature status for each assigned person,
- sending an email message with a link to sign the document,
- two-step verification via SMS,
- sending reminders,
- downloading the complete document after the signatures have been provided.
These functionalities enable the following communication flow to be implemented within the workflow:
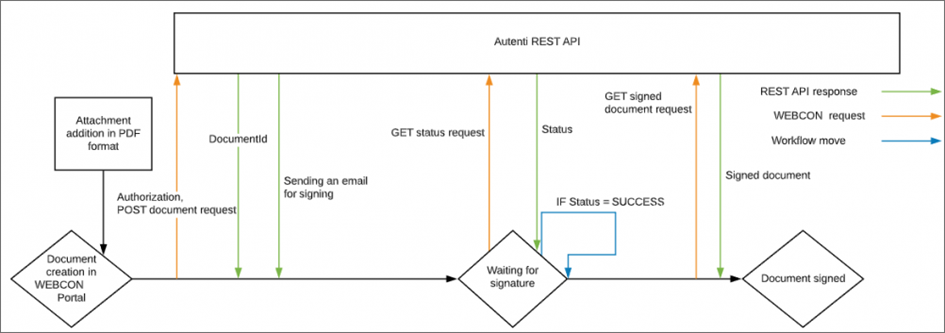
Fig. 1. Workflow diagram
Several actions have been defined in the process to handle the following operations:
- sending the document to Autenti,
- retrieving the signature status for individual assigned persons,
- sending reminders about the need to sign the document,
- sending a request to return the document together with its status.
A Timer mechanism has also been used. It automatically attempts to run the path responsible for checking the document signature status in Autenti every hour.
Business case
For the purposes of this presentation, a simplified document workflow was used. It includes several basic stages: document preparation, manager approval, and signing the document by external parties.
The process starts at the Prepare document step, where a document template is generated. The document then moves to the Manager approval step, where it can be approved or rejected. Once approved, the document proceeds to the Awaiting for signatures step. At this stage, the system periodically, every hour, runs the Check status path to verify whether the document has been signed in Autenti. The signature status is also checked for each assigned person. If a person has not signed the document within the specified time, a reminder is sent to them. After all required signatures have been provided, the workflow ends at the Approved step.
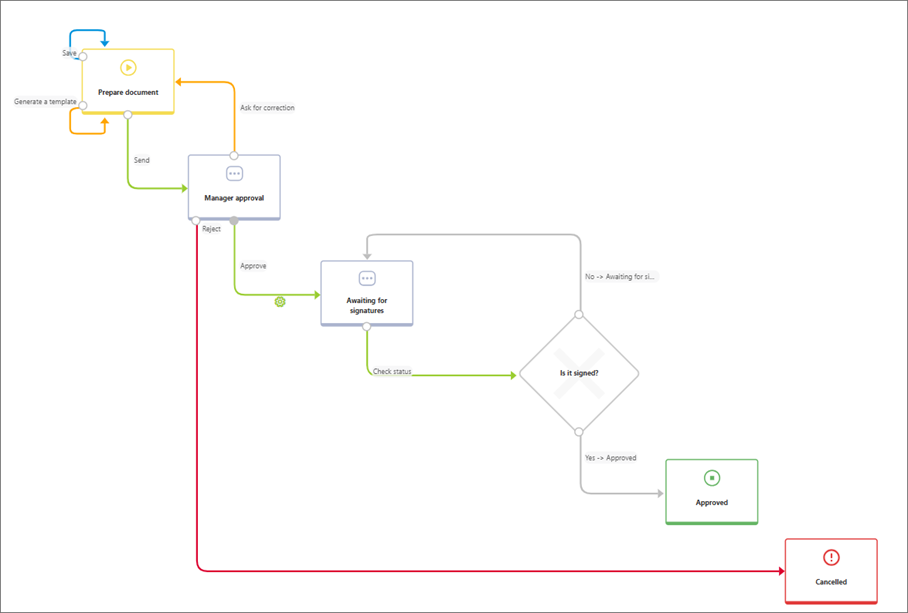
Fig. 2. Signature diagram
The form contains form fields required to execute the signature actions:
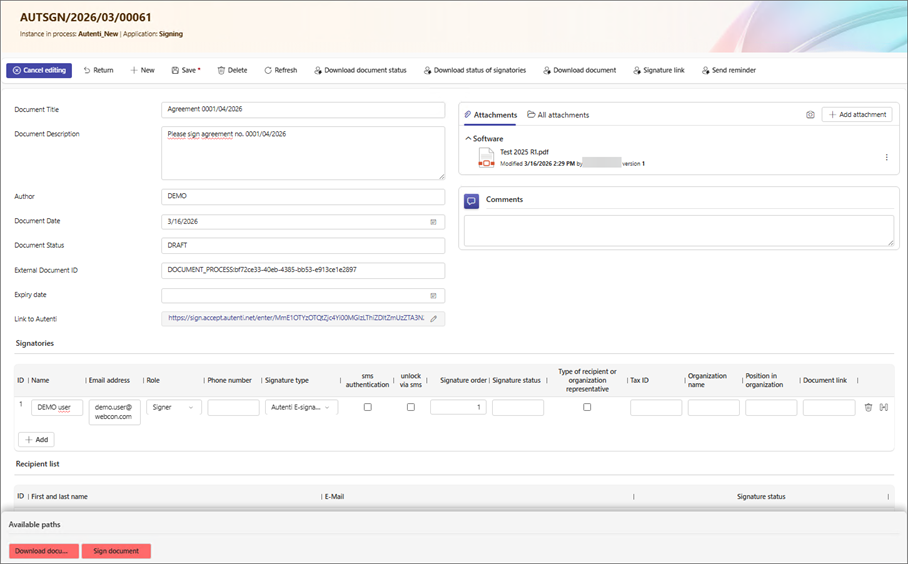
Fig. 3. Signature workflow form
In addition to standard form fields related to the document signing process, the form also includes the Link to Autenti form field, which can be automatically completed using the related Get link for sign action. This makes the document signing link available directly in the WEBCON workflow, without the need to search for the email message sent by Autenti. This is a convenient solution for process participants — after running the action, they can proceed directly to signing the document from the form level, which speeds up their work and simplifies document handling.
The Signers Item list is used to specify all participants in the document signing process and assign them the appropriate roles and authorization settings. Each row in the list corresponds to one person participating in the process.
In the current version of the add-in, values related to the Autenti integration, such as recipient roles or signature types, do not need to be defined manually. The SDK add-in package integrating WEBCON with Autenti provides ready-made Custom data sources in addition to the supported actions. These sources can be assigned to the relevant form fields on the form. The available sources include, among others, document and signature statuses, signature types, and recipient roles. As a result, when configuring the form, there is no need to manually recreate values compliant with Autenti — the supplied sources can simply be used.
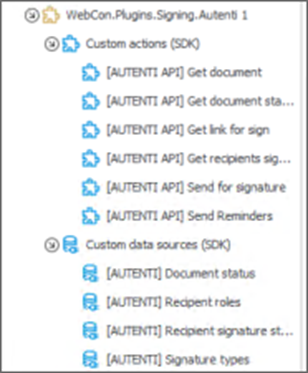
Fig.4. Autenti add-in package with actions and data sources
In the Role column (form field type: Choice field), specify how the given person participates in the signing process. The field uses the Recipient roles source, which provides roles compliant with Autenti:
- SENDER – the person sending the document,
- SIGNER – the person signing the document,
- APPROVER – the person approving the document without signing it,
- REVIEWER – the person reviewing the document with the option to add comments,
- VIEWER – the person with read-only access to preview the document.
In the Phone number column (form field type: Single line of text), enter the phone number of the person signing the document. This form field is required if SMS authentication is selected in the configuration.
In the Signature type column (form field type: Choice field), specify the signature method. The field uses the Signature types source. This source is configurable, so all available signature types can be left enabled, or the list can be limited to selected values according to the requirements of a given process.
The following signature methods are available in the source:
- Autenti E-signature – a standard electronic signature,
- Qualified signature – a qualified electronic signature, equivalent to a handwritten signature and having full evidentiary value (including a one-time signature — the service requires additional configuration on the Autenti side),
Qualified electronic signatures - Advanced Autenti e-signature – an advanced electronic signature, uniquely linked to the signer and performed with identity verification.
Advanced electronic signature
The next two columns contain choice fields related to SMS code handling:
- SMS authentication – selecting this option means that before signing the document, the user must enter the SMS code sent to the specified phone number.
Authorization using SMS code - Unlock via SMS – selecting this option encrypts the document. The user will only be able to view its contents after entering the SMS code.
“Securing document access with an SMS code” - what does it mean when sending a document?
The Signature order field makes it possible to control the order in which signatures are provided. The value of the Signature status field is retrieved automatically in the context of the given user using the Get recipients signature status action.
The next columns of the Item list refer to the organization represented by the signer. These are: Organization name, Tax ID, and Position in organization. It is also possible to indicate that a given recipient acts as a representative of the organization.
The last column contains a link to the document, provided that the action for retrieving the signing link has already been executed. This allows the user to proceed to sign the document without having to use the link sent in an email message.
A technical text field named External Document ID must also be added to the form. This field is crucial for the subsequent course of the process. It stores the document identifier (GUID) assigned by Autenti after the document has been successfully saved in the platform database.
According to the Autenti REST API documentation, make sure that Autenti has returned a valid GUID. If this identifier is missing, it means that the document has not been registered correctly, and the technical field will remain empty. Such a situation indicates an integration-side issue and prevents the signing process from continuing correctly.
Integration configuration should begin with creating two REST Web Service connections to the Autenti REST API. These connections are used to send PDF documents for signature and to handle authorization.
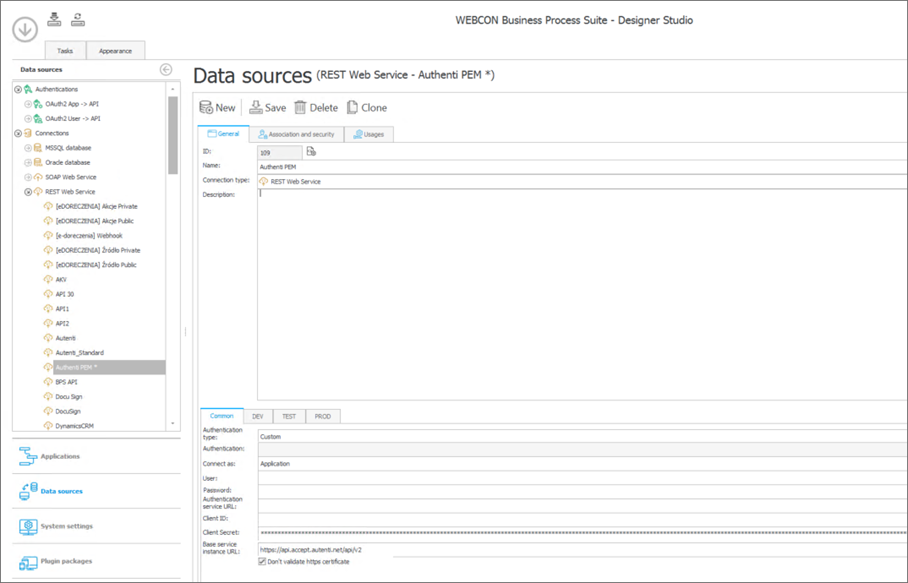
Fig. 5. API connection configuration
The connections use the JWT Bearer grant authentication mechanism, described in detail in the Autenti documentation. To connect to Autenti, you must first generate a key pair. The public key must be converted to the JWKS format and configured in the API application on the Autenti side. The private key must be kept in the .PEM format, as it will later be used in the connection configuration in WEBCON.
Two connections must be created:
- connection with the PEM key – in this connection, enter the base URL of the service instance and provide the private key in .PEM format in the Client Secret field.
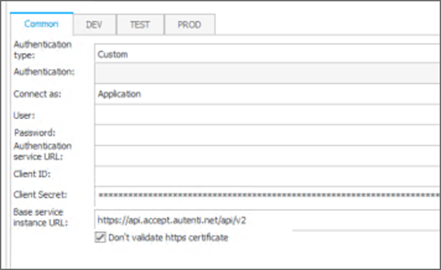
Fig. 6. Connection with the PEM key
- second connection – in this connection, enter both URLs and complete the Client ID and Client Secret fields.
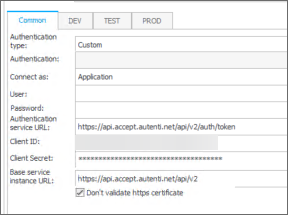
Fig. 7. Second REST Web Service connection
In the connection configuration, provide the following URLs:
- For the test environment:
- authorization service URL –
https://api.accept.autenti.net/api/v2/auth/token, - base service instance URL –
https://api.accept.autenti.net/api/v2.
- For the production environment:
- authorization service URL –
https://api.autenti.net/api/v2/auth/token, - base service instance URL –
https://api.autenti.net/api/v2.
The above URLs are valid as of April 30, 2026, and may change in future versions of the Autenti platform. It is recommended to verify them in the official documentation before starting the configuration.
The next stage is to configure the action that sends the document for signature. In the example described here, the action was added in the Manager approval step. An automation should be added on the Accept path, and the appropriate SDK action should be placed inside it.
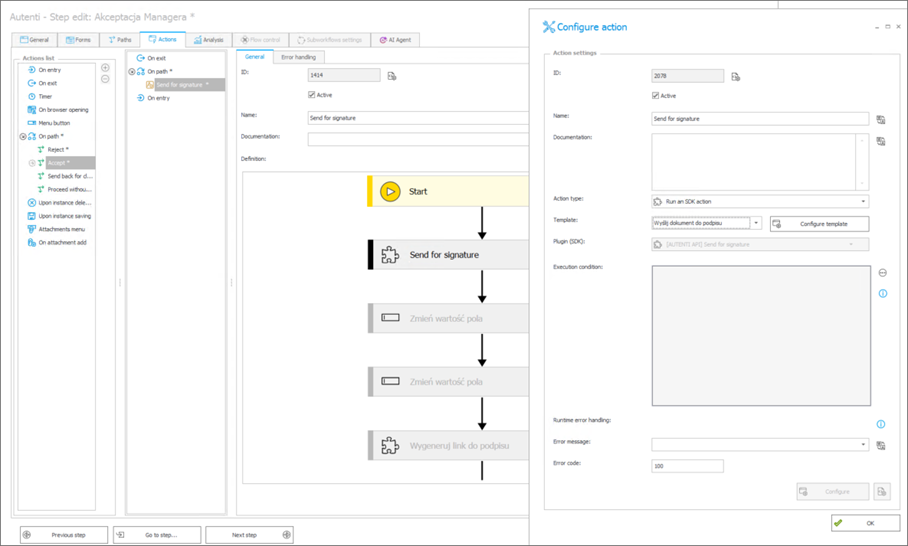
Fig. 8. Preview of the send document action
The configuration of the individual action sections is presented below:
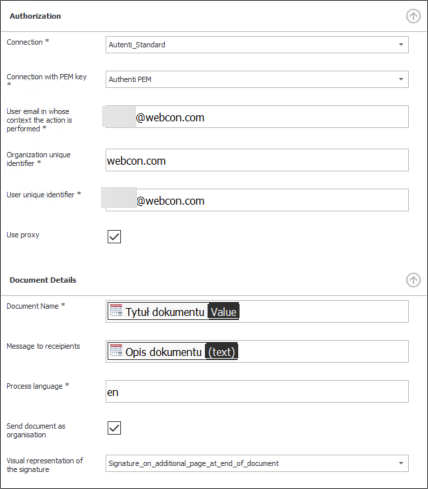
Fig. 9. Send for signature action configuration
In the action configuration, indicate both previously created connections that use the JWT Bearer grant mechanism, as well as the email address of the user in whose context the action is executed in Autenti. At this point, you must also define two technical fields used by JWT Bearer for identification: Unique organization identifier and Unique user identifier.
In the Document properties section, indicate the fields containing the title and description of the document that will be sent for signature. This information will be visible in the body of the email message sent to the people invited to sign the document. Selecting the Send document as organization checkbox allows messages to be sent on behalf of the organization.
The next section concerns Attachments. Attachment selection can be configured in two ways:
- Category – specify the attachment group from which files for signature should be retrieved. Additionally, a regular expression can be provided to narrow down the filtering, for example to files with the .pdf extension.
- SQL – in this case, complete the field with an SQL query to the WFDataAttachmets table. The query should return the identifiers of the attachments intended for signature.
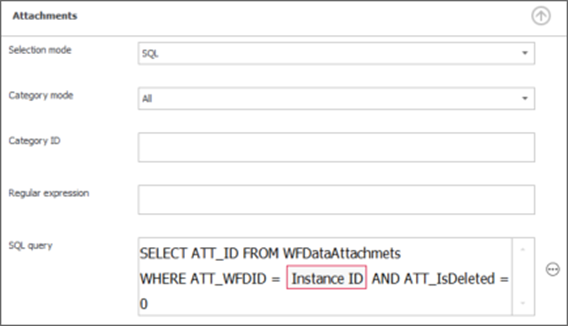
Fig. 10. Attachment selection
SELECT
ATT_ID
FROM WFDataAttachmets
WHERE
ATT_WFDID = {WFD_ID}
AND ATT_IsDeleted = 0
If only the attachment indicated in a specific form field is to be signed, the query can be further narrowed down, for example as follows:
SELECT
ATT_ID
FROM WFDataAttachmets
WHERE
ATT_WFDID = {WFD_ID}
AND dbo.ClearWFElemID(ATT_Attribute1) = 1
AND ATT_IsDeleted = 0
In the next section, define the key recipient fields that determine the data sent to the electronic signature service.
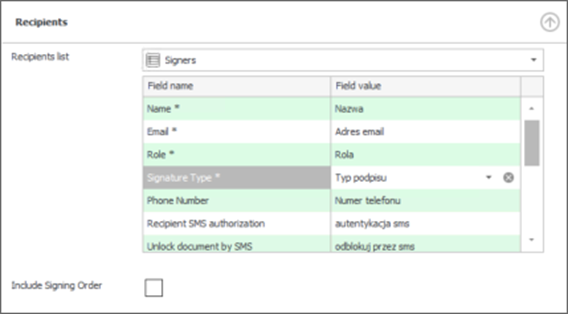
Fig.11. Recipient data
- Recipient list
- Select the Item list containing the data of the people who will participate in the document signing process. The columns of this list were discussed earlier in the article. Fields marked with an asterisk are mandatory.
- Include signing order
- This field is required if at least one row in the Item list contains the Approver role.
The last section in the SDK action configuration is Response. In this section, specify the fields in which the external document ID, the link to the document in Autenti, and the document status will be stored.
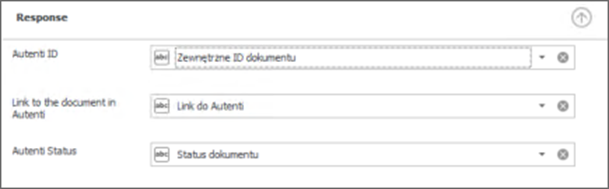
Fig.12. Output data
After configuring the action, you can go to the Portal and test the solution. To do this, create a new instance, complete the list of signers, and then follow the path to the Manager approval step.
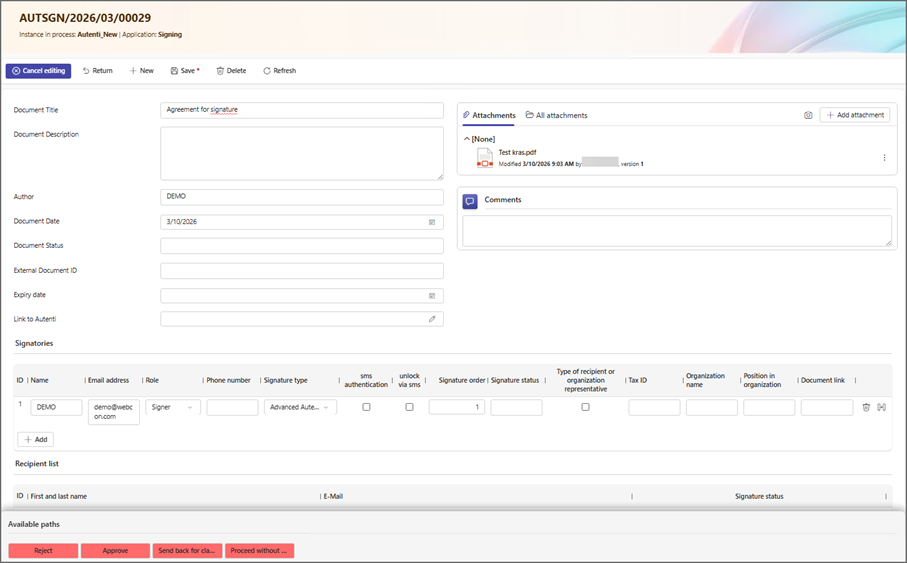
Fig. 13. Form window
After approval by the supervisor, the document is sent for signature to the people specified in the Signers Item list. These people receive the following email message from Autenti:
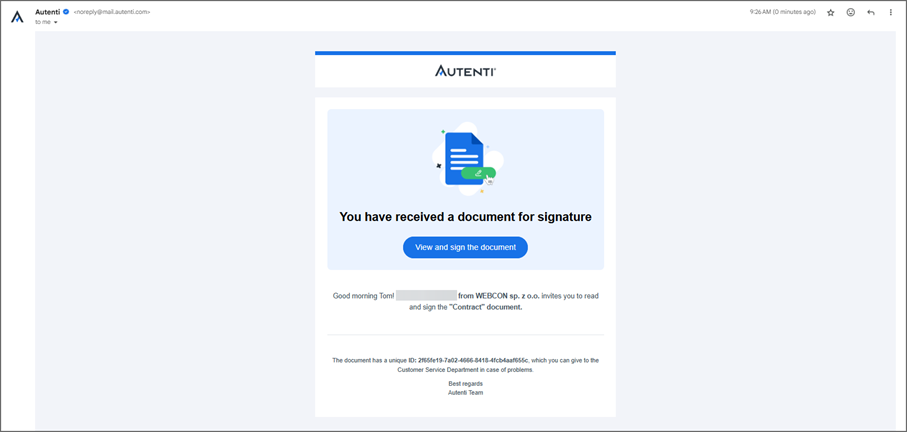
Fig. 14. Content of the email from Autenti
The View and sign the document button is also a hyperlink that leads to the document that is ready to be signed. Clicking the link redirects you to the authorization page, where you need to enter the SMS code to unlock the document. If the Unlock via SMS option is not selected, the document is displayed immediately, without requiring authorization.
If the process includes the action for retrieving the signing link, the user can use the link available directly on the form, without having to open the email message. If the document has been locked using SMS, the action for retrieving links will not work.
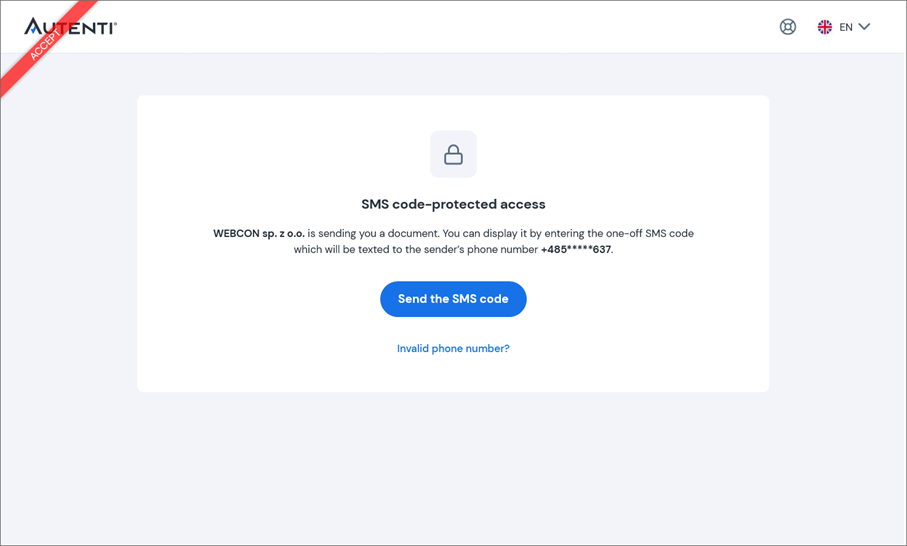
Fig. 15. Document secured with SMS code
After entering the SMS code correctly, the document to be signed will be displayed along with the key details. After reading the document, click the Next button.

Fig. 16. Document to be signed
After clicking the hyperlink, you’ll be prompted to confirm your signature by entering a one-time code sent to your phone number. Entering a one-time code is required because, when registering the instance in the BPS Portal, additional SMS authentication was enabled for this user.
If this option is not enabled, signing the document requires no additional confirmation – simply click the Sign button to complete the process.
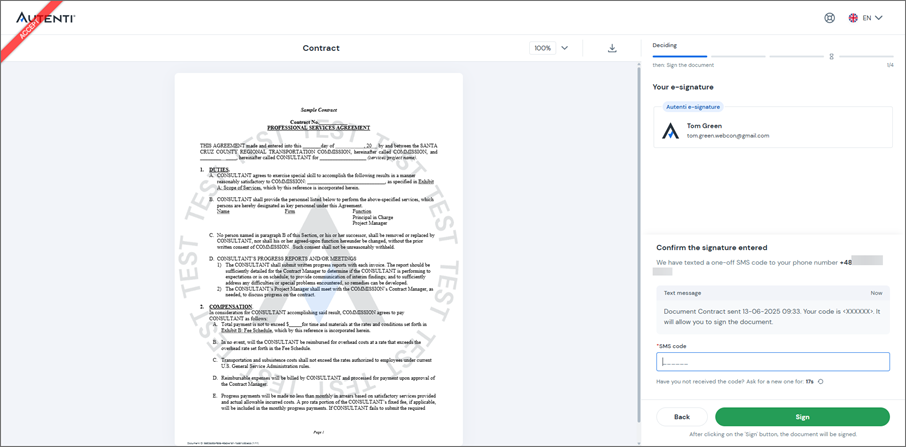
Fig. 17. Document - confirmation of signature
After entering the code, the system will display confirmation details about the document signing.
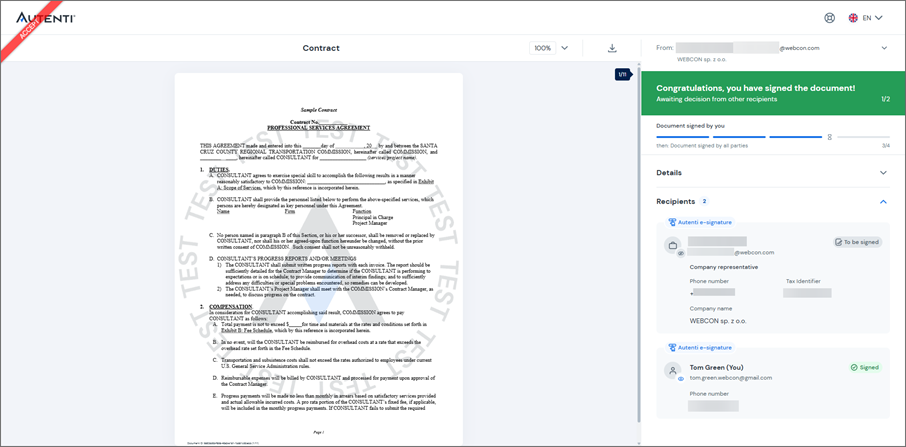
Fig. 18. Signed document screen
A confirmation of the completed document signing, along with a copy of the signed contract, will be sent to all individuals listed as signatories.
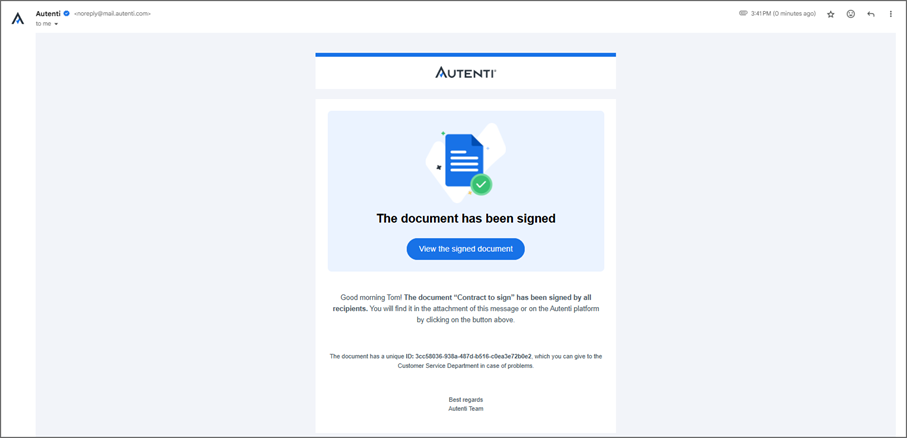
Fig. 19. Return mail
If the document is signed successfully, it will include a certificate and stamp verifying the authenticity of the signature.
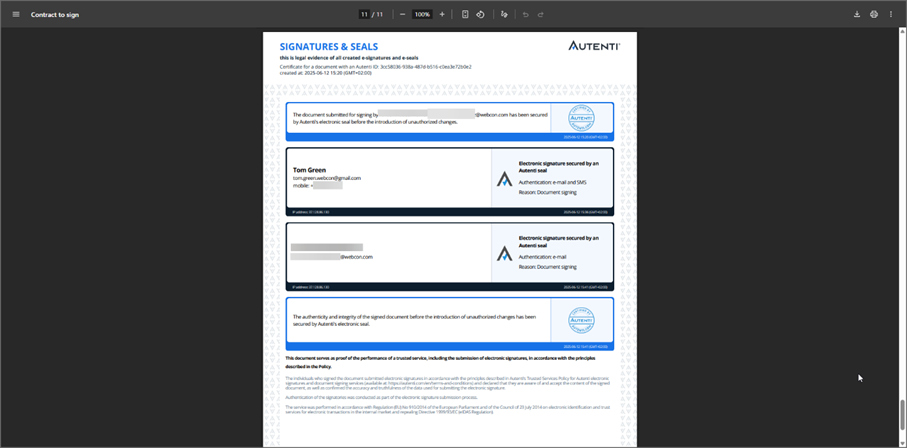
Fig. 20. Autenti signature certificate
While the document is being signed in Autenti, the WEBCON instance remains in the Awaiting for signatures step. At this stage, additional actions can be configured and then triggered, for example, by using a Timer or buttons available in the menu, as shown in the screenshot below.
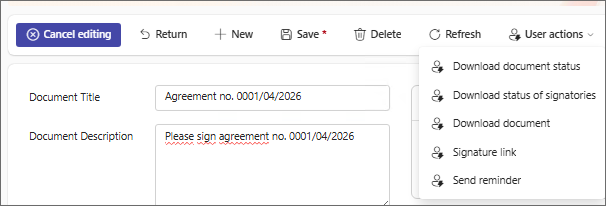
Fig.21. Action buttons in the menu
The Download status of signers action retrieves the document signing status in the context of each person and then saves it to the Item list in the Signature status column.
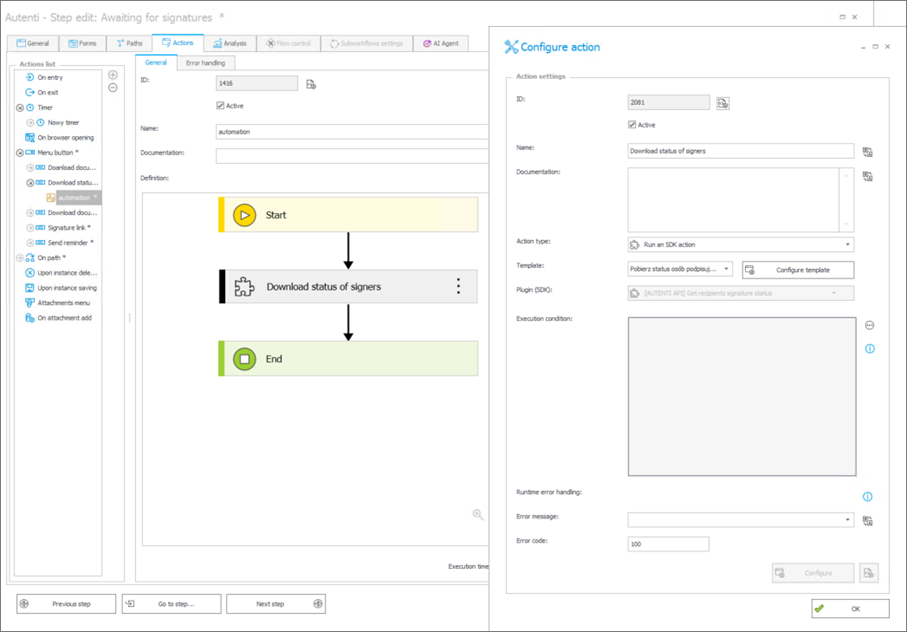
Fig.22. Configuration of the action for retrieving signers’ statuses
Another action that can be triggered at this step using a button in the menu is Send reminder. After it is executed, users receive a reminder message about the document awaiting signature.
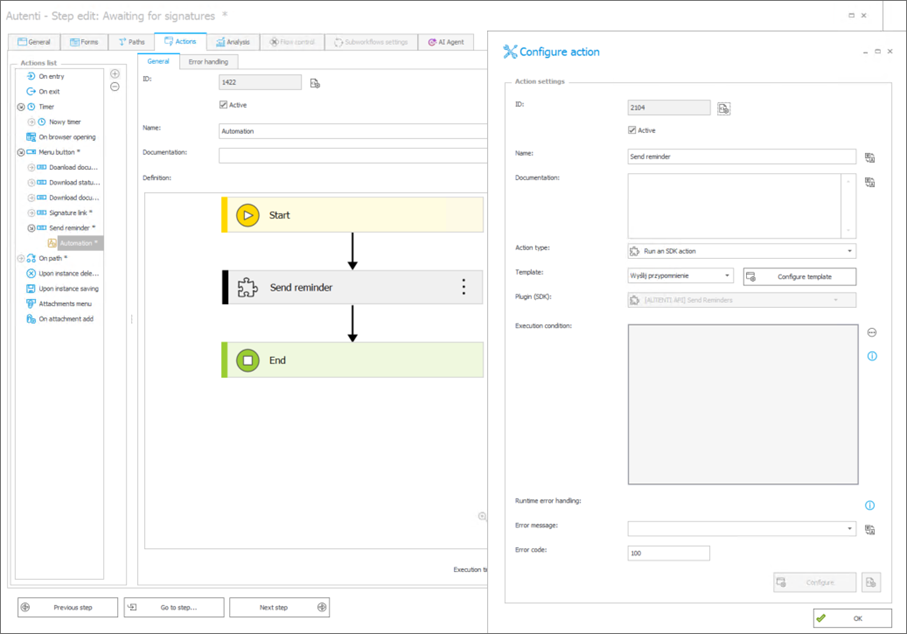
Fig.23. Configuration of the action for sending a reminder
To complete the process, configure an action that checks the signature status of the entire document and then downloads the document once its status changes to COMPLETED. This automation should be added on the Check status path.
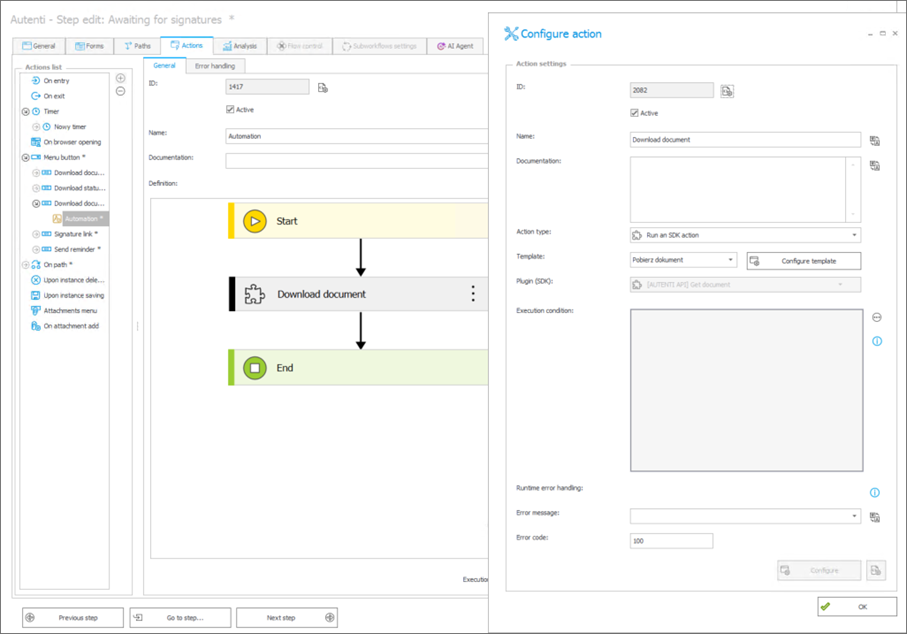
Fig. 24. Document download action preview
The authentication settings are the same as for the action used to send the document. In the Autenti ID field, indicate the field that stores the document identifier assigned by Autenti.
The next step is to configure the conditional step Is it signed?, which is preceded by the Check Status path.
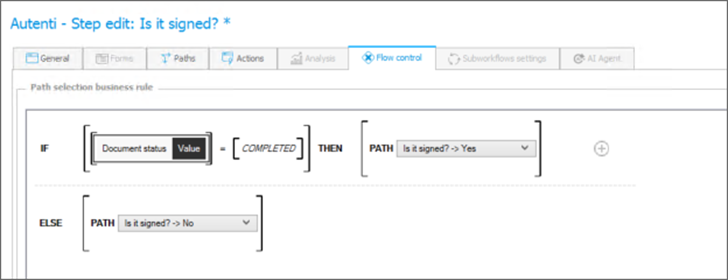
Fig. 25. Configuration of the Is it signed? conditional step
If the document download action results in the value COMPLETED being provided in the Document status from Autenti form field, the instance is routed to the final step. Otherwise, the item will return to the Awaiting for signatures step.
The system can return different statuses retrieved from the SDK source:
- PROCESSING
- COMPLETED
- SUCCESS
- REJECTED
- FAILED
- WITHDRAWN
- ERROR
In the Awaiting for signatures step, configure a Timer function that checks every hour whether the document has been signed.
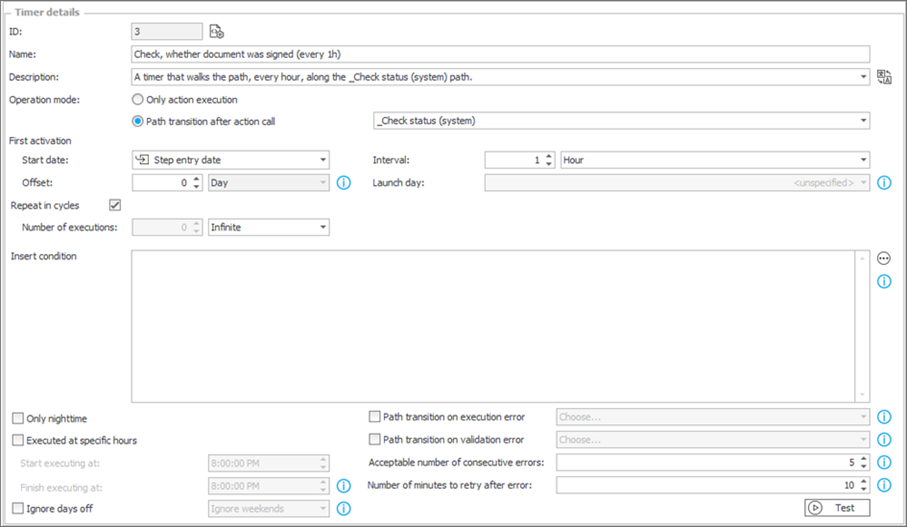
Fig. 26. Timer function configuration
Set the operation mode to Path transition after action call. If no action is defined, the Timer function will attempt to move the document to the next step every hour.
After the action is successfully performed, the value COMPLETED appears in the Document status, indicating that the signature process has been completed and all participants have signed the document. As a result, the instance is forwarded to the final step, and the signed document is saved in the Signed category.

Fig. 27. Instance at the final step
Conclusion
The workflow described above serves as a sample implementation of the WEBCON add-on for integration with Autenti.
The source code for all add-ons is available on the official GitHub repository: https://github.com/WEBCON-BPS and is released under the MIT License.
+48 12 443 13 90