Applies to version: 2020.1.x and above; author: Franciszek Sakławski
Introduction
WEBCON BPS allows you to optically recognize of instances and then, assign their values to the appropriate form fields. The following article describes the method of configuration a process to read data on the instance.
The configuration of WEBCON BPS system
To run the OCR AI you must to:
- Install the ABBYY FineReader component (Fine Reader 11 installation)
- Enable the “OCR AI” service role
- Import/add an OCR AI project
The following configuration uses two OCR AI projects – for tax id and fields identification (provided by WEBCON BPS).
These projects were imported in the “OCR AI” projects in the system configuration in Designer Studio.
The workflow configuration
The simple workflow consisting of eight steps was created for the purpose of the article:
- Start – a start step
- Wait for scan – a step in which the workflow instances are waiting for the scan
- Wait for text layer – a step in which there are workflow instances, whose attachments are waiting in the queue for processing (text layer queue)
- Wait for OCR AI (TAX ID) – a step in which there are workflow instances, whose attachments are waiting in the queue for processing (OCR AI recognition queue)
- Wait for OCR AI – a step in which there are workflow instances whose attachments are waiting in the queue for processing (OCR AI recognition queue)
- OCR Verification – a step in which a person verifies the correctness of the data and corrects the information read
- Wait for OCR AI Learn – a step in which there are workflow instances whose attachments are waiting in the queue for processing (OCR AI learning queue)
- Final (positive) – a final step
Fig. 1. The workflow schema
The configuration of the “Add a text layer” action
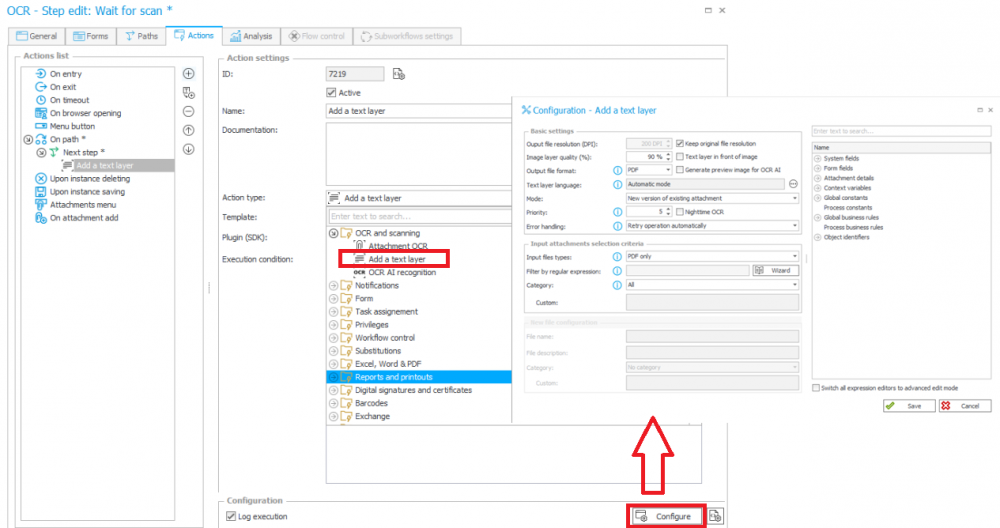
The first step is to configure the action of adding a text layer. Enter the “Next step” path edit in the “Wait for scan” step and add the “Add a text layer” action. Next, enter the configuration by clicking the “Configure” button and set fields like on the screen below:
Fig. 2. The configuration of the “Add a text layer” action
- Mode – in this field you determine in what form the attachment with the text layer will be added to the instance
- Priority – on a scale of 1 to 10, where the 1 is the highest priority
- Error handling – this setting specifies what happens after the first processing error of the queue instance
- Filter by regular expressions – the field that allows you to fill in a regular expression used to select the files for which the text layer will be generated
The attachments for which the text layer is to be applied are added to the queue and analyzed according to the given priority. The system will move the instance by a default path to the next step, after applying the layer.
In the next step, read the TAX ID – this is important because the invoice template is checked by tax id.
The OCR program treats the invoice as a semi-structured document. This means that while most invoices have a similar pattern, the location of the fields on the document may differ. An invoice from one contractor may have a tax identification number or date of issue given elsewhere than an invoice from another contractor. However, the program assumes that incoming invoices from the same contractor will be built according to the same scheme. Therefore, it is extremely important to correctly identify the tax identification number and thus the invoice scheme.
The configuration of the “OCR AI Recognition” – tax id
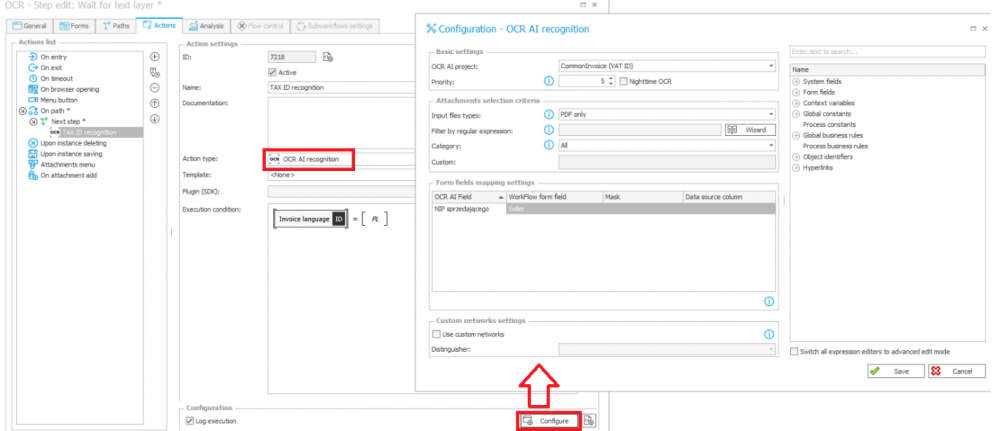
To correctly check the tax identification number, define action on the path going through from the “Wait for text layer” step. Add the “OCR AI Recognition” action and configure them according to the following screen:
Fig. 3. The configuration of the “OCR AI Recognition (TAX ID)” action
You must select the correct “OCR AI project” defined to the tax id read. In our case this will be “CommonInvoice (VAT ID)" project.
The system once again queues our instance. After reading the tax id number, the instance will be automatically moved to the next step.
Sections in the configurations:
- Mapping – allows you to set which OCR AI project fields will be entered into the appropriate form fields
- Custom networks – checking this field allows you to select the distinguisher
- Distinguisher – allows you to select the form field based on which the project OCR AI is selected which is used in “Recognize OCR AI” action
Configuration of the “OCR AI Recognition” – Fields
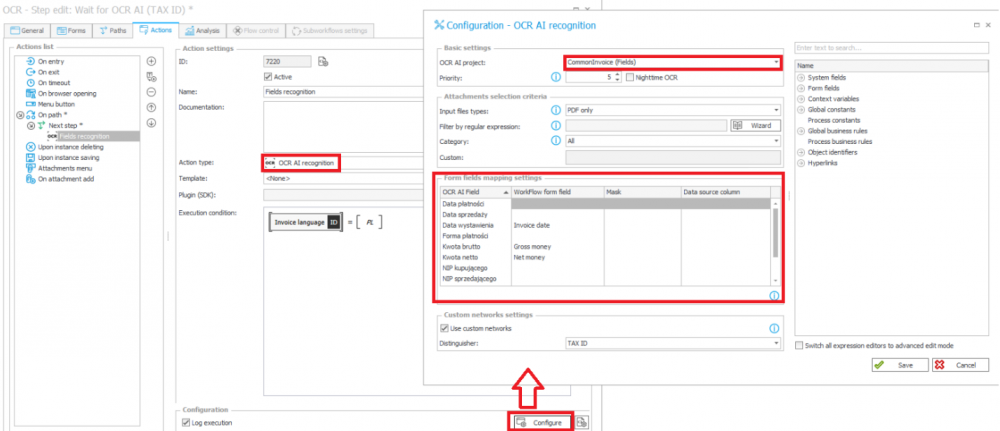
In the next step the system recognizes the fields on the invoice and assigns values to the fields defined on the form. This action is of the same type as the tax id recognition action, but we will use another project to them (OCR AI project for field recognition).
Fig.4. The configuration of the “OCR AI Recognition” for fields
Configuration of the “Teach OCR AI” action
After reading the fields, the system will move the instance to the OCR verification step. At this step the user verifies the correctness of reading data and can correct information – they can improve the fields read and means for them the learning buttons.
More information about the new OCR verification view on the MODERN can be found at New OCR verification view.
To properly teach the program, add the “Teach OCR AI” action on the path and then, configure it according to the screen below:
Fig.5. The configuration of the Teach OCR AI action
- Attachments selection criteria – you can select the attachments which will be included during teaching by using the SQL query
By using the “OCR AI Learn” path you can teach the program. In this way the system learns how to analyze vendor invoices based on the NIP distinguisher.
Summary
This article described three types of actions use when configuring OCR AI. Careful planning of the workflow steps and actions and using the OCR AI Projects, can facilitate document handling and improve daily tasks.


