Applies to version: 2020.1.x and above; author: Franciszek Sakławski
Introduction
When designing MODERN forms for WEBCON BPS Portal, it is important to take into consideration what the end user is expected to do on the form and how to make sure they do it correctly.. A user should be able to discern what value should be entered into what field. In addition to thematically grouping form fields, you can also add tooltips with instructions next to field labels.
Tooltips
Thanks to tooltips on the form, a user has the ability to learn more about the form they are currently working on. In WEBCON BPS, such tooltips can be found both on form fields and on transition path buttons. For form fields, the tooltip will be located in the small “I” icon next to the form field. For the paths – you need to hover over the path button and you will see a tooltip. We can also add step descriptions that will appear in the Task details section of the form.
Business case
A simple vacation request workflow has been created and then, a new instance in the system has been created.
Fig. 1. The request form
Tooltips on the form field
As you can see, next to the “Leave start” and “Leave end” form fields there are “I” icons. Hovering over them will display a tooltip for the given form field.

Fig. 2. Tooltip on the form field
To configure a tooltip to the form field, go to the WEBCON BPS Designer Studio and go to the selected form field configuration, then enter the text of the tooltip in the “Description” field.
Fig. 3. Adding a tooltip in Designer Studio
Tooltips on paths and steps
The workflow steps in the MODERN form are listed on the right:

Fig. 4. The MODERN form
The step description is visible at all times in the Task details section (if it is present on the form). To check the tooltip on the current step and other steps, hover over them.

Fig. 5. The tooltip on the workflow step
The situation is similar to form fields . When editing a given workflow, the step edit configuration will have its own“Description” field.
Fig. 6. Adding the tooltip in Designer Studio
To set the tooltip on the transition path button, go to the step edit of the step from which the path originates, and go to the “Paths” tab, select the path on which you want to add the tooltip, and then fill in the “Path description in tooltip”.

Fig. 7. Adding the tooltip in Designer Studio – on a transition path
Additional information
Lengthy tooltips
The character limit for the tooltip is very large, so be careful not to set one that is too long and contains too much information. The tooltip should be a short and concise note directing the user.
To demonstrate what a tooltip might look like, a longer text like “Lorem Ipsum” was pasted in the “Description” field of the transition path. After hovering over the path button, we can observe the monstrosity that we have unleashed upon this world . As you can see in the screen below, large swathes of the form are obscured by the tooltip.
Fig. 8. The form with a tooltip that is too long
Translations
If the system is multilingual, you can define tooltips in different languages. The program will automatically check the user’s language (set in Portal settings), and will show the tooltip in that language.
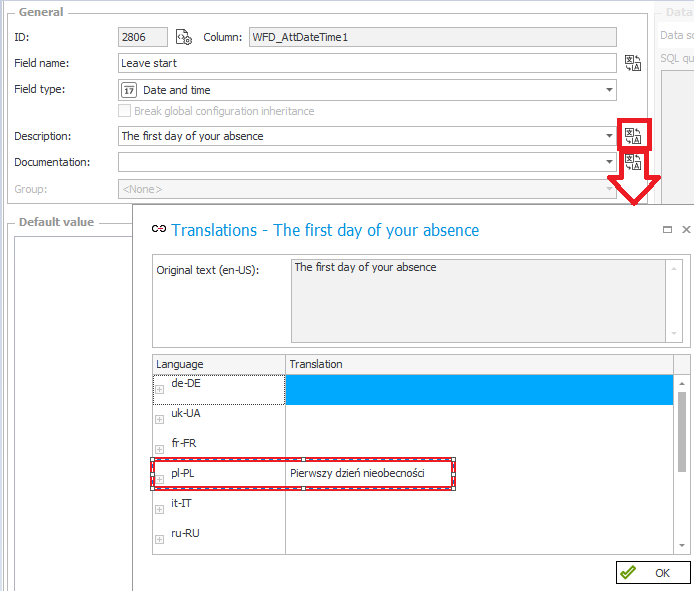
To add multiple versions of the same tooltip in the different languages, go to the form field configuration and then click the icon located to the right of the “Description” field. A new window will open, here you can fill in the tooltips for the languages you are interested in.

Fig. 9. Adding the tooltip translation
As the language on the Portal is set to Polish, the tooltip in the given form field should be displayed in Polish.

Fig. 10. Translated tooltip
Summary
Tooltips are great tools that can help users orient themselves on the form. By providing additional tidbits of information to your end users you can help them navigate tricky forms, and also get them accustomed to new processes they haven’t used before.
Although the above examples may seem obvious, experience shows that users are prone to making mistakes, and will often misinterpret the purpose of a form field. Thanks to tooltips you can avoid such mistakes and confusion, which will significantly speed up and facilitate the work of your company.


