New way to use a digital signature
Applies to version: 2021.1.x and above; author: Mateusz Klos
The following configuration is for Standalone installation. For SharePoint intallation, no WebDav is used - only the SharePoint attachment library.
Installing an add-on from a file
Consider a simple process where the user drops a file into the "Attachments" section and then wants to digitally sign it using the Adobe Acrobat Reader installed on their local computer. This program does not have to be set as a default tool for opening PDF files, while editing you can select such program and mark it as default. It is also important to allow the website pop-ups instead of blocking them, because this is how the browser will inform us about the download of the required add-on. The Portal address should be added to trusted sites to avoid possible problems with downloading the add-on. The user has placed the Contract.pdf file in the "Attachments" section of the form. However, to be able to edit the document, you need to save the element (before or after adding the attachment) so that it becomes visible in the process. A newly added attachment will always have version number 1.
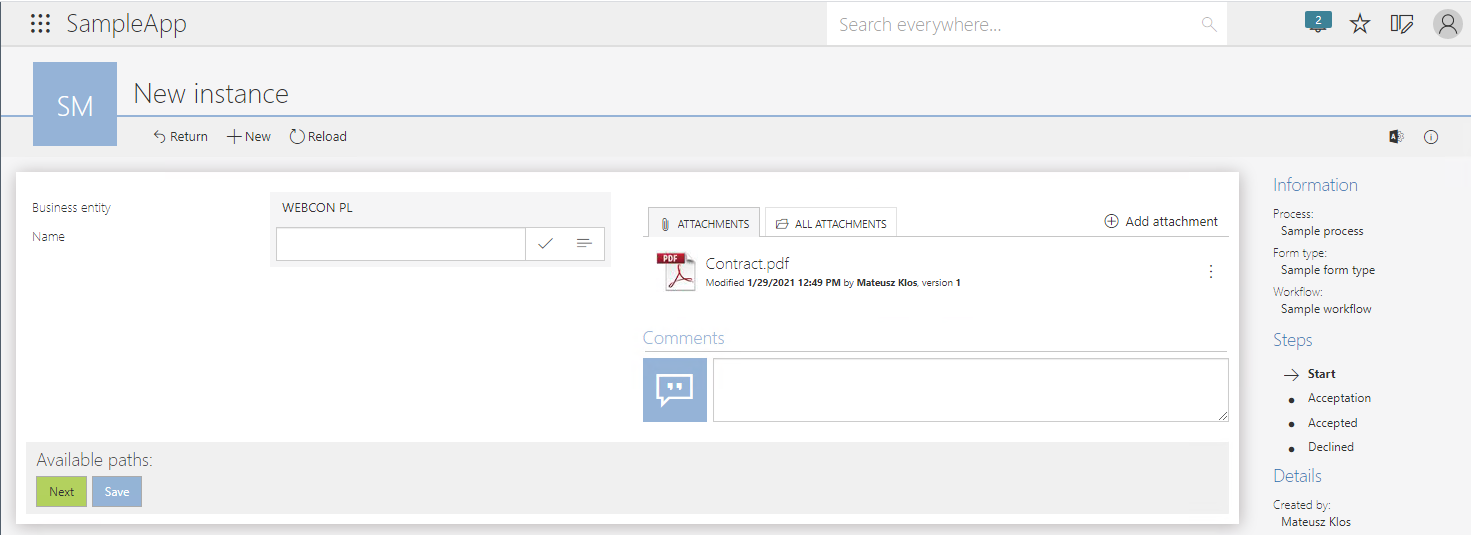
Fig. 1 Form after saving with an attachment added
After the item is saved press the icon with three dots, and a window with options for managing the attachment will appear. To edit an attachment with an external tool, select "Edit file". As indicated by the bar at the top of the form, the user must be in edit mode to see all available options.
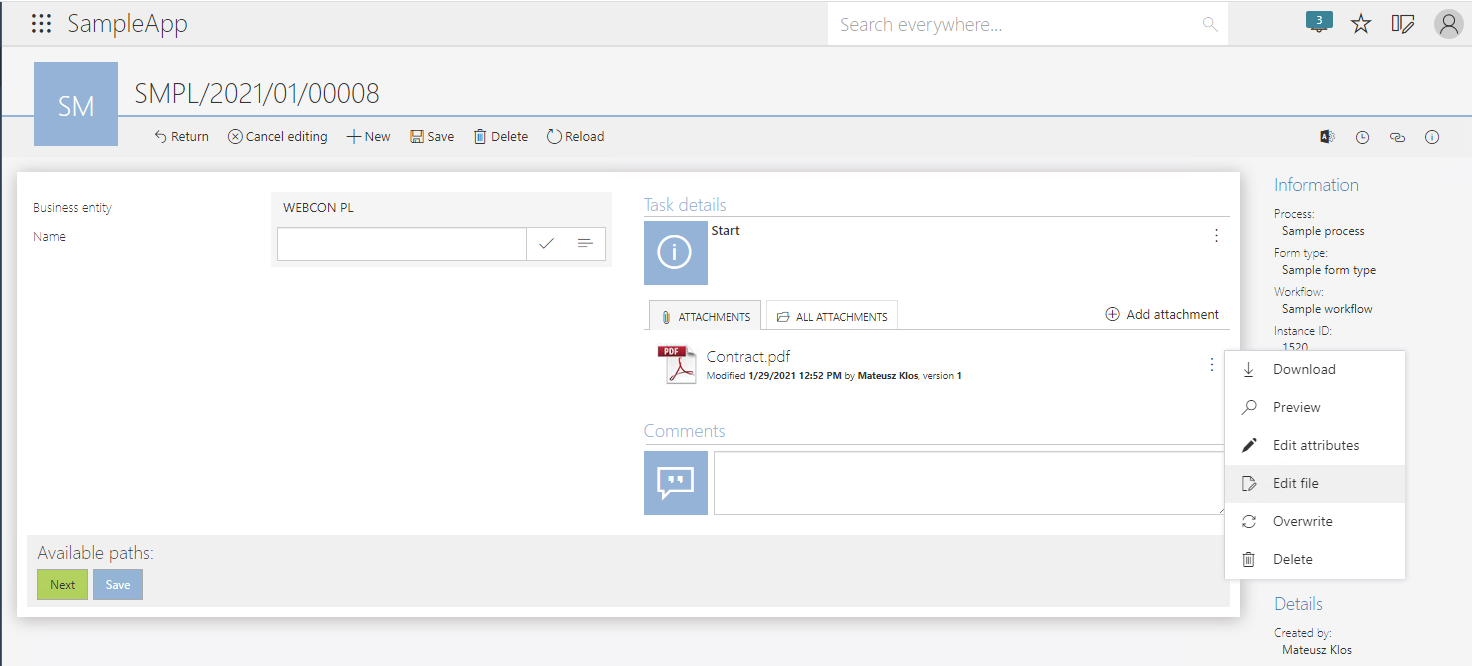
Fig. 2 Attachment management options
After selecting the "Edit file" option, a pop-up window should appear with a message informing the user that the required add-ons must be installed to enable the new functionality to work properly. This is why you should allow your browser pop-ups in advance.
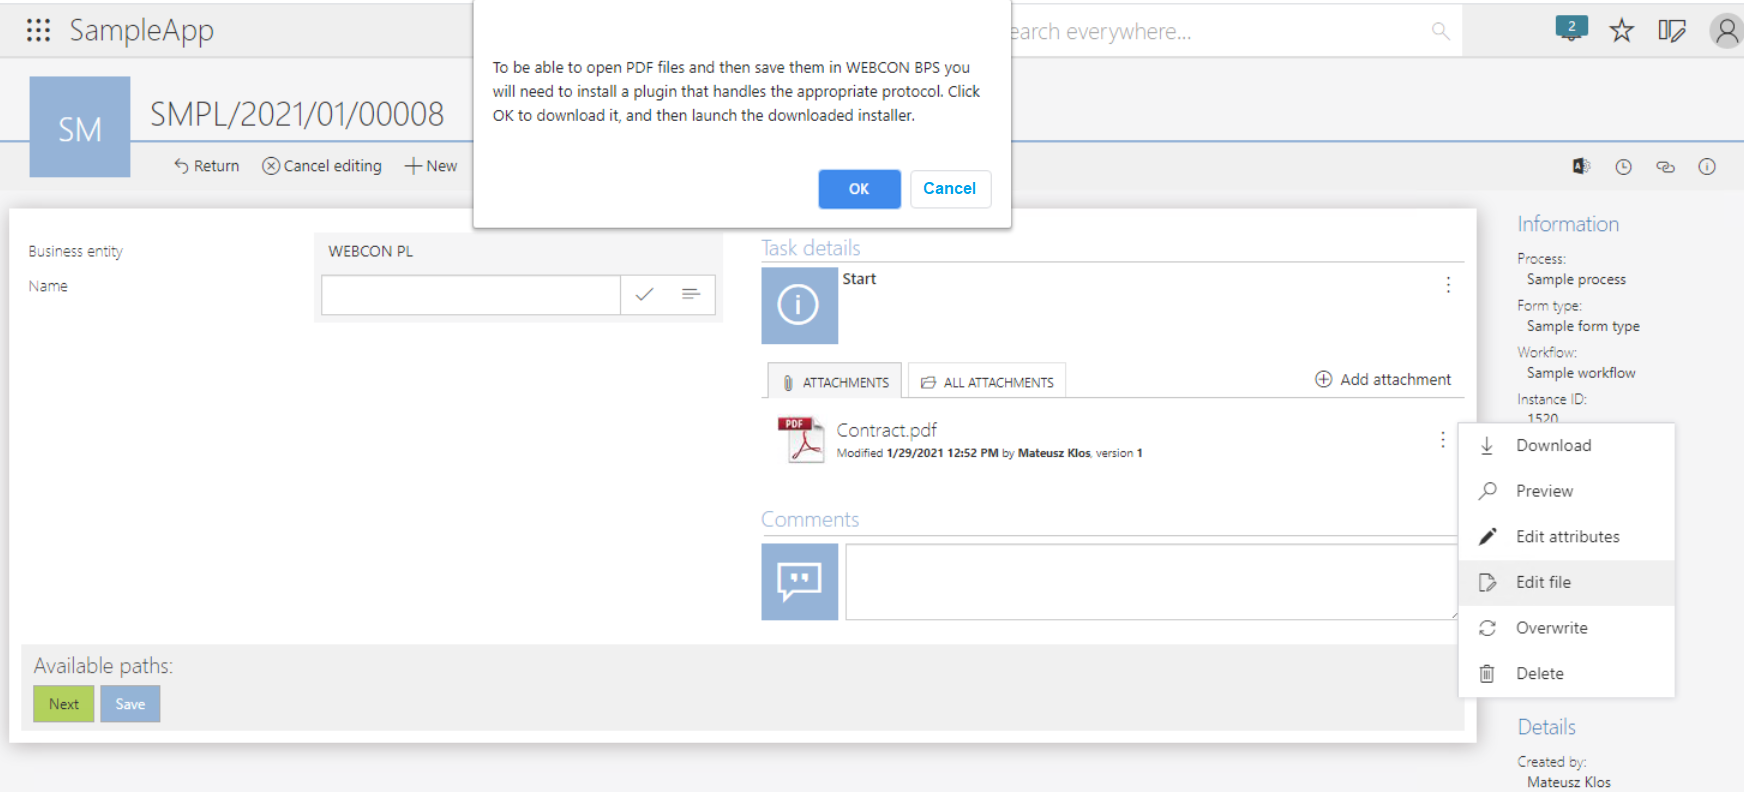
Fig. 3 A message informing that the add-on has been downloaded
After clicking "OK" the download of the installation file with the extension .msi, weighing about 50 MB, will start. When the download is complete, install the add-on by going to the downloaded file. The installation consists of uploading a new necessary add-on to the browser.
After starting the wizard, the user will have to select the installation type - "Typical" or "Custom". The first option should be selected on Windows 10 and others. When using Windows Server, the "Custom" option must be selected - otherwise the add-on will not be installed and Windows will return an error.
Selecting a typical installation will immediately install the add-on, so this article will describe a custom installation. After selecting the above-mentioned option, the user must select for whom the installed software will be available. The choice is between the current user and everyone using that computer. You should choose the latter option when installing the add-on on Windows Server. Please select a file transfer limit after proceeding. For example, the value given will be 500 MB. Clicking "Next" will start the installation of the add-on.

Fig. 4 Installation "Custom" - selection of the maximum file size
After refreshing the page, the add-on should install correctly. To check this, the user should go to the Chrome browser settings, select "Extensions" and see if the add-on is included in the list of loaded add-ons. For proper operation, it is also necessary that it is turned on.
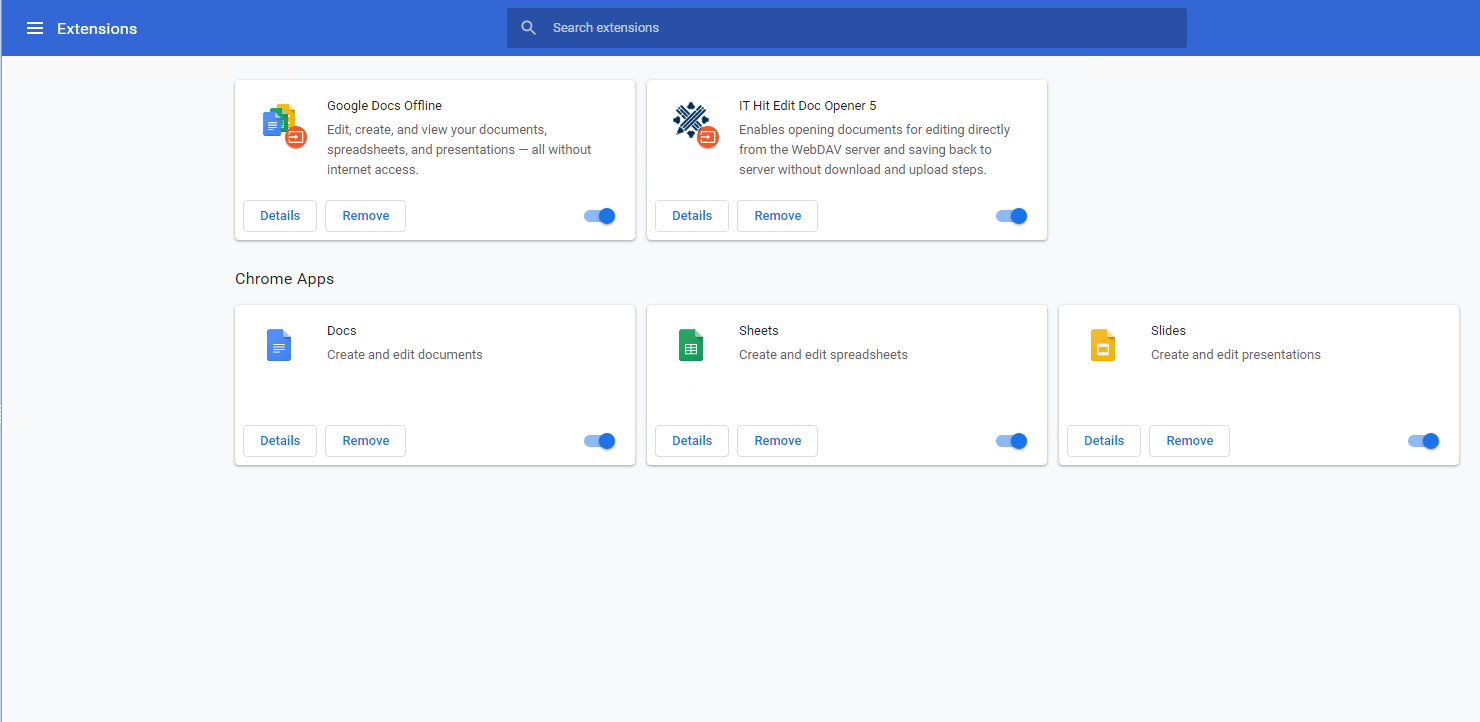
Fig. 5 Correctly installed and enabled add-on IT Hit Edit Doc Opener 5
Installing the add-on from the Chrome Web Store
It is also possible to install the add-on manually - in the case of this browser, it is available in the Chrome Web Store at the following link:
You can also find this extension by searching for "IT Hit Edit Doc Opener 5" - this is also the name of the add-on. There are other versions of Document Opener in the Chrome Store, but they won't work with the form.
When entering the page with the add-on, click "Add to Chrome", then in the pop-up window "Add Extension". As in Fig. 5, the extension should appear added and enabled.
Digitally sign the file
After the correct installation of the add-on and refreshing the page with the form, clicking "Edit file" should redirect us to Adobe Acrobat Reader. In order to digitally sign a file, select the "Tools" tab, then "Certificates", "Open". A bar with the available options will appear at the top of the document. In order to create a digital signature, the user must click the first item on the left - "Digitally sign". A pop-up message will inform the user then that he has to choose a place on the document where the sign will be placed.

Fig. 6 Inserting a signature in a specific place on the document
After selecting the area for signature, a window with a selection of available certificates, if any, will be displayed, or the user can create a new one. By choosing the second way, you will get three options to choose the type of certificate:
- Use a signature creation device - when using certificates from an external manufacturer (using a smart card or a USB token),
- Use a digital ID from a file - in a situation where the user wants to import an ID from a file,
- Create New Digital ID - Creates a new automatically signed digital ID.
For the purposes of the article, the third method will be chosen, i.e. the user will create a new identifier.
After proceeding, select the location for saving the new certificate. You can save as a .pfx file (and then protect it with a password) or save in the Windows certificate store. The second option is more recommended if we want to share this certificate with other applications.
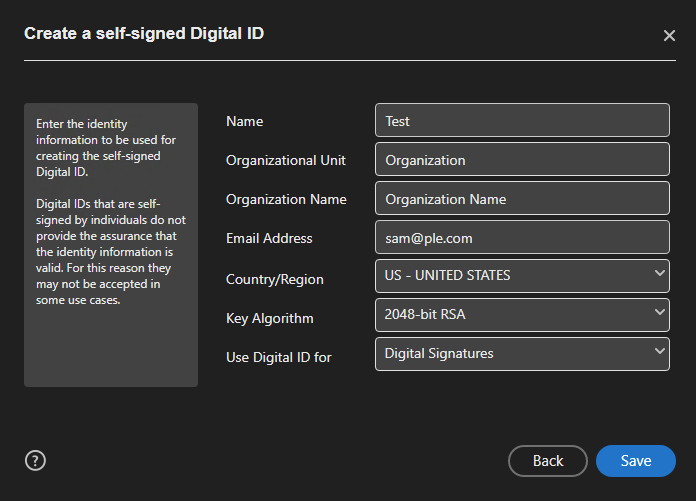
Fig. 7 Creating a self-signed digital ID
After entering the data, shown in the picture above, and saving, a new digital identifier will be created. When the user selects it from the list, it will be taken to the "Sign as ..." window. Here you can view the details of the certificate, e.g. the signature algorithm, expiration date, etc. There is a checkbox under the graphic preview of the signature, the selection of which results in blocking the document after signing. It is related to preventing further people from editing fields, including signature fields. The "Block ..." option should not be selected if the user is not the last person to sign the document.
In the upper right corner there is a "Create" button. After selecting it, you can adjust the graphic appearance of the signature on the document (name, date, font, etc.) It is also possible to configure a graphic signature by hand, after entering the "Draw" tab.
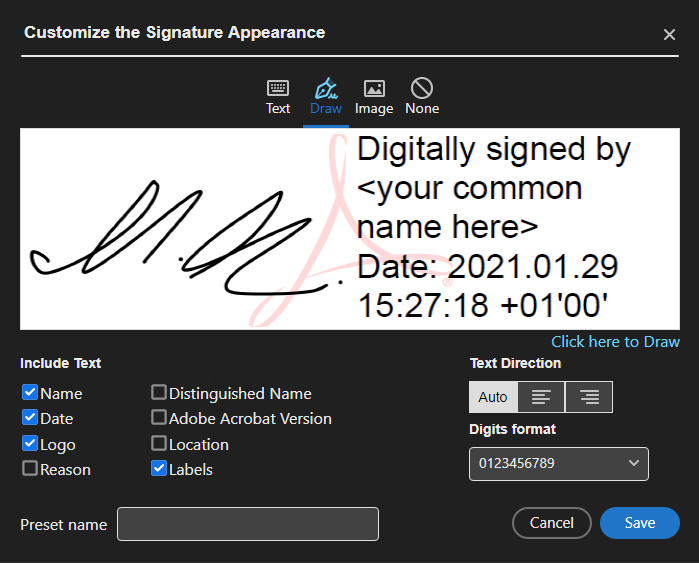
Fig. 8 Customizing your own signature appearance
Once the user has configured his signature, clicking on "Sign" will appear a file explorer window with a virtual WebDAV directory. The path to it looks similarly to that:
https://wdr2021.webcon.pl/dav/db/1/element/1520/attachments/26
There are documents saved with an issued digital signature. It is worth noting that this is a virtual directory, so these files are not saved on the machine. Here the user only needs to overwrite the existing file. After clicking "save" in an external program, you can immediately see that the document has been signed. By clicking on Adobe Acrobat Reader on the signature mark, the user can validate its correctness.
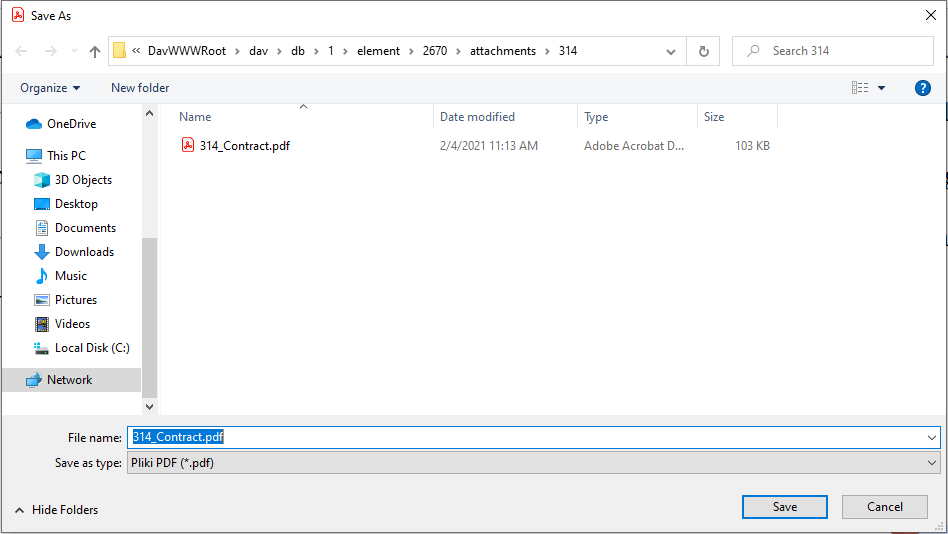
Fig. 9 Overwriting an attachment with the version signed in the virtual directory
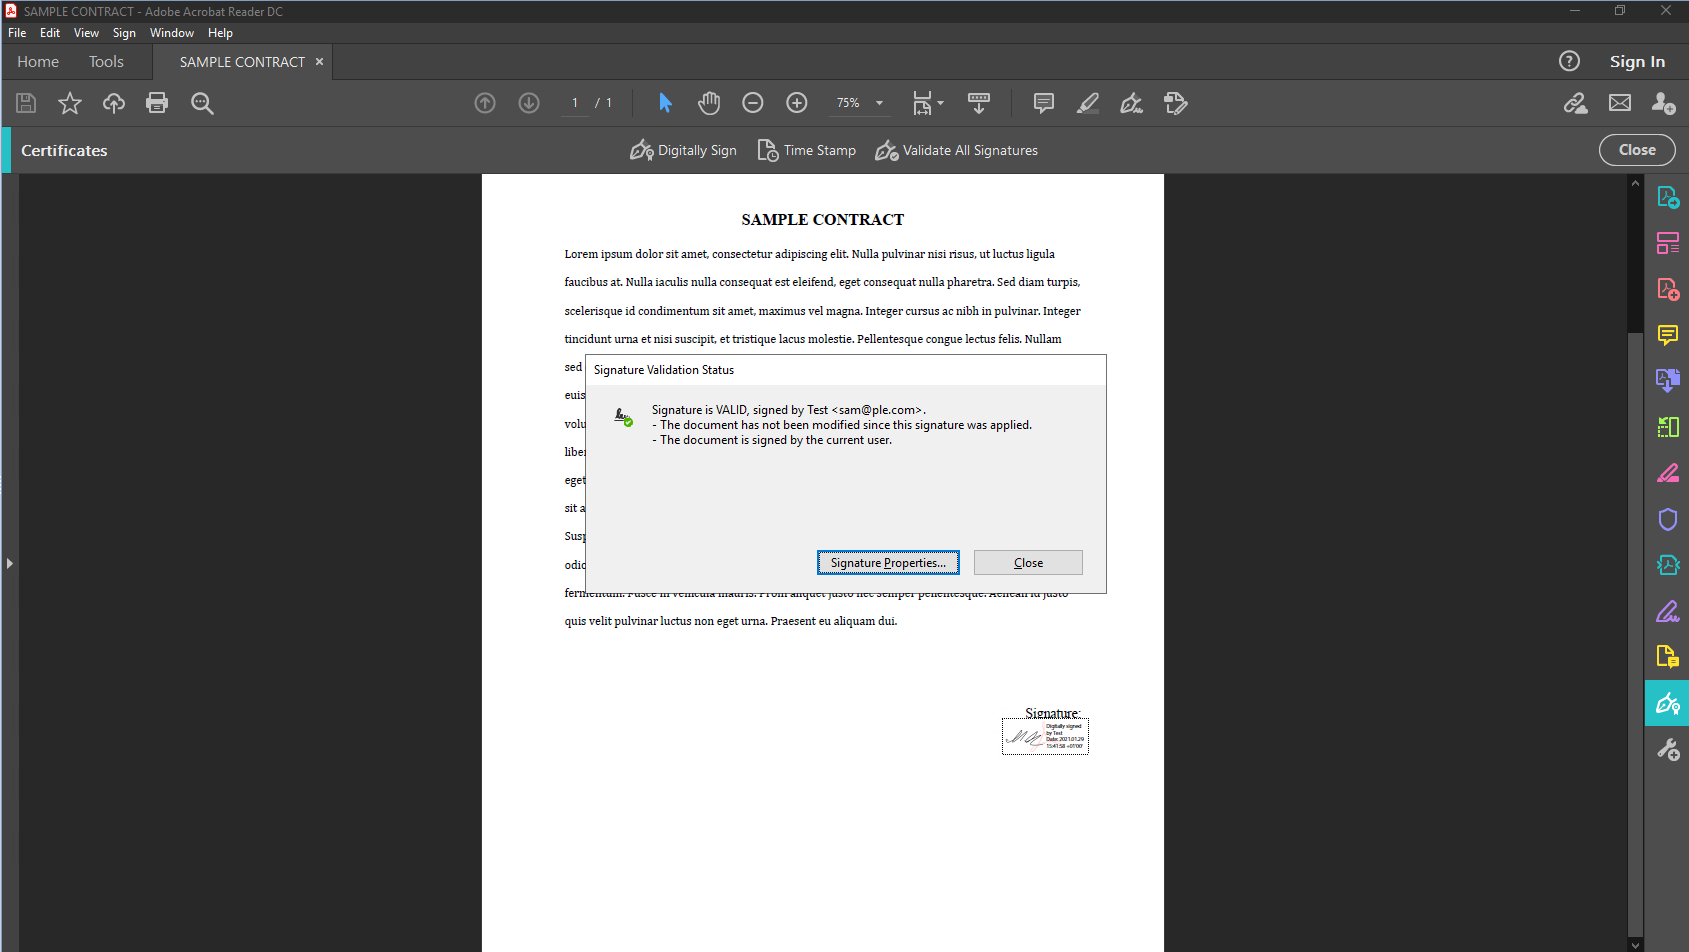
Fig. 10 Digitally signed document and signature validation status
Now the user can exit the external PDF editor and return to the form which now needs to be refreshed to see the changes. After doing this, you can see that the version of the attachment has changed - it increased. Despite signing the attachment once, it is still possible by other persons, provided that the document has not been blocked.
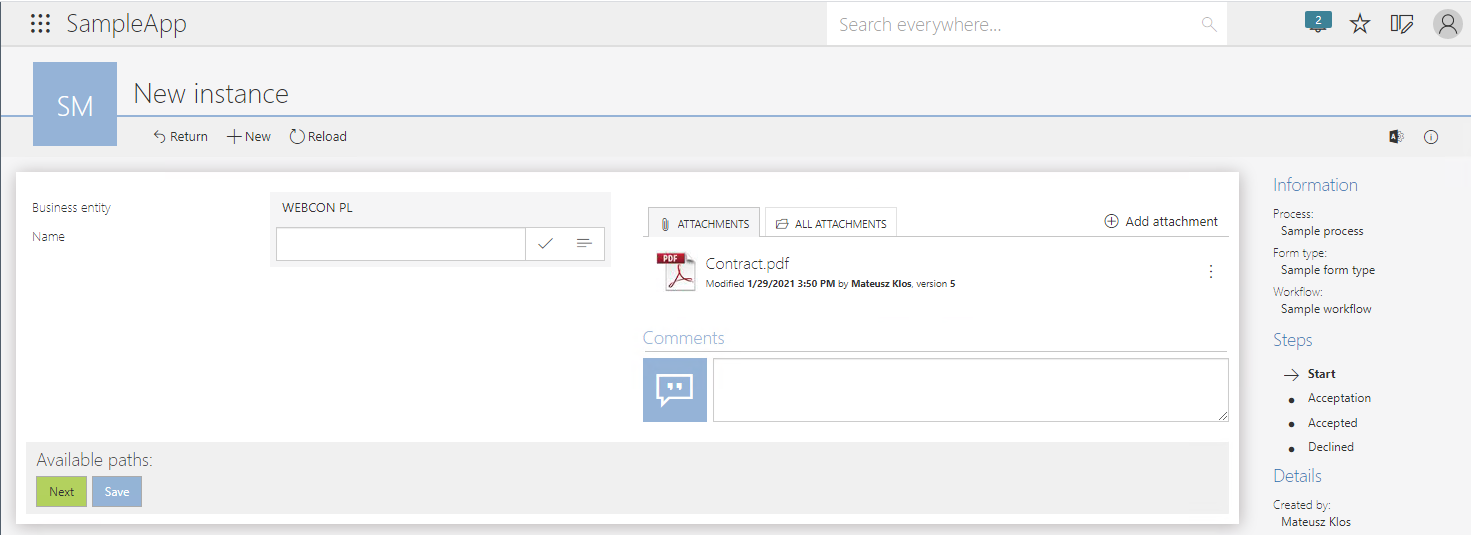
Fig. 11 Signed attachment with a revised version
This is how the new functionality of attachment signatures with the use of an external tool looks - it greatly facilitates and speeds up the work with the processing of text documents.


Which one should we buy and how do we activate it in webcon?