Administration within Portal
Applies to version: 2021 R1 and above; author: Konrad Wojtycza, Łukasz Maciaszkiewicz
Introduction
This article examines the admin mode in Portal and the capabilities of users with Business administrator privileges. In addition to detailing the specifics of the aforementioned mode, the article addresses the process of granting Business Administrator privileges and configuring rules that include the Is admin mode active? variable.
Who is the Business administrator?
In simplest terms, the Business administrator in the WEBCON BPS platform is the individual with the highest privileges within an instance in Portal. In addition to the aforementioned ability to utilize admin mode in Portal, they also have access to all instances, with the ability to edit and delete them (including view attachments). Furthermore, the Business Administrator can initiate new instances and view archived ones.
NOTE: Please remember that the roles of Business administrator and System administrator are distinct. The former has access to all data within Portal, while the latter can modify configurations at the Designer Studio level.
- Granting Business administrator privileges
Business Administrator privileges can be granted in three ways:
- globally, across all applications within the Portal. To do this, navigate to the Global privileges window (System settings → Global parameters ) and enter the details of the respective individual in the Business administrators field;
- within a specific process or process and business entity. In this scenario, user details are entered in the Business administrator field located within the User privileges tab in the process configuration window;
- within a specific form by choosing the workflow on the selection tree and opening the Associated form types tab (once you select the form type, enter the user details in the Business administrator field).
TIP: Each application within the system can have a different Business Administrator. To streamline contact with that individual for regular application users, it might be a good idea to assign the Application supervisor role to that administrator.
How to enable the admin mode?
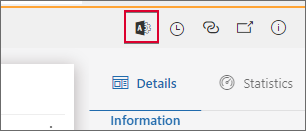
To enable (or disable admin mode), open or initiate an instance within the Portal and click the Admin (![]() ) button on the right side of the form. Note that this button is visible only to Business administrators.
) button on the right side of the form. Note that this button is visible only to Business administrators.
In visual terms, the activated admin mode is not significantly different from the standard edit mode. Nevertheless, please note that, in addition to the Previous version (![]() ) and Admin actions (
) and Admin actions (![]() ) buttons next to the Admin button, administrators have the ability to edit form fields that are configured as Read-only. In other words, they can change the values of form fields in instances where they have no assigned tasks and that regular users cannot normally edit.
) buttons next to the Admin button, administrators have the ability to edit form fields that are configured as Read-only. In other words, they can change the values of form fields in instances where they have no assigned tasks and that regular users cannot normally edit.
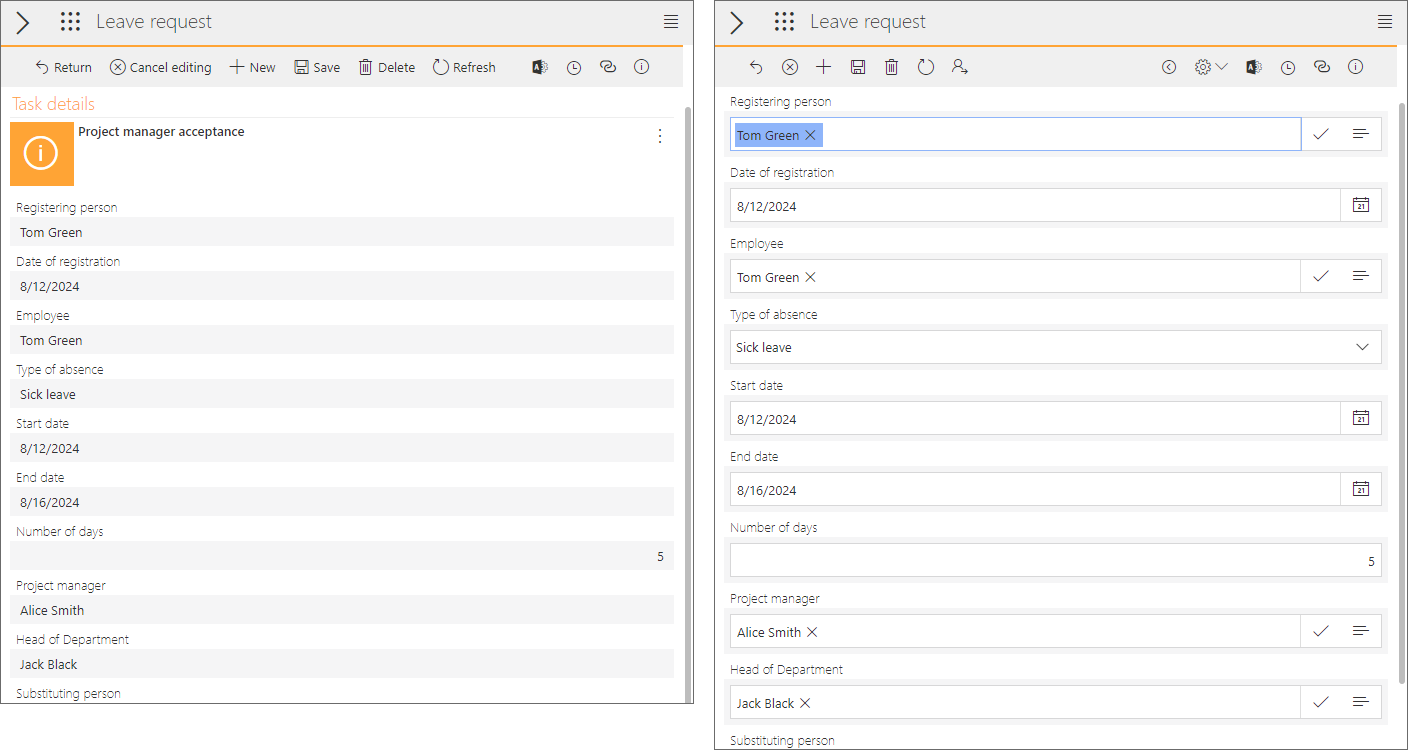
One form, two modes. On the left: form in standard edit mode. On the right: form in admin mode.
Displaying instance version
A particularly useful feature for each administrator is the ability to display instance versions at the form level (form versions saved as a result of path transition, action execution, saving operation, etc.). It allows administrators to verify the changes made to the form and potentially make their own corrections.
Access to this functionality is provided by the Previous version button mentioned earlier. Pressing it will display the previously saved form version. Importantly, after clicking this button, a new button labeled Next version will appear on its right side. This button serves the opposite function, allowing you to view the form version that is newer than the one currently displayed. It is also worth noting that users can easily return to the original instance view using the Go back to instance button.

Managing instances in admin mode
In addition to the broad data management tasks, such as editing Read-only form fields or displaying form versions, the admin mode offers administrators several functionalities that streamline instance management.
To use them, click the Admin actions button in the top menu of the form.
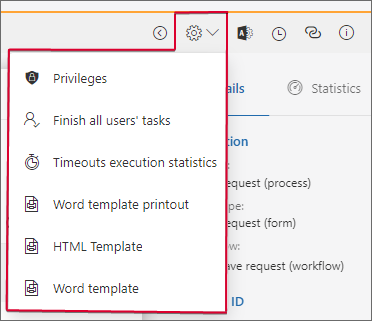
The Admin actions button groups several useful options in a drop-down menu.
- Displaying and granting additional privileges
By selecting the Privileges option, you can view detailed information about the rights associated with the instance. The information here is organized by the locations in the system where privileges have been granted. For example, if a user has been granted Business administrator privileges at the process level in Designer Studio, this window will display the relevant information under the On a process level heading.
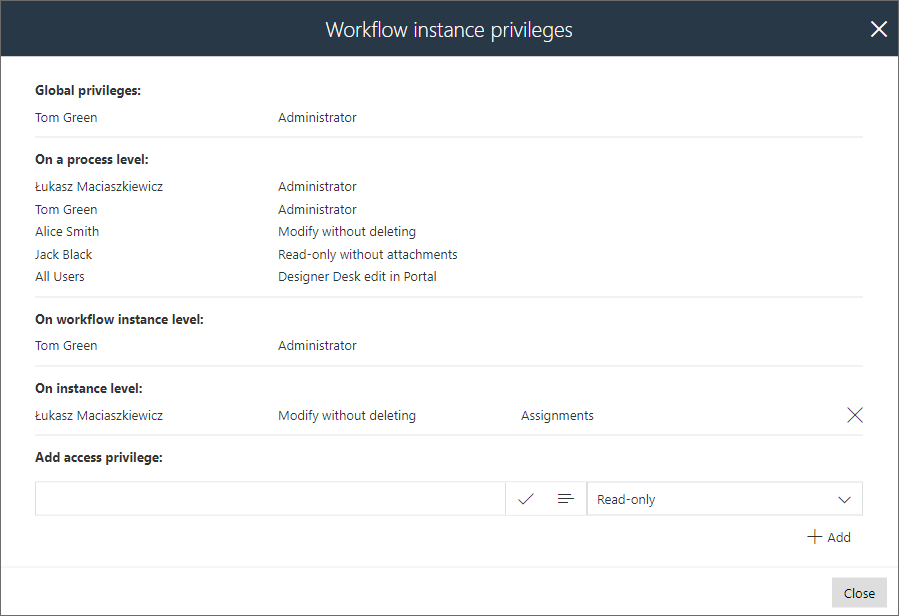
The Workflow instance privileges window displayed after pressing the Privileges button.
In addition to viewing privilege information, administrators can also add or remove privileges at the instance level. In the first scenario, to remove privileges assigned to a user, navigate to the On instance level heading and click the “X” button on the right side of the respective row.

The “X” button visible next to rows grouped under the On instance level heading allows you to remove privileges.
Within this window, administrators can also add privileges to an instance. To do this, go to the Add access privilege section. Once you find the right user or group, specify the type of assigned privileges using the drop-down list visible on the right side.

With the user or group selected and the type of privileges specified, simply click the Add button located below the previously mentioned drop-down list.

- Completing tasks assigned to other users
An important feature reserved for administrators is the ability to complete tasks assigned to other users. It is particularly useful when one of the users assigned a task is absent. Access to this feature is provided through the Finish all users’ tasks option, which is described in the article The “Finish all users’ tasks” option available on the Community website.
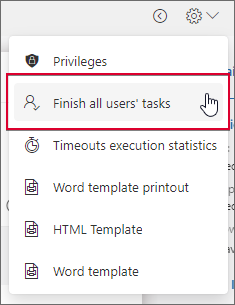
Please note that selecting this option will complete all tasks associated with an instance at a given step and enable path transition. Additionally, when an administrator completes a task, this action is documented in the instance History with the note “(Updated in administration mode)” in the Comments section.
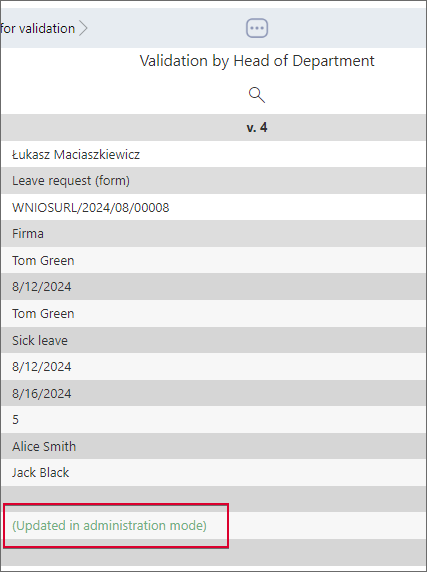
Completion of a task by an administrator is documented in the instance History.
NOTE: Starting with the 2021 R1 version, the default option selected in the path parameters configuration in Designer Studio is Set other tasks as cancelled (step edition window → the Paths tab → Parameters → Operation executed on parallel tasks). With this configuration, completing a task by one user results in canceling possible parallel tasks assigned to other users. This means that other users no longer need to complete that task to transition the path, and administrators do not need to use the described functionality.
- Displaying statistical data on the execution of On timeout actions
By enabling admin mode, administrators can also access information on the execution of On timeout actions, provided these have been configured within the process. To do this, select the Timeouts execution statistics button from the Admin actions button drop-down list. Clicking the button opens the following window:

The information here is presented in tabular form. Users can monitor, among other things, the number of times an action has been executed, when it was last initiated, and how many times it will be executed.
- Generating templates based on instance form
The template generation functionality allows the Business administrator to export the contents of the Portal and save them locally as either a Word or HTML file. You can do this by selecting one of the three options in the Admin actions button drop-down list.
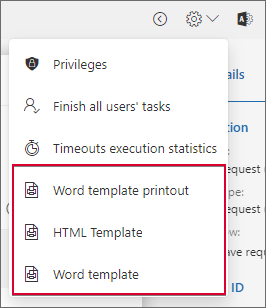
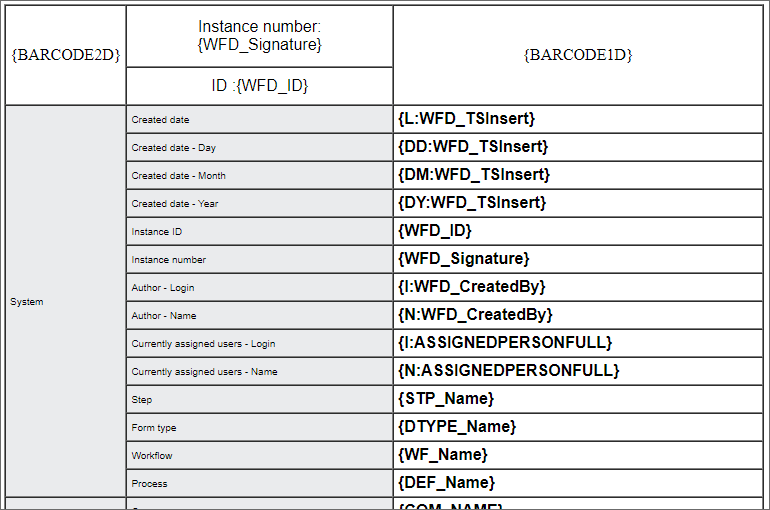
Using the Word template printout option, administrators can easily generate a document in .docx format. Such a document not only reflects the content of the form but also includes the values entered by users in the form fields at a given step. You can also generate an “empty” template using the Word template option. In this scenario, the document contains form field names with variables listed to the right of them, enclosed in braces.
It is worth noting that the generated template is similar to the one generated using the WEBCON BPS add-in for Word which is discussed in the article WEBCON BPS add-in for MS Word.

Template comparison. On the left: a template containing form field values generated using the Word template printout option. On the right: a template with variables instead of values (the Word template option).
Additionally, by using the HTML template option, you can generate an HTML template containing tags for individual form fields and their elements. Those tags can then be used to create your own HTML template.
Instance History in admin mode
The administrator’s special privileges do not end there. Enabling admin mode at the instance level also displays its History in that mode. This means that administrators see more than their peers viewing History in standard mode… In fact, they see everything: History displayed in admin mode includes information on all elements, including those whose visibility is restricted in the Designer Studio configuration. The administrator also sees complete information on all instance versions, modifications, and users who have or had tasks assigned within the workflow.
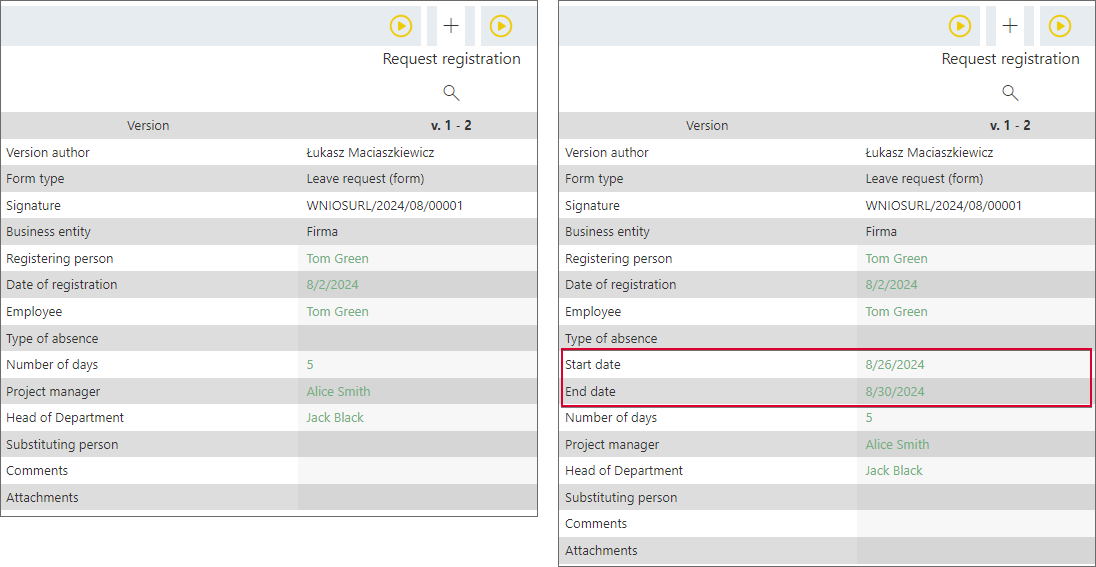
On the left: History displayed in standard mode. On the right: History in admin mode. Note the two highlighted form fields: their visibility has been restricted for regular users by a rule but they remain visible to the administrator.
It is worth noting that administrators can display History in admin mode even if it has not been activated at the form level. To do this, go to the instance History and click the Admin button in the upper right corner of the window.
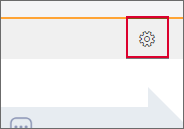
The Admin button allows you to independently enable admin mode in the instance History.
To learn more about the instance History and displaying it in admin mode, read the article Instance history in WEBCON BPS Portal available on the Community website.
Instance removal
One of the distinguishing characteristics of a Business administrator is their ability to remove instances from the workflow. You can this by clicking the Delete button visible in the form menu.

The Delete button allows the Business administrator to permanently remove an instance from the workflow.
The button is visible to the Business administrator, regardless of whether the form is currently displayed in admin mode (you can configure its visibility in the Field matrix within Designer Studio). Please note that once the button is used, an instance is irreversibly removed from the workflow. Therefore, it should only be used in applicable situations, such as when deleting duplicate entries in a dictionary process.
Extras: the Is admin mode active? variable
Finally, it is worth mentioning the ability to configure form elements in Designer Studio, such as path buttons, menu buttons, or form fields, to be visible, editable, or required only in admin mode. This functionality is provided by the Is admin mode active? variable. By inserting it into an applicable configuration field (e.g., Editability restriction or Visibility restriction on a form) for a given element, an application designer can reserve that element, its editability, or its requiredness exclusively for administrators. As the variable returns a “POSITIVE” value, such users will gain the respective capabilities immediately after enabling admin mode.
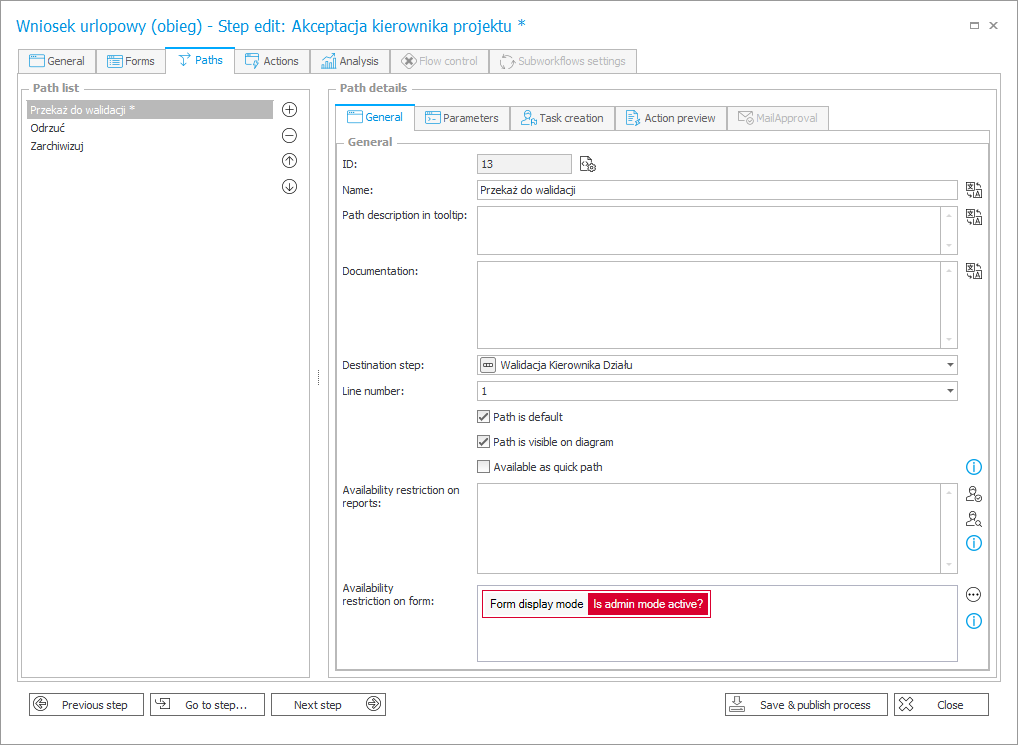
The “Is admin mode active?” variable inserted into a field that restricts the visibility of a path on the form.
Summary
With Business administrator privileges and admin mode enabled, a user gains full control over editing and managing Portal instances. With that in mind, it is important to grant such privileges only to individuals with an in-depth understanding of the system, as well as process and workflow logic.

