Containerization of WEBCON BPS
Applies to version: 2023.1.x and above; authors: Marcin Kapusta, Krystyna Gawryał
Introduction
The newly released version of WEBCON BPS (2023.1.x) enables containerization of the system components. Thanks to this, it possible to use Docker images provided for WEBCON BPS Portal, BPS Workflow Service, and Search Server (Solr) and run these modules in containers.
Containerization is an alternative to the standard installation of WEBCON BPS components and is particularly applicable when using cloud services, making it much easier to install the system in such an environment.
This article provides step-by-step instructions for installing WEBCON BPS with its core components running in independent containers.
Choosing a containerization platform
Since most containerization platforms use Docker images, it is possible to install and run WEBCON BPS in containers on a wide range of such platforms.
In this article, containers will be created and run using Docker Desktop. It is necessary to install this program in advance and perform all the installation steps on the same computer.
By following the steps described herein, WEBCON BPS can be installed in containers on any other containerization platform (e.g. Azure Container Instances or Azure Kubernates Service).
Installation plan
When installing WEBCON BPS in containers, only the database is created using the installer. Other components of the system must be downloaded as Docker images and run in containers using relevant scripts.
For this reason, it is good practice to plan the environment in advance, detailing the system components, their network addresses, and communication between them.
The following diagram shows the installation process described herein, along with the addresses of each service.
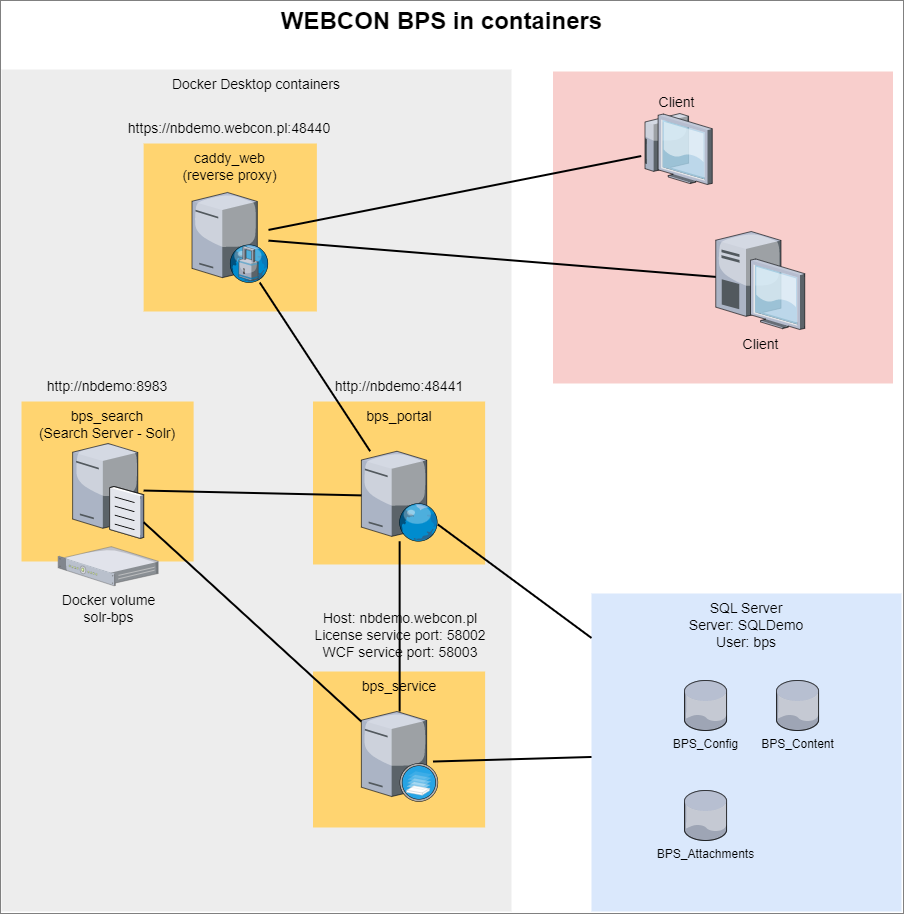
The example uses Docker Desktop. All basic components of WEBCON BPS can be installed there. Only the system's databases must be created on an existing instance of Microsoft SQL Server accessible from the computer running WEBCON BPS in containers.
Installation steps:
- Creating the WEBCON BPS Search Server container and initializing Solr search indexes.
- Creating SQL databases using the WEBCON BPS installer.
- Creating the WEBCON BPS Workflow Service container.
- Creating the WEBCON BPS Portal container.
- Starting Designer Studio and activating the license.
All the scripts listed in this article are located in the BPS_Docker_Desktop file.
Data storage in WEBCON BPS
The first step of the installation is to create databases for WEBCON BPS. The platform uses two types of databases. All user input and configuration data are stored in Microsoft SQL Server relational databases. In addition, a large portion of these data feeds the Solr search indexes supported by Search Server.
Creating the Search Server container
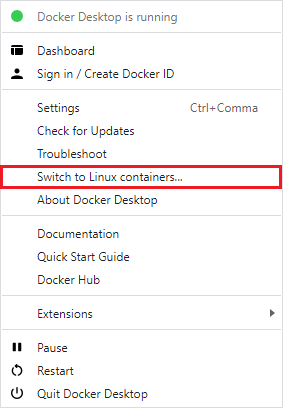
- The Search Server container image is built based on the official Solr image for the Linux operating system. Therefore, Docker Desktop must be switched to support Linux containers – right-click on the program icon in the system tray and select the following option from the drop-down list:
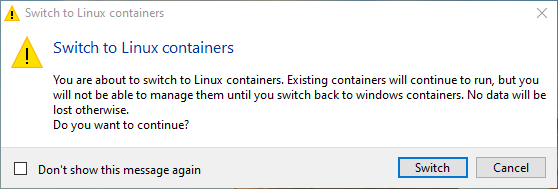
- After a while you will see a warning as below. Click Switch to make Linux container support possible.
- As a rule, container is a non-persistent object. Therefore, care must be taken to ensure that data are not lost when the container is disabled. In Docker Desktop, this is ensured by the Docker Volume component that allows to create dedicated volumes responsible for storing data generated and used by the application.
Create a new volume for Solr called solr-bps – open the CMD console and use the cd command to navigate to the bps_docker_desktop folder, then type the command:
docker volume create solt-bps
- You can preview the created volume in Docker Desktop under the Volumes tab:

- Start the container by entering the following command in CMD:
docker run -d --env-file solr_env.dist -p 8983:8983 --mount source=solr-bps,target=/var/solr --name bps_search webconbps/search:2023.1.1.41 bash –c “/opt/bps-solr/scripts/run-precreate-cores.sh”
where:
-d – running the container in the background,
-p 8983:8983 – mapping host port 8983 to container port 8983 (default port on which Solr is running),
--name bps_search – container name,
webconbps/search:2023.1.1.41 – the image based on which the container is run; choose the version corresponding to the WEBCON BPS version,
--env-file solr_env.dist – the Solr container will be run with the environment variables defined in this file. Currently, this is only a limitation on the RAM used. It is possible to configure additional variables,
--mount source=solr-bps,target=/var/solr – mapping the created volume to the container directory where files with search indexes, privilege configuration, and log files will be stored,
bash –c “/opt/bps-solr/scripts/run-precreate-cores.sh” – path to the script that initializes Solr index structures. This script must be passed the first time the container is started for the indexes to be created. It can always be passed, because when the container is restarted, the script detects the existing indexes and skips their re-creation.
- You can preview the created container under the Containers tab:
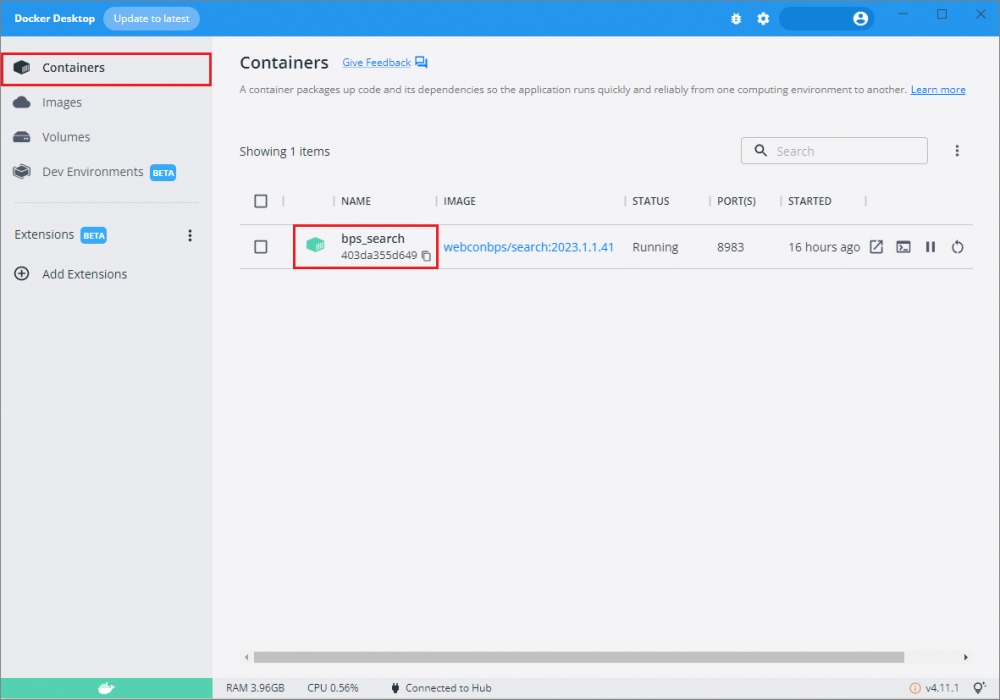
- The Solr service will be available on this computer at http://nbdemo:8983/solr (where nbdemo is the name of the Docker Desktop machine).
Creating an SQL database
- Download the WEBCON BPS installer in the appropriate version (the version used in the example is 2023.1.1.41).
- Run the installer and, after accepting the license, select the installation mode: New WEBCON BPS installation.
- Then select the Standalone environment type. Select Next in the System verification step and Skip in the Component selection step.
All components will be run from Docker images, and the installer will only be used to create and configure the database.
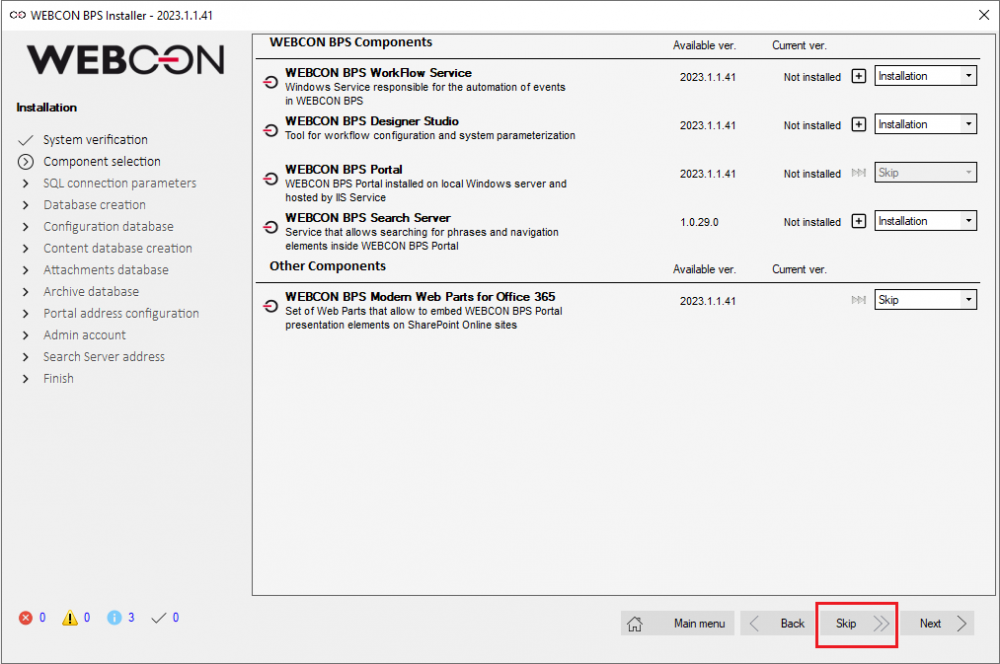
- In the next installation steps: Database creation parameters, Configuration database creation, Process database creation, Attachment database creation, proceed in the same way as for the standard WEBCON BPS installation.
It is recommended to copy the name of the configuration database, as you will need it when starting the Portal and Service containers.
- In the Portal address configuration step, enter the address where the BPS Portal will be made available according to the infrastructure plan. In this example, WEBCON BPS Portal will be accessible via reverse proxy at the external address: https://nbdemo.webcon.pl:48440.
Here, enter the Portal address according to the applicable infrastructure plan and select Next.
- In the Administrator account step, enter the password for the admin user who will be able to complete the configuration of the WEBCON BPS installation after logging in to Designer Studio. Be sure to remember that password.
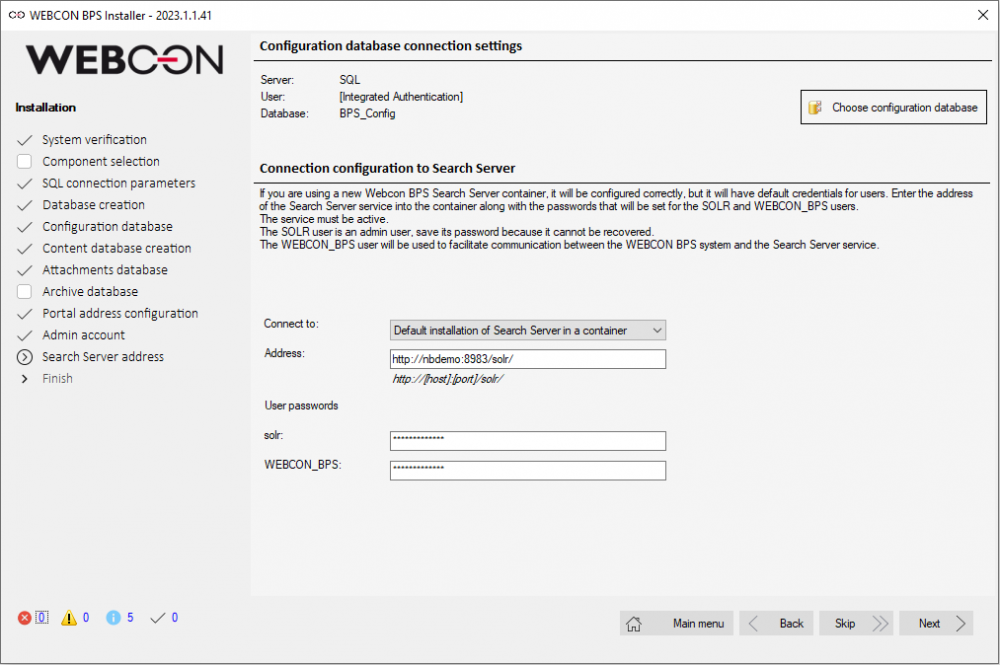
- The last step is Search Server address. Here, the installer needs to change the default user passwords in Search Server and register this Search Server instance in the configuration database.
To do so, select Default Search Server installation in container in the Connect field.
Then enter the Search Server container address. In this example the address is: http://nbdemo:8983/solr/.
Additionally, enter passwords to be set for the Solr and WEBCON_BPS users.
Note: the Solr user is the administrator of this Solr instance. Take care not to lose their password, as it is not saved anywhere ielse.
During this step, the Search Server container must be running, because the installer will connect to it to change passwords and validate the contents of the container.
Creating the Workflow Service container
- The Workflow Service and BPS Portal container images are built on the basis of Docker images of the Windows Server Core operating system.
Therefore, as before, you need to switch Docker Desktop to support Windows-type containers.
- Before starting the service container, complete the service_env.dist configuration file. This file allows you to set the relevant values for environment variables and pass them to the service container.
These are exactly the same values that can be set using the appsettings.json file in a standard WEBCON BPS installation.
For the correct start of the service, you need to set the first two variables – connection string, to connect to the configuration database, and the name of the host on which the service will be running:
Configuration__BpsDbConfigRaw=Server=SQLDemo;Database=BPS_Config;User ID=bps;Password=p4ss;
Configuration__ExternalWebService__Host=nbdemo.webcon.pl
Other parameters can be left unchanged.
- Start the container by entering the following command in CMD:
docker run -d -p 58002:58002 -p 58003:58003 --env-file service_env.dist --name bps_service webconbps/service:2023.1.1.41
where:
-d – running the container in the background,
-p 58002:58002 –p 58003:58003 – mapping host ports 58002 and 58003 to the corresponding container ports (port numbers must match those set in the service_env.dist file),
--env-file service_env.dist – the container will be run with the environment variables defined in the file,
--name bps_service – container name,
webconbps/service:2023.1.1.41 – the image based on which the container is run; choose the version corresponding to the WEBCON BPS version.
- You can preview the created container under the Containers tab:
Starting the BPS Portal container
- As in the case of the service, before starting the container, you need to properly configure the environment variables file. For Portal, this is the portal_env.dist file.
In order to start Portal correctly, you need to set the first two variables – they should contain the same connection string to the configuration database:
App__ConfigConnection__Value=Server=SQLDemo;Database= BPS_Config;User ID=bps;Password=p4ss;
App__LogsConnection__Value=Server=SQLDemo;Database=BPS_Config;User ID=bps;Password=p4ss;
Other parameters can be left unchanged.
Note that the container is not on a domain, so it is necessary to define a database username and password as an alternative to the more commonly used domain login.
- Start the container using the command:
docker run -d -p 48441:48441 --env-file portal_env.dist --name bps_portal webconbps/portal:2023.1.1.41
where:
-d – running the container in the background,
-p 48441:48441 – mapping the host port 48441 to the container port 48441. This port should match the port set in the configuration in the portal_env.dist file.
--name bps_portal – container name,
webconbps/portal:2023.1.1.41 – image based on which the container is run,
--env-file portal_env.dist – the container will be run with the environment variables defined in the file.
Preparing a reverse proxy container for Portal
Running Portal in a container is often intended to easily scale a web application by starting more containers. In such a configuration, the Portal container is usually not made available directly to users, but requires a load balancer.
In the test installation described here, such a configuration will be simulated by creating a container with a reverse proxy server for Portal. It can be any server with such feature. This article uses a Caddy server based on a Windows image. The Caddy server container can be created as follows:
- Create a Caddy server configuration file named Caddyfile with the following content. Remember to replace the nbdemo.webcon.pl domain with your own, while the container name and the port indicated by the reverse proxy must match the Portal container you created earlier:
nbdemo.webcon.pl:48440 {
tls /etc/caddy/cert.pem /etc/caddy/key.pem
reverse_proxy bps_portal:48441
}
- Reverse proxy uses the https protocol. For the reverse proxy address to be trusted, use a trusted certificate for the test computer address. To do this, place the cert.pem and key.pem files with the certificate in the current folder.
- Create a DockerFile item with the Caddy image and the contents as follows:
FROM caddy:2.6.4-windowsservercore-1809
COPY Caddyfile /etc/caddy/Caddyfile
COPY cert.pem /etc/caddy/cert.pem
COPY key.pem /etc/caddy/key.pem
Next, build the Caddy container using the command:
docker build -t caddy/reverse.proxy .
- Start the container using the command:
docker run -d -p 48440:48440 --name caddy_web caddy/reverse.proxy
Environment settings
The architecture of the configured solution is based on two components:
- Reverse proxy (Caddy) – https://nbdemo.webcon.pl:48440/
- Portal – http://nbdemo.webcon.pl:48441/
Therefore, to run Portal in a container, open the link: https://nb-demo.webcon.pl:48440/.
Note: running WEBCON BPS components in containers is only possible for users with subscription licenses. Starting another container will require the use of another license. If the container has been properly disabled, the license is released. A report on the licenses used is available in WEBCON BPS Designer Studio.
In addition, an external authentication provider, e.g. Azure Active Directory or OpenID Connect, will be required as Windows authentication does not work properly in containers.
- Log in to WEBCON BPS Portal by entering the admin user's password that was provided when creating database.
- Install Designer Studio from the user menu in Portal.
- Log in to Designer Studio by entering the admin user password.
- Activate (subscription) licenses in Designer Studio.
- Configure user list synchronization (e.g. with Azure Active Directory) and force it to run.
- Configure an authentication provider other than Admin accesses, such as Azure Active Directory.
- After synchronizing the user list, assign licenses to the appropriate users.
- Assign global privileges to users from your organization who will manage the installation configuration.
After completing these steps and verifying that everything works correctly, you can disable the Admin access authentication provider.

