Importing applications using the public API
Applies to version: 2024 R1 and above, author: Krystyna Gawryał
Introduction
WEBCON BPS is equipped with application export and import mechanisms, enabling users to create applications in one environment (DEV/TEST/PROD) and then deploy them in another. Until now, export and import operations have been initiated by administrators in WEBCON BPS Designer Studio, requiring user input to define the scope of the export/import and monitor its progress. However, such an approach could be challenging, for instance, due to limited access to specific environments or a lack of appropriate privileges.
With the 2024 R1 release, functionality was introduced that allows application import operations to be automated and executed using the public API in Portal. This article describes this functionality and all accompanying system changes.
Application for automatic import
The introduction of the functionality involved the preparation of appropriate tools. Accordingly, a console application called BatchImportApp (.exe file) was created and made available among WEBCON BPS installation files in the “Tools” (formerly “Migration Tools”) directory. This tool imports WEBCON BPS applications using defined parameters. Specifying some of these parameters is required for the automatic default import operation to be successful. Additionally, it provides optional parameters that are used for non-standard data import or that directly relate to the tool itself.
Table 1. below lists these parameters with an indication of their function and requiredness.
Table. 1. Automatic application import parameters
|
|
|
|
Name |
Description |
|
-a, --portalAddress |
Portal address |
|
-d, --dbId |
Content database ID |
|
-c, --clientId |
Client ID |
|
-s, --clientSecret |
Client secret |
|
-p, --package |
Path of the exported package |
|
|
|
|
Name |
Description |
|
-i, --importConfiguration |
Path of the .json file with custom import configuration |
|
-l, --splitFileLargerThan |
Used to split the package files larger that 20 MB |
|
-f, --fileChunkSize |
Size of a single chunk; |
|
--help |
Used to display context sensitive help with parameter descriptions |
|
--version |
Used to display application version |
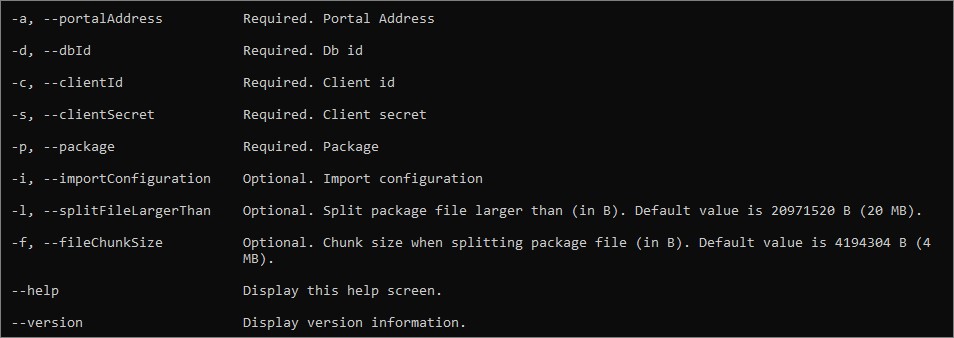
Fig. 1. Preview of application screen with explanation of import parameters
Procedure for automatic default import of applications
Preparation for import
As indicated in Table 1. above, the parameters required for default import using a dedicated console application are the Portal address and database ID on the environment where the application is to be imported, the credentials of the API application through which the import is to take place, i.e. Client ID and Client secret, and the path of the data package previously exported from Designer Studio as a .bpe file on the local disk.
Automatic import can be carried out using any API application. Client ID and Client secret can be found in the configuration window under User profile → Administration → Integration → API.
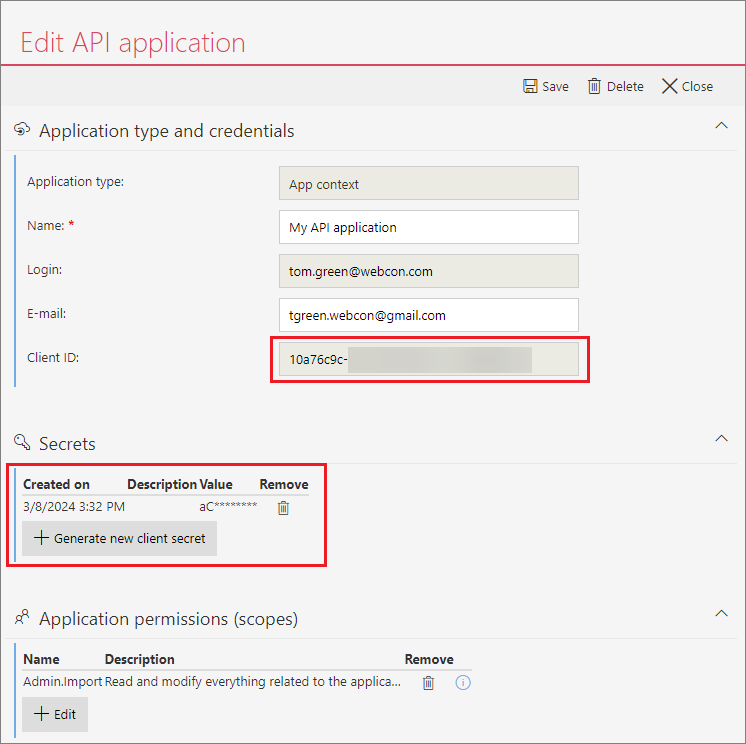
Fig. 2. API application editing window with credentials highlighted
For the import to be possible, a new Admin.Import item must be checked in the list of API application permissions. This allows reading and modifying all configuration data used during application import. (The operation will also succeed with the Admin.ReadWrite.All permission checked).
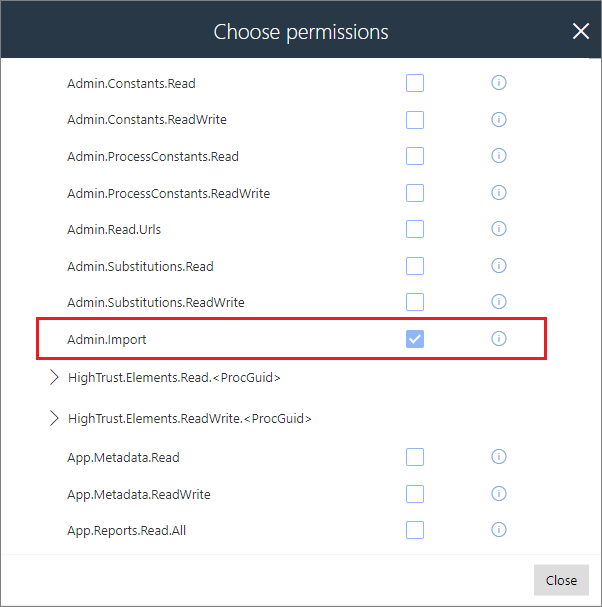
Fig. 3. API application permission window with Admin.Import role checked
Default application import via API
To initiate a default application import, use the CMD command prompt to open the BatchImportApp console application. Then, enter all the required parameters with their respective values. The order of the parameters in the command is arbitrary.
![]()
Fig. 4. Example of a command for the default import of an application
Successful application import is indicated by the “Completed” status in the CMD console. Additionally, the application logs can be accessed in a .txt file.
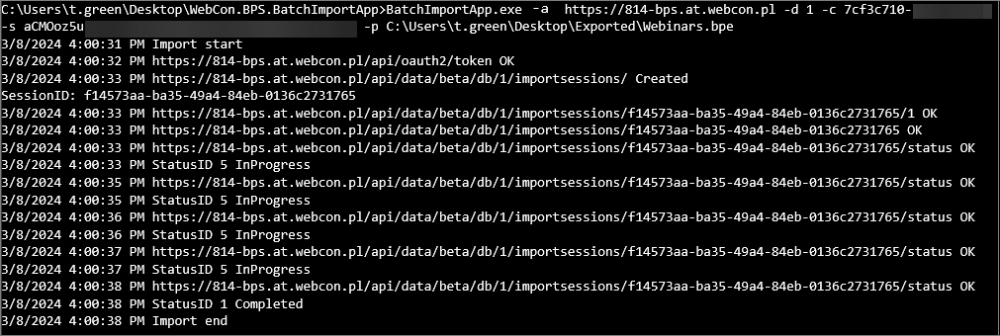
Fig. 5. Information on successful application import in the CMD
Import history
Apart from being able to use the new/updated application on the target environment, users can now additionally check the details of an automated import that has been performed. As with the standard wizard-based import, all relevant information and logs are available in the Import history. Furthermore, the scope of logged information has been expanded to include a “LogSummary” section containing a summary of the application import.
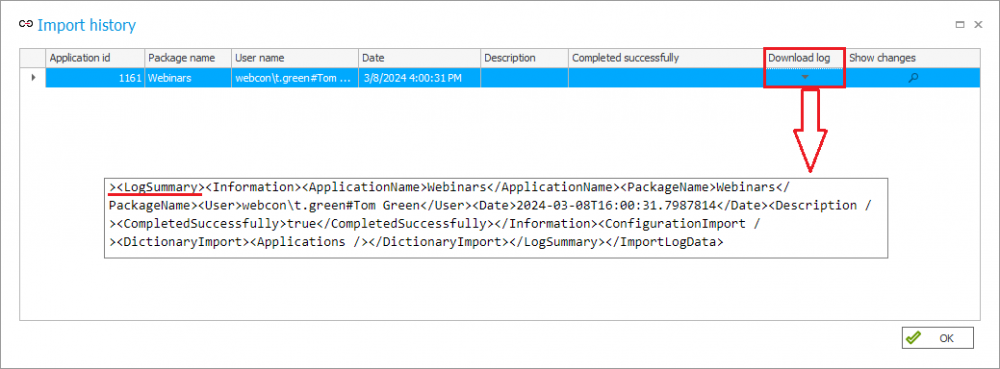
Fig. 6. Import history: Download log option
and the log fragment containing the “Log summary” section
In the event of any irregularities, information on import errors will also be available in the log, which will be flagged in advance by the BatchImportApp.
Automatic import with additional configuration file
Downloading the configuration file
In addition to the automatic import of applications using default parameters, there is also an option to import applications with specific elements indicated as subject to import. This solution is particularly useful in the case of extended applications (e.g. consisting of many processes), where indicating only the elements that are important from the point of view of import is more optimal and justified.
To facilitate this process, the option Create file with default import parameters (API) has been added to the export wizard window in Designer Studio. When this option is selected, an additional .json configuration file with settings is created when exporting the application. This file can be used to import the application to the target environment using the API. The parameters passed in the file will be applied at the stage related to the analysis of the package and the environment where the import takes place.
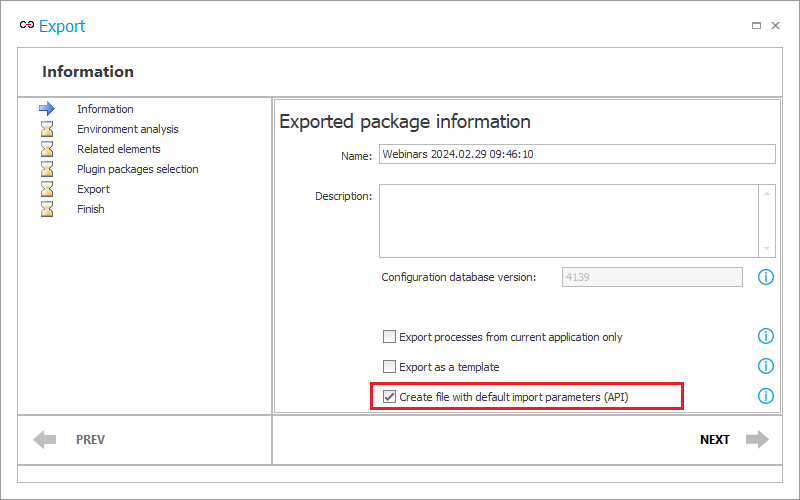
Fig. 7. Export wizard window with the option to create a file
with default import parameters highlighted.
After a successful export, the .json file will be automatically saved to the location indicated for the standard .bpe export file. It will also be possible to preview the contents of the .json file by clicking the Import Parameters button in the Finish step of the wizard.
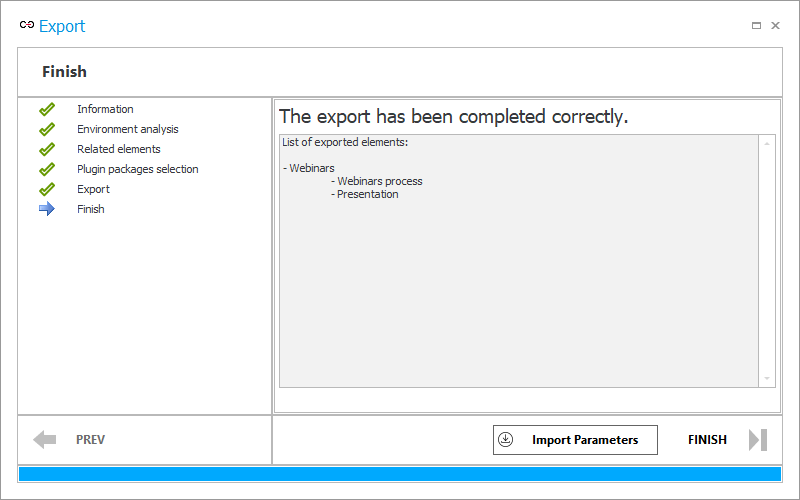
Fig. 8. Export wizard window with option to preview the .json file
Configuration file parameters
The .json file saved on disk contains the default import configuration that remains constant regardless of the application being exported.
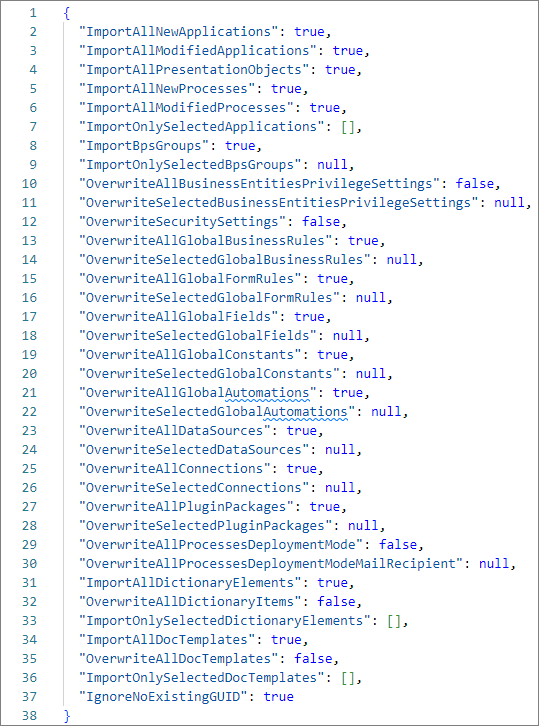
Fig. 9. Contents of the default .json file
The file's primary function is to provide users with a ready-made structure for importing the application and configuration data of its processes. Table 2 below explains the functions of all the parameters available in the file.
Table. 2. Parameters of the .json file for custom application import

The .json file must be completed according to the expected scope of the import. Each parameter in the file can be modified by entering the GUID of a specific BPS element (application, process, presentation object, data source, etc.) in place of the “null” value or between square brackets. The value should be set to true/false accordingly. However, it is important to note that the indication of specific elements (“Selected” / “OnlySelected”) takes precedence over all elements to be imported (“All”). For instance, if the "ImportAllPresentationObjects" parameter is set to "true," it will be ignored if the "ImportOnlySelectedPresentationObjects" parameter is entered in the same configuration file with the corresponding GUID of the presentation object.
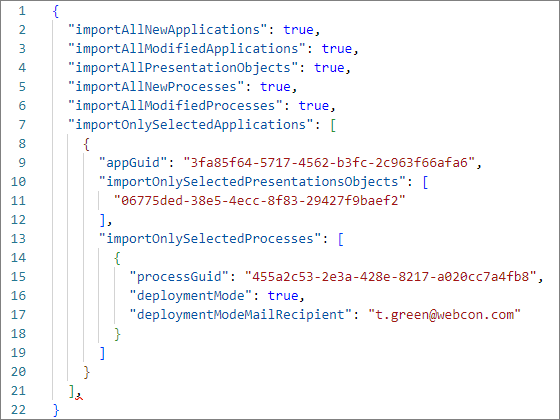
Fig. 10. Excerpt from the completed .json file according to which only the selected
process and presentation object, among others, will be imported
In the provided example, the application GUID should be specified in the “appGuid” parameter, and the presentation object GUID in the “ImportOnlySelectedPresentationObjects” parameter. If only a selected process is to be imported, that process should be indicated by entering its GUID in the “processGuid” parameter. The values of other parameters (see Table 2) should be entered in a similar way if the import operation is to be limited to selected application/process elements or if it is to consist in overwriting them.
Import using the .json file
The contents of the updated .json file are transferred after entering a command in the BatchImportApp console application containing the -i parameter with the path of this file on disk.
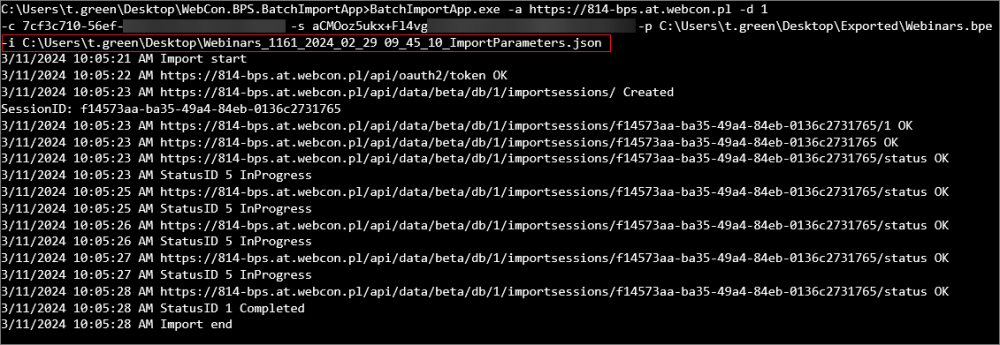
Fig. 11. Custom import of the application and its elements using a .json configuration file
The details of the automatic import carried out can also be viewed in the corresponding log downloaded from the Import history section.
Swagger
The introduction of the discussed functionality also involved the addition of new HTTP endpoints and methods in Swagger. These elements were created in the PublicApiImport section within the API beta definition.
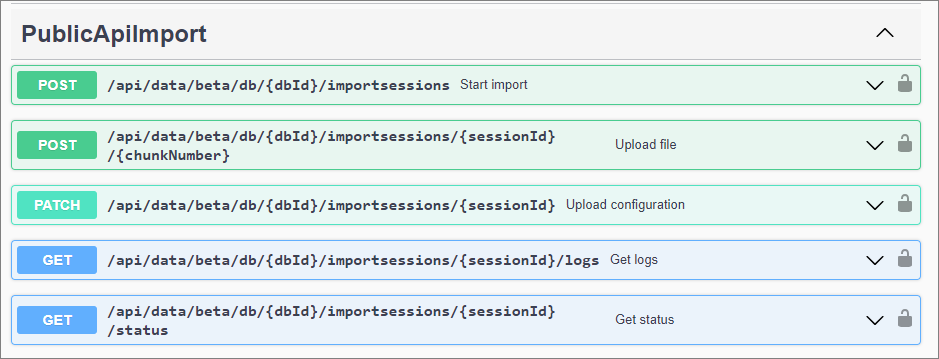
Fig. 12: New POST, PATCH, and GET endpoints in Swagger
With this solution, it will be possible to integrate with the API application used for automatic import, display interactive documentation, as well as call queries and test functionalities.
Order of calling methods
The following is the order of calling new methods in Swagger for testing the automatic import functionality:
- Perform an authentication operation. Select the API definition in the upper right corner of the screen. In the Account section, select Try it out and fill in the grant_type, client-id, and client_secret fields with data from the API application configured earlier in Portal. Copy the generated token.
- Set the API beta definition and click Authorize. Enter “Bearer” in the Value field and then the copied token preceded by a space.
- Expand the PublicApiImport node to display the added HTTP methods.
- Click Try it out for the first POST method (Start import). Enter the database ID by completing the dbID field. If the import is to be done in parts, enter the values of the “ChunkSize” and “TotalSize” parameters (values given in bytes (B)). The status “201” indicates that the operation was completed successfully.
- Go to the POST (Upload file) method. Click Try it out. Fill in the dbID field again. In the sessionId section, copy the session ID from the console application (see Fig. 11). In the chunkNumber field, enter the sequence number of the chunk. If importing in one chunk, enter “1”. Click the Select file button available next to the file option and indicate the location of the exported .bpe file on the local disk. The status “200” indicates that the operation was completed successfully.
- For the PATCH (Upload configuration) method, also specify the dbID and sessionID. In the Example value field, paste the contents of the .json file with the default or modified import configuration. If all entered parameters are correct, the import will begin.
- GET (Get logs) allows you to check detailed logs of the performed import operation. For this purpose, it is necessary to specify dbID and sessionID.
- The GET (Get status) option allows you to track the status of the automatic import, indicating whether it was successful, if there were any errors, or if the operation is still in progress.
Summary
The import of an application via a public API is a solution that enables the transfer of data associated with a BPS application to other environments. It is particularly applicable to highly isolated environments, where any changes require special privileges and a number of tests. The method of application import described in this article is more automated, takes place using ready-made tools and credentials available directly from Portal, and does not require access to many resources. As a result, it can be an excellent alternative to standard application import performed using a dedicated wizard in Designer Studio.

