MailApproval – moving along a path using email
Applies to version: 8.0.x; author: Paweł Jawień
Updated: 11.03.2026; author: Lily Adamowicz
Related documentation
A detailed description of the functionalities mentioned herein and their configuration can be found in the following sections of the WEBCON Help:
Functionality description
WEBCON BPS allows tasks in the system to be delegated to other users, as well as tasks to be automatically closed and a transition path to be selected by replying to the standard email messages sent by the system.
Example of operation
In the absence request workflow, at the Approving step, it is possible to approve or reject the request both by using the buttons on the form and by replying to the standard email message sent when the task is assigned to the approver.

Fig. 1. Absence request workflow
After the absence request is registered, a task to approve or reject it is assigned to the approver. When the task is assigned, the system sends a standard email message containing information about the task, in accordance with the applicable template.
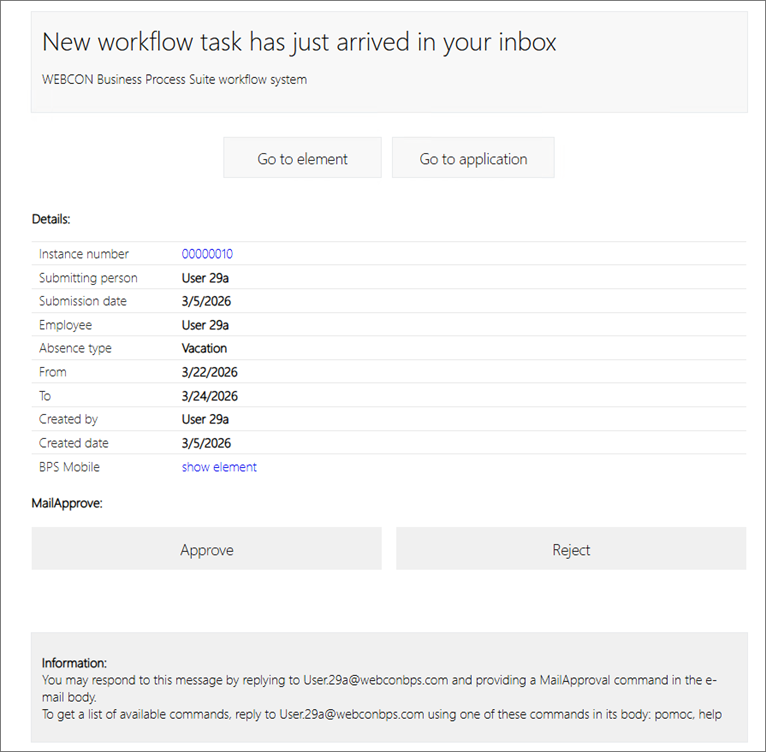
Fig. 2. Email informing about the task
The content of the email message (enabling the MailApproval action) also includes information on how to view the commands available for the given workflow step. To do so, simply reply to this message and enter the word “help” in the message body, so that the system returns a list of commands associated with the step at which the task was assigned.
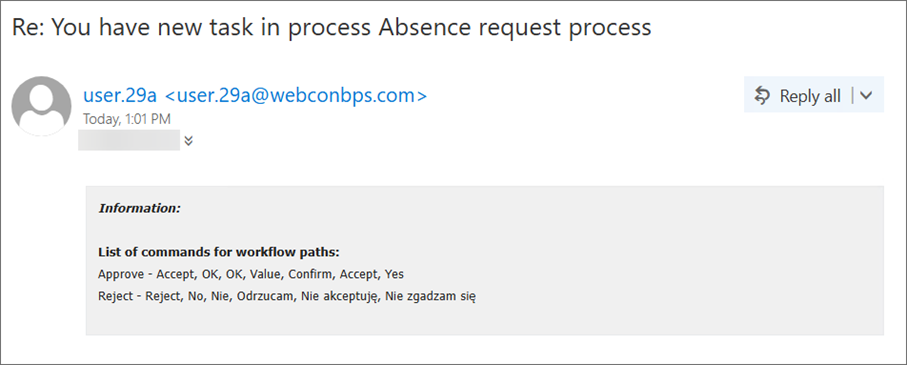
Fig. 3. Email containing the list of MailApproval commands
After an email reply containing one of the predefined words, for example “OK”, “Confirm”, “Yes”, or “Accept”, is sent, the system approves the absence request and moves it along the selected path to the next step of the workflow. At the same time, the approver receives a confirmation message indicating that the task has been completed, together with the path that was used.

Fig. 4. Confirmation of task completion
System settings
To enable moving between workflow steps by means of email messages, the appropriate configuration must be performed.
Global parameters
Open WEBCON Designer Studio, go to the System settings tab, and select the branch MailApproval.
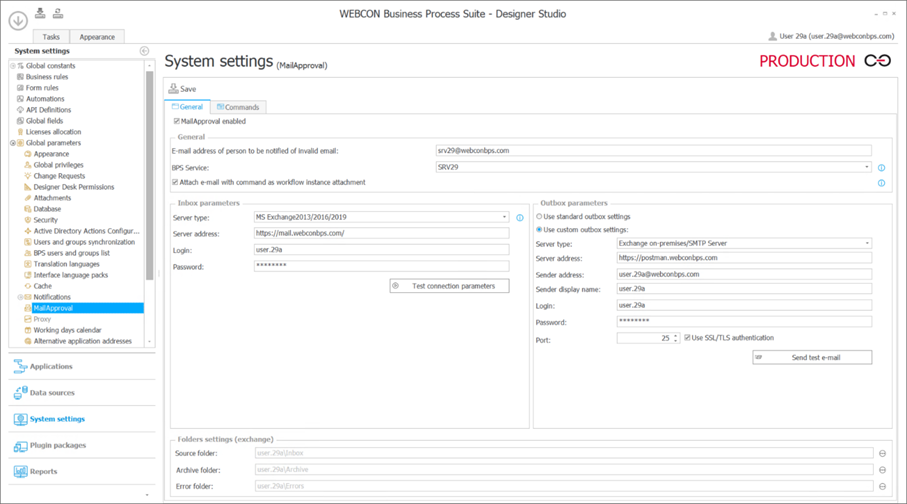
Fig. 5. MailApproval configuration screen
The MailApproval global configuration screen consists of two tabs:
- General
- Commands
Tab: General
For the mechanism to operate correctly, a mailbox on a Microsoft Exchange server is required. A MailApproval mailbox in Exchange Online can also be used via Microsoft Graph.
It is recommended to create a dedicated mailbox intended exclusively for handling MailApproval. The mailbox should contain separate folders for processing incoming messages, archiving processed messages, and storing error messages.
In the example shown, three folders defined in the Folders settings (Exchange) section were used:
- Source folder – for processing incoming messages,
- Archive folder – for archiving processed messages,
- Error folder – for handling erroneous messages.
On the General tab, you must also configure the inbox and outbox parameters, the connection to the Exchange server (server type and address), and provide the parameters of the user in whose context the mailbox handling MailApproval operates.
Detailed information on how to complete the fields is available on the Help page.
Tab: Commands

Fig. 6. Tab: Commands
The second part of the MailApproval global configuration is located on the Commands tab. In the Command groups section, you can define standard, most commonly used sets of commands supported by MailApproval. Then, in the Commands section, for each command you must specify a list of words and phrases to which the MailApproval function will respond.
Process configuration
After saving the global MailApproval configuration, this function must be configured in each process whose operation is to be supported by MailApproval.
The MailApproval function is associated with transition paths at individual workflow steps. The relevant settings for each workflow step are available on the Paths tab, in the MailApproval subtab.
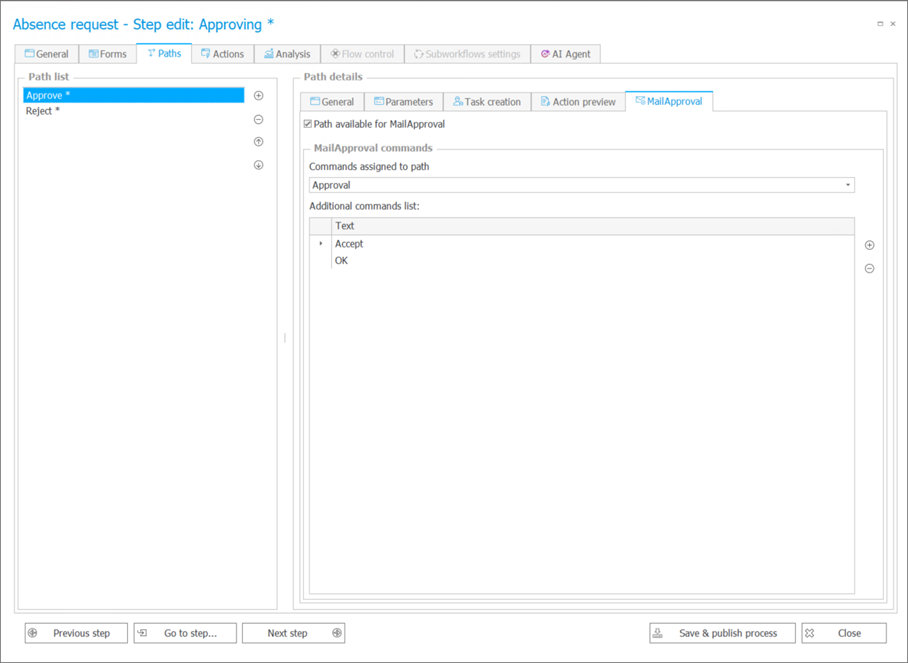
Fig. 7. MailApproval configuration for the Approve path
On the left side of the screen, a list of paths for the selected step is displayed. For each path, MailApproval support can be enabled by selecting the Path available for MailApproval checkbox on the right. After enabling it, the path must be associated with one of the command groups defined in the global configuration. Additionally, you can specify custom keywords dedicated to this path that are not included in the global configuration but are intended to trigger a transition along this path.
After saving the settings, the path will be handled by MailApproval.
NOTE: For MailApproval to work, sending the standard email message must be enabled on the Task creation tab.

Fig. 8. Standard email sending option enabled
+48 12 443 13 90