Managing BPS groups
Applies to version 2020.1.x, author: Dawid Golonka
Introduction
WEBCON BPS Standalone is what we call an installation of the system that operates without SharePoint. It was already possible to synchronize groups and individual users into the system by using the designated Portal interface. In version 2020.1.3., a new functionality for managing BPS groups and users has been added to supplement this process.
This articles described how the actions related to the BPS groups can be used.
Workflow configuration and creating an example BPS group
A BPS group was created with two users:

Fig. 1. Users in the “Managers_test” group
For more information about creating groups and task assignment see:
https://howto.webcon.com/bps-groups-in-standalone-installation-type/
https://howto.webcon.com/assigning-tasks-to-bps-groups/
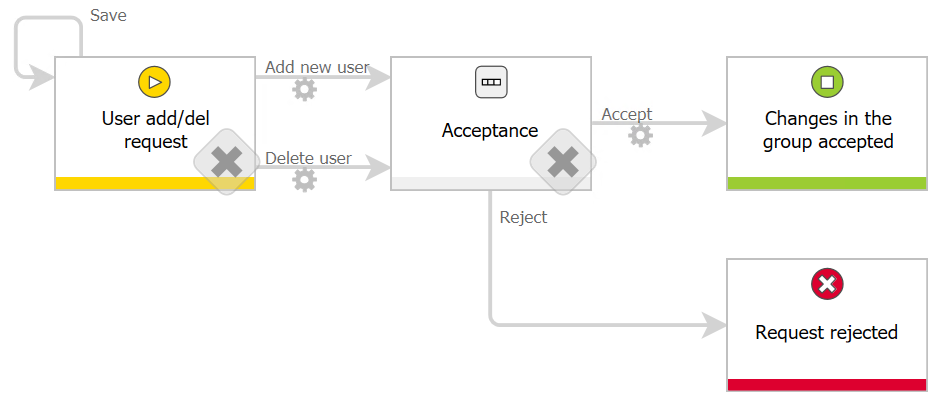
The next step is to create an example workflow used to submit a request for adding/deleting a BPS user. This request is directed to the accepting person who can accept or reject them. The “Add/Delete a single user to BPS groups” is performed on the “Accept” path going from the
Acceptance” step to the “Changes in the group accepted” final step.

Fig. 2. The adding/deleting users to the BPS group
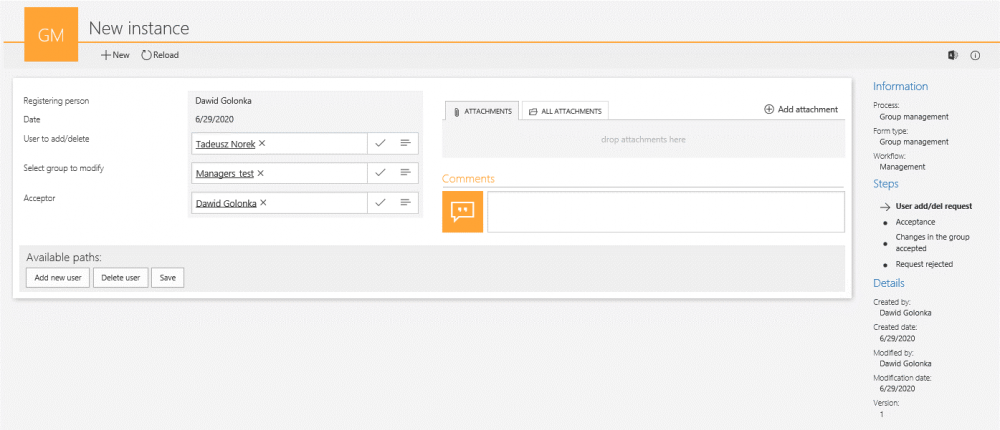
The form view on the start step is presented below:

Fig. 3. The form view on the start step
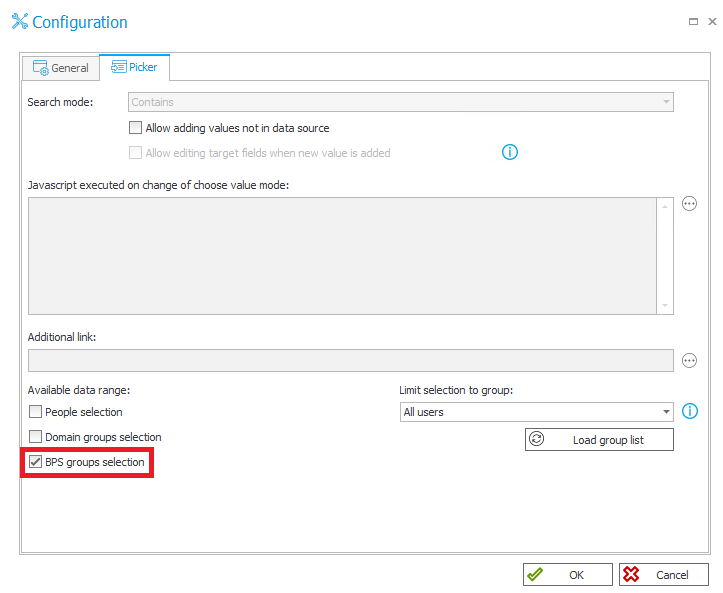
The fields with the register person and date are automatically filled in. The selection of the other three parameters seen on the form: the person to be added, the accepting person, and the group that will be modified, is done by using three “Person or group” form fields. To limit the possible selections in the “Select a group to modify” field to only show BPS groups, in the configuration window of the form field we check the “BPS groups selection” field.

Fig. 4. Narrowing down the person or group select window only to the BPS groups
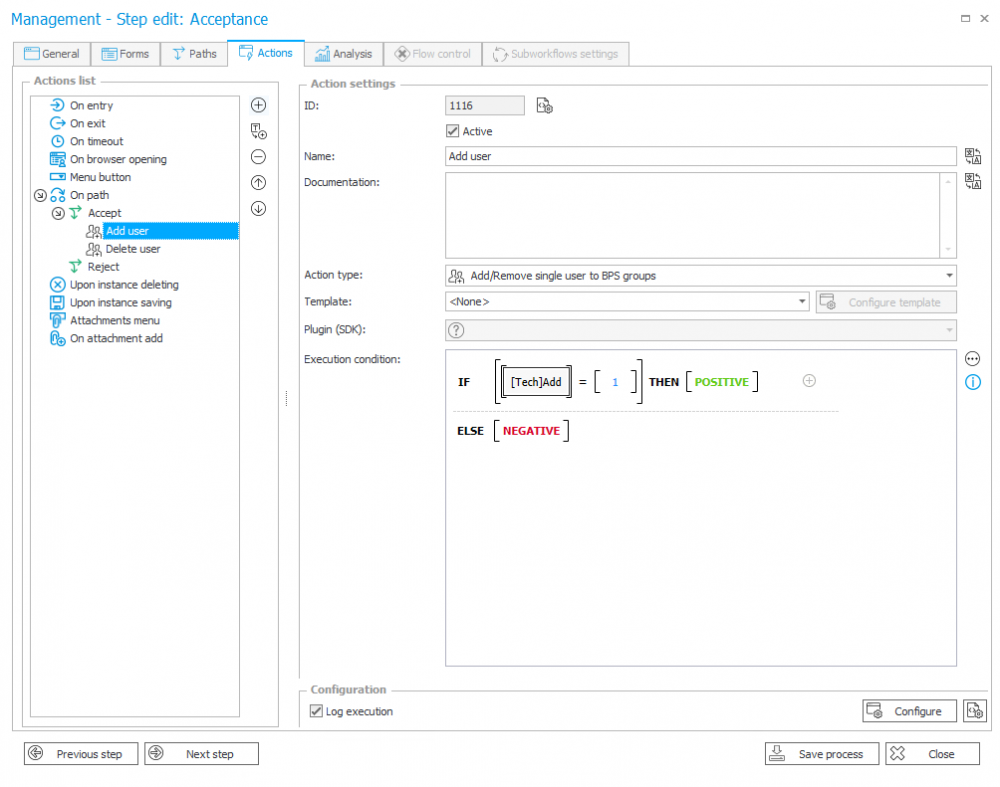
On the “Acceptance” step, on the “Accept” path the actions used to add and delete users have been implemented – they are started after completing the selected condition (see below).
Add a user:

Fig. 5. Add a user action
Delete a user:

Fig. 6. Delete a user action
Two technical “[Tech]Add” and [Tech]Remove” form fields have been created in the process. Depending on whether in the previous step we add the “Add a user” or “Delete a user” path, one of the form field is set to the “1” value. As you see in Fig. 5 and 6, an action appropriate for a path which goes a workflow will start. In the WEBCON BPS this functionality can be implemented in several ways – this solution is one of the ability.
Below there is a form view in the acceptance step – in the “Request type” there is information for acceptor whether the person is added or deleted form the group.

Fig. 7. The form view in the acceptance step
Configuration of the “Add/Delete user to the BPS group”

Fig. 8. The action configuration
The “Mode” parameter is used to specify whether we want the action to add or delete a user. Enter a user identifier (BPS ID) in the UPN format (e.g. t.norek@webcon.pl). In this action you can add only one user (the action of adding multiple users is described in the next part of this article).
In the group identifier section, a group (or groups) can be entered in two ways – statically or dynamically. In the static mode, manually enter the group name in the UPN format, in the dynamic mode to indicate groups you can use the variables editor located on the right. In both cases when you add several groups, separate them with a semicolon.
Select the synchronization mode. After updating user or group data, an independent synchronization operation must be performed. User data synchronization may take few seconds and until its completion, user data is not available in the system.
The “Synchronization mode” parameter defines whether the action is to wait for the synchronization process to complete. Both synchronization modes are described in the context help in the system under the “F1” button.

Fig. 9. Synchronization modes
In the example workflow, both the user to be added and the group to which the user will be added – is based on the form fields provided on the form.
After completing the entire workflow to the final step, check if the user indicated on the form in Fig. 3 has been added to the group:

Fig. 10. The “Tadeusz Norek” user has been added to the group
To check this functionality let’s try to delete a user. By starting the workflow, fill out the form in the same way as when adding it, but this time you follow the path that starts the action in the delete option:

Fig. 11. The Delete a user step – the start step
After completing the workflow check if the user was deleted from the group.

Fig. 12. The “Tadeusz Norek” user has been deleted from the group
The “Tadeusz Norek” user is not a management team member anymore.
Configuration of the adding/deleting users to the BPS group
A separate action has been implemented in the system which is used to add multiple users to the BPS group simultaneously (the “Add/Delete users to the BPS group” action):

Fig. 13. The configuration of the action adding multiple users
The action does not differ from the one described above. The only difference is the ability to add several users at the same time. Remember to separate usernames with semicolons.

