Pre-paid - electronic transactions in WEBCON BPS
Applies to version: 2020.3.x and above; author: Agnieszka Burda
Introduction
The following article is an extension of the Lunchtime article – see Lunchtime application
The “Lunchtime” application has been enhanced with dictionary processes that allow you to pay for meals with money previously paid into your personal account.
- [LT Account] – a dictionary that stores information about an employee’s account
- [LT Transactions] – a dictionary that stores information about carried out transactions, it is divided into four types of forms corresponding to four types of transactions which can be done on a given account:
- Deposit – to deposit money into your account
- Refund – to return money paid into the account
- Payment – to pay for meals
- Repayment – to return money for unrealized orders
Application page
The application page consists of two dashboards:
- Lunchtime
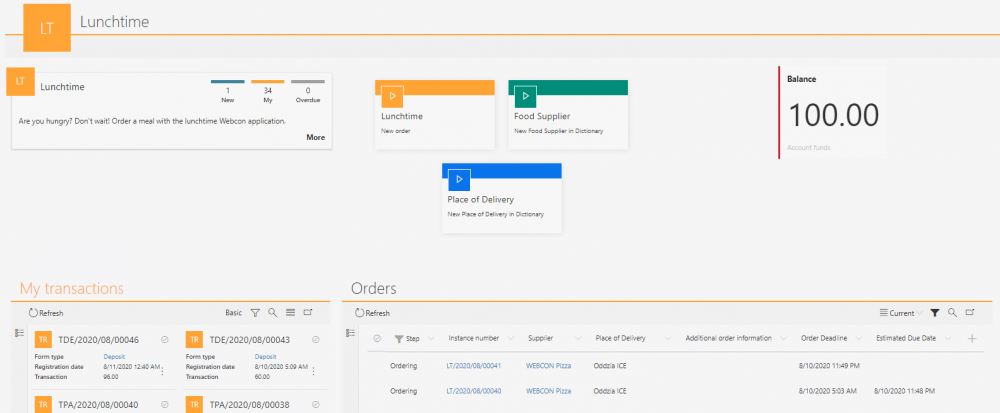
Fig. 1. The main page of the application
- Lunchtime administration

Fig. 2. Lunchtime administration
The first of them has been enhanced with the “Balance” section, visible in the upper right part which shows the user’s current account balance. The report with the status for the currently logged in user was created, and then the “Report Tile” element was embedded on the dashboard which presents one column from the selected report.
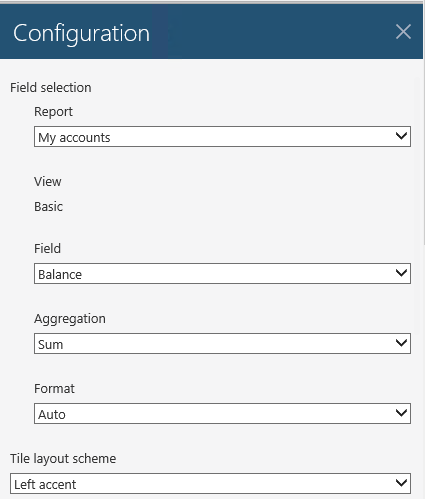
Fig. 3. The configuration of the Report Tile - Account
On the “Lunchtime” dashboard, a new “My transactions” report that contains all transactions carried out on a given account was added. To the second dashboard, two dictionary reports have been added:
- Transactions – that contains all employee’s transactions
- Account – that contains all account created
The reports were divided into Active and Inactive views. On the “Account” report, the amounts of employees whose account balance is 0 are marked in red.
Account dictionary
From the “Lunchtime administration” level you can create new accounts using the “New” button visible on the “Account” report.
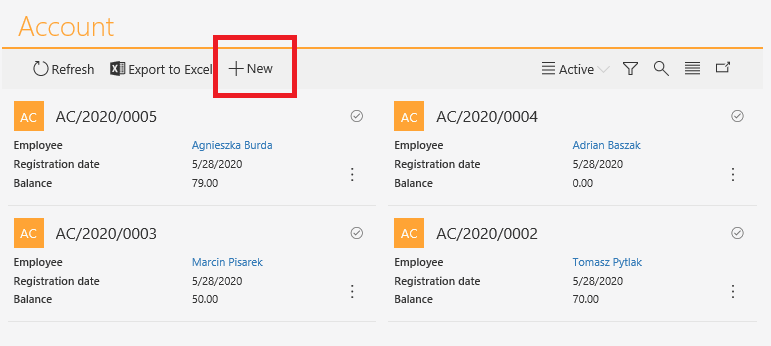
Fig. 4. The "New" button to create new accounts
After clicking the button, a new “Account” dictionary instance is opened in which the following fields are visible:
- Employee – a person type field that downloads data from the AD related
- Registration date – a field in the read-only mode with the current date
- Balance – a field in the read-only mode with the current account balance
- Active – a checkbox that informs whether an account is active or inactive
To register an account- fill out the “Employee” required field and go through the “Save” path.
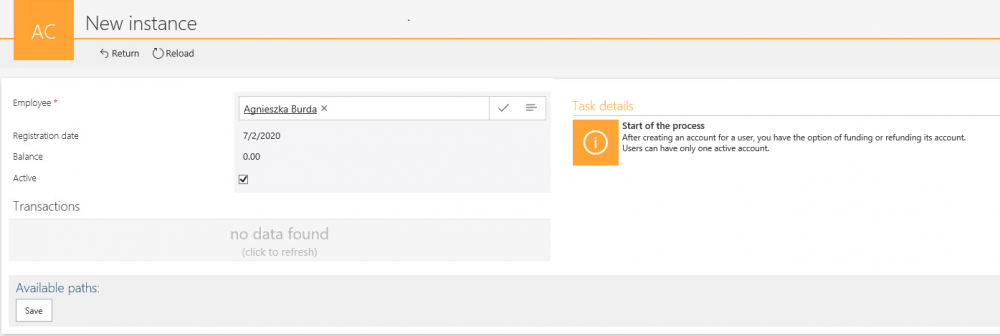
Fig. 5. A new Account dictionary instance
After going through the path, a user’s account is created – this form is the level from which you can add money to them or return them (by using the “New deposit” or “New Refund” buttons).
There is no option to create a new account for an employee who already has such an account – so after going through the “Save” path, an appropriate message will be displayed.
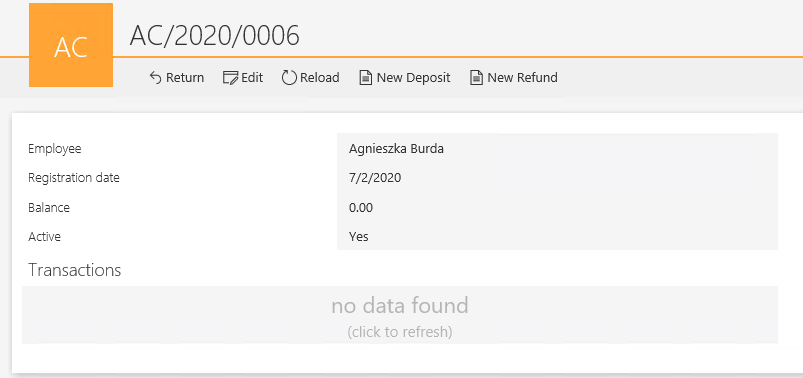
Fig. 6. The Account dictionary
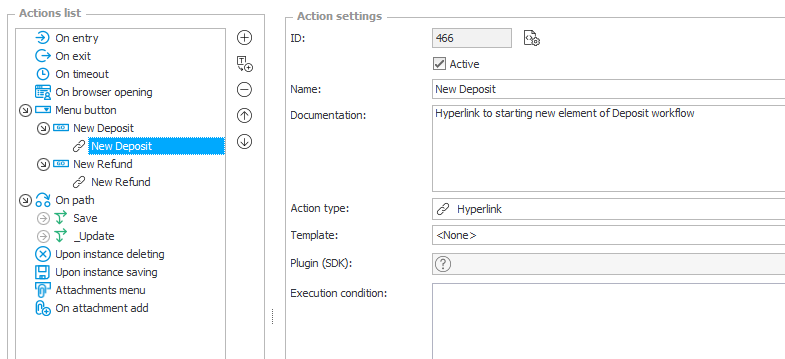
Fig. 7. The configuration of the "New deposit" button
The user's login in the only passed parameter.
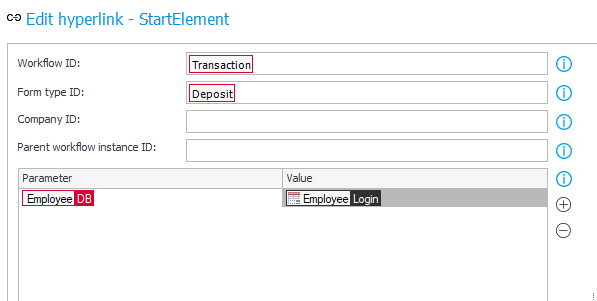
Fig. 8. The configuration of the hyperlink used to start an instance
Transactions dictionary
Using the “Transactions” dictionary you can change the employee’s account balance which is related to the “Account” dictionary by the user’s login. There are four types of forms: Deposit, Payment, Refund and Repayment. All form types use with the same workflow that consists of one step with one “Save” path. From the configuration side, there are three actions on the “Save” path – the first of them is the validation action that checks if a given amount is positive for each form type.

Fig. 9. The configuration of the validation action
The second action is “Change value of single field” which depending on the form type, sets a value in the “Transaction” field as negative or positive. This is due to the fact that when you pay money to an employee or for lunch – the account balance decreases, while when money is deposited or returned to the account – it increases. It is possible to use one field for this purpose for all transaction types, but it is more intuitive for users to enter a positive value for each type of transaction.

Fig. 10. The configuration of the "Change value of a single field" action
The last action is “Move a workflow (SQL)” that moves the “Account” workflow to update the amount in the “Balance” field. In the configuration window in the “Parameters” tab enter the “_Update” technical path which moves the workflow.

Fig. 11. The configuration of the "Moe a workflow (SQL)" action
In the “Data” tab, an SQL query is created that adds a new value from the “Transaction” field to the current value in the “Balance” field. The employee’s account balance is increased or decreased by the specified amount.

Fig. 12. Edition of the query
The next part of the article describes the different types of transactions that can be done on your account.
Deposit
An employee wants to deposit money to their pre-paid account. After creating such an account, create a transaction of depositing money by the employee. To do this, select the “New Deposit” button that allows you to create a new instance of this dictionary.

Fig. 13. Deposit - new instance
In the “Deposit” field, enter the amount transferred by an employee. The other fields are read-only mode. After going through the “Save” button, the user’s account balance will be increased by the specified amount.
The entered change is visible for employee from the main dashboard level in two places:
- New amount is visible in the “Balance” section
- New transaction is visible in the “Transaction” report
The administrator can also view the transaction from the level of the “Account” dictionary. The value in the “Balance” field has been updated and a new row has been added in the “Transactions” table.

Fig. 14. The account after Deposit transation
Refund
If an employee wants to return the money (for any reason) they deposited to the pre-paid account, the “New Refund” button should be used. After selecting this button, a new instance for this dictionary is opened. In the “Refund” field they enter the amount that should be returned (the value in this field must be positive). The other fields are read-only.

Fig. 15. refund - new instance
After going through the “Save” path, the user’s account will be updated.
Payment
There is no option to manually start an instance for this form type – it is automatically started from the “Lunchtime” workflow.
When the “Lunchtime” workflow is at the “Food choices” step, a user has the option to make an order. On the “Today’s order” list adds a new row and selects the “Pre-paid” field.

Fig.16. Making orders with the pre-paid option
After approving the order, three action are executed at the “Final call” step (after going through the “Finish Collecting Orders” path). The first action (Change items list values type) unchecks the “Paid Up” field in the employee’s orders where there is not enough money to pay for the meal.

Fig. 17. The configuration of the action unchecking the "Pre-paid" field
The second action creates a new instance in the “Transactions” dictionary with the “Payment” form for each row with the “Pre-paid” field selected. We used the “Start a subworkflow (SQL)” action to create the payment transaction. In the “Basic” tab of the action configuration window, the appropriate process with the form type and a path, has been selected.

Fig. 18. Starting a new "Payment" transation
In the “Data” tab, the SQL query has been created that prescribes the appropriate values from the “Today’s Order” item list where the “Pre-paid” field for the newly created transaction has been added.

Fig. 19. Starting a new "Payment" transaction
After the action is executed, the completed transaction can be seen on the user’s account. The amount in the “Balance” field has been decreased by the amount of the order placed (18 pln) and a new row has been added in the “Transactions” table.

Fig. 20. The account after the "Payment" transaction
The last action executed on this path is the change of the item list value that automatically selects orders as paid (the “Paid Up” field) if the “Pre-paid” checkbox is selected.

Fig. 21. The configuration of the action updating the "Today's order" list
After going through the path, the “Paid Up” column is updated. Already paid orders are marked as green. In addition, a “Debtors” list appears above the “Today’s Order” list with employees who have not paid for this meal with the total amount that should be paid for lunch.

Fig. 22. List of debtors
When employees paid for a meal, select the “Paid Up” field and save the form – the debtors will disappear from the debtors’ list.
Repayment
When the money for lunch is debited from the user’s account, but for some reason the order has to be canceled (e.g. an employee has not gone to the company) – money should be returned to the user’s account. For this purpose, the last of the transaction types – “Repayment” is used.
In the “Lunchtime” process, the “Cancel” path is visible on the “Ordering” and “Awaiting Delivery” steps. The action of creating the “Repayment” transaction has been created in both places.
To create the repayment transaction, the action of starting subworkflows (SQL) has been used – in the configuration of the action, fields about the process, form type and transition type have been completed in the “Basic” tab.

Fig. 23. The configuration of the repayment starting
In the “Data” tab there is the SQL query that describes the appropriate fields from the “Today’s Order” item list to the fields in newly created transaction.

Fig. 24. The SQL query used to start repayment
After executing the action, the money will be returned to the users’ accounts and the next row will appear in the “Transactions table.

Fig. 25. Account after repayments

