Signing document with Autenti service
Applies to version: 2025 R2 and above; author: Kacper Świętek, Lily Adamowicz
Related documentation
A detailed description of the functionalities mentioned herein and their configuration can be found in the following sections of the WEBCON BPS Help:
The entry is an extension to the article Signing document with Autenti service.
Introduction
In WEBCON BPS, digital signature handling is implemented using dedicated actions developed with the Software Development Kit (SDK). This mechanism ensures secure and seamless execution of document signing operations. Currently, the user can implement integration add-ons that enable seamless collaboration with the following external electronic signature service providers:
This article provides a detailed guide to integrating WEBCON BPS with Autenti. It outlines the document signing process and demonstrates the configuration of a sample workflow, which includes sending a document for signature and retrieving the signed version.
License requirements
To use the integration between WEBCON BPS and Autenti, an appropriate integration license must be purchased. Contact your Autenti representative directly for details. Communication with the Autenti platform is handled through a system account, which is used to send documents for signature. Individuals signing the documents do not need an Autenti account or a WEBCON BPS license.
Description of the process
The Autenti platform provides various ways of handling the processed documents. These include:
- creating a document in the system,
- uploading the document file for signature,
- checking the document status,
- sending a document signature link via email,
- two-stage validation using SMS service.
These functionalities enable the following communication scheme (workflow):

Fig. 1. Workflow diagram
The process includes two defined actions:
- sending a document to Autenti,
- sending a request to return the document along with the status.
The Timer mechanism is also employed to automatically trigger the path responsible for checking the document's signature status in Autenti every hour.
Business case
For demonstration purposes, a simplified document workflow will be used, consisting of several basic stages: document preparation, manager's approval, and signing by external parties. The process begins with the Prepare document step during which a document template is generated. Next, the document moves to the Manager approval stage, where it can either be approved or rejected. After approval, the document advances to the Awaiting for signatures step, where the system periodically (every hour) triggers the Is it signed? path to verify whether the document has been signed in Autenti. Once all signatures have been submitted, the workflow concludes at the Approved step.
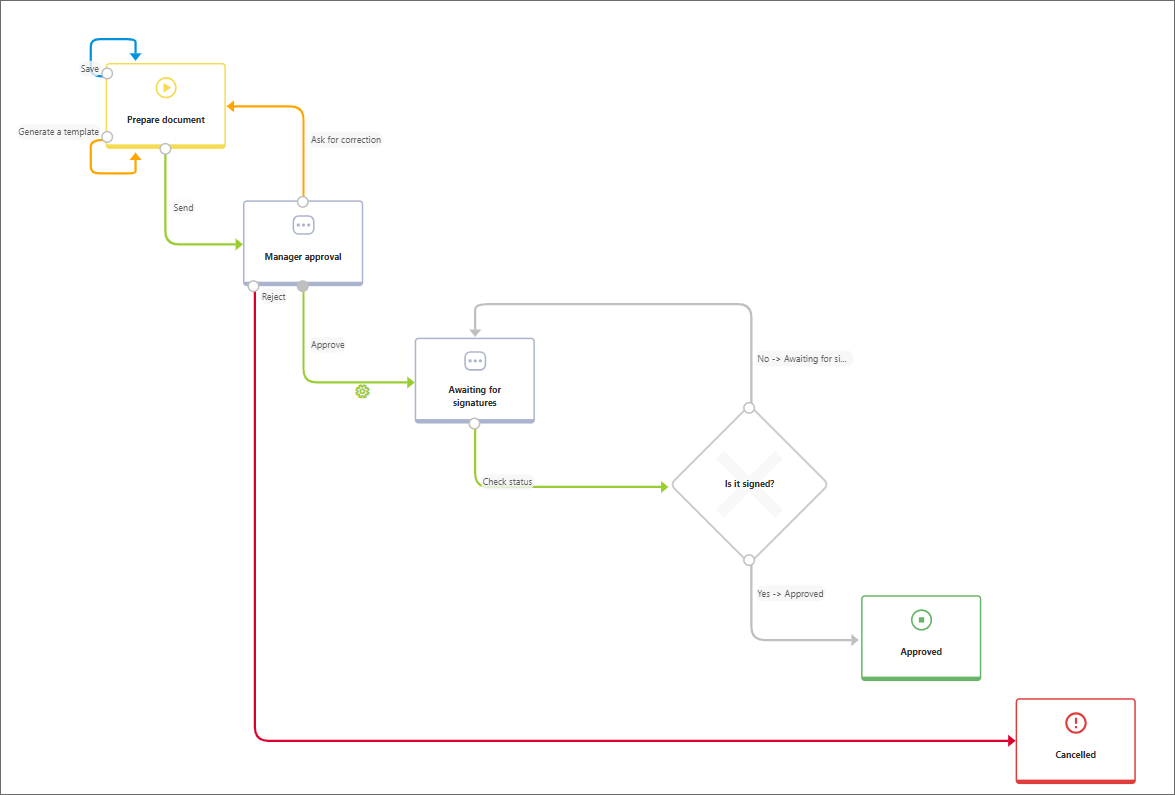
Fig. 2. Signature diagram
On the form, you need to define the form fields required to initiate the signature action.
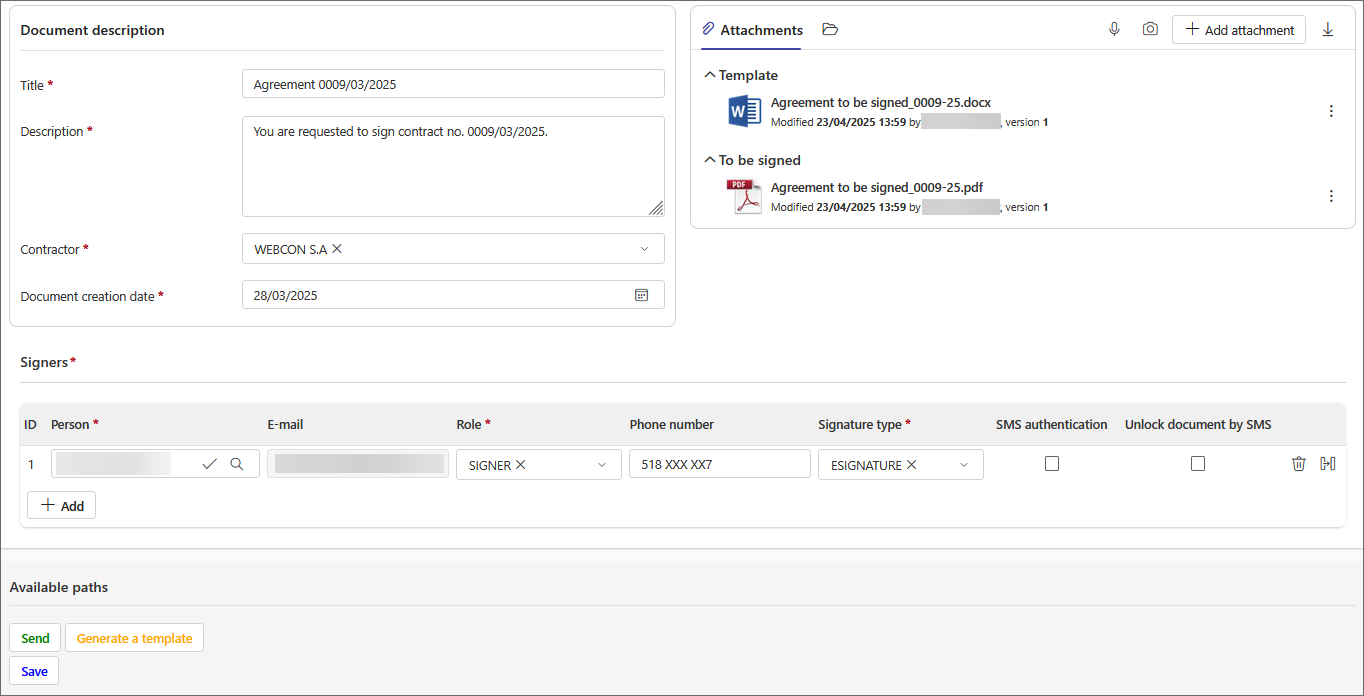
Fig. 3. Signature workflow form
The Signers list is used to specify all participants involved in the document signing process and to assign them the appropriate roles and authorization settings. Each row in the list corresponds to one person involved in the process.
In the Person column (form field type: Person or group), select a specific user. Based on the selected person, the system automatically completes the e-mail address to which the invitation to sign the document will be sent.
In the Role column (form field type: Choice field), specify the user’s role in the signing process. You can select from the following roles, as defined by Autenti’s requirements:
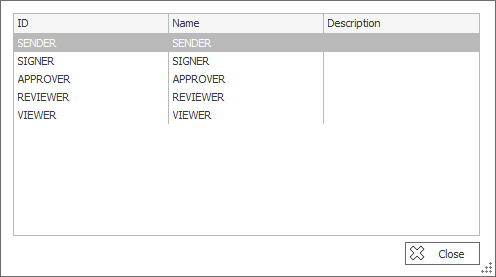
Fig. 4. Choice field configuration
- SENDER – a person who sends the document,
- SIGNER – a person who signs the document,
- APPROVER – a person who approves the document (without signing),
- REVIEWER – a person who views the document and can add comments,
- VIEWER – a person granted access to preview the document only.
In the Phone column (form field type: Single line of text), provide the signatory's phone number. This form field is mandatory if SMS authentication is enabled.
In the Signature type column (form field type: Choice field), specify the selected form of signature:
- ESIGNATURE – standard electronic signature,
- QUALIFIED_ESIGNATURE – qualified electronic signature.
Additionally, you have two more fields to select:
- SMS authentication – when this option is selected, the user must enter an SMS code sent to the specified phone number before signing.
Authorization using SMS code - Unlock document by SMS – when this option is enabled, the document is encrypted, and the user can view its content only after entering the SMS code.
“Securing document access with an SMS code” - what does it mean when sending a document?
You should also include a technical text field named Document ID from Autenti, which is essential for the subsequent steps of the process. This field stores the document ID (GUID) assigned by the Autenti system upon successful saving in its database.
According to the Autenti REST API documentation, you need to verify that the Autenti system has returned a valid GUID. If this ID is missing, it indicates that the document was not properly registered, and the technical field will remain empty. This situation indicates a problem on the integration side and prevents the signing process from proceeding properly.
The integration setup begins with configuring the REST connection to the Autenti REST API, enabling documents to be sent in PDF format.

Fig. 5. API connection configuration
You need to create a new REST Web Service connection and set the authentication type to Salesforce. Next, in the connection configuration, complete the following details, as shown in the screenshot:
- User – the email address associated with the Autenti account used for integration,
- Password – the password for the Autenti account,
- Client ID – the value provided by Autenti for integration purposes,
- Client Secret – the API secret key provided by Autenti,
- Authentication service URL – https://api.accept.autenti.net/api/v2/auth/token.
- Base service instance URL – https://api.accept.autenti.net/api/v2.
The above URLs are current as of April 17, 2025 and may be subject to change in future versions of the Autenti platform. Therefore, it is recommended to consult the official documentation to verify the URLs before configuring them.
The next step in the process is to configure the action that sends the document for signature. In this example, the action is configured within the Manager approval step. On the Approve path, add an automation step, within which the corresponding SDK action will be placed.
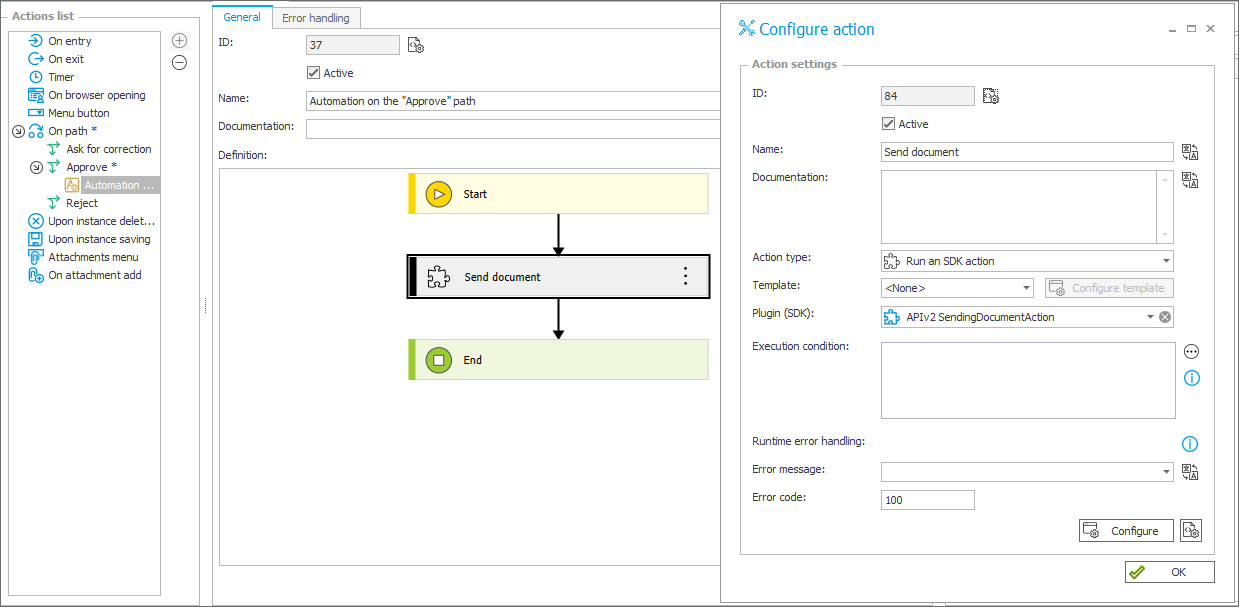
Fig. 6. Preview of the document sending action
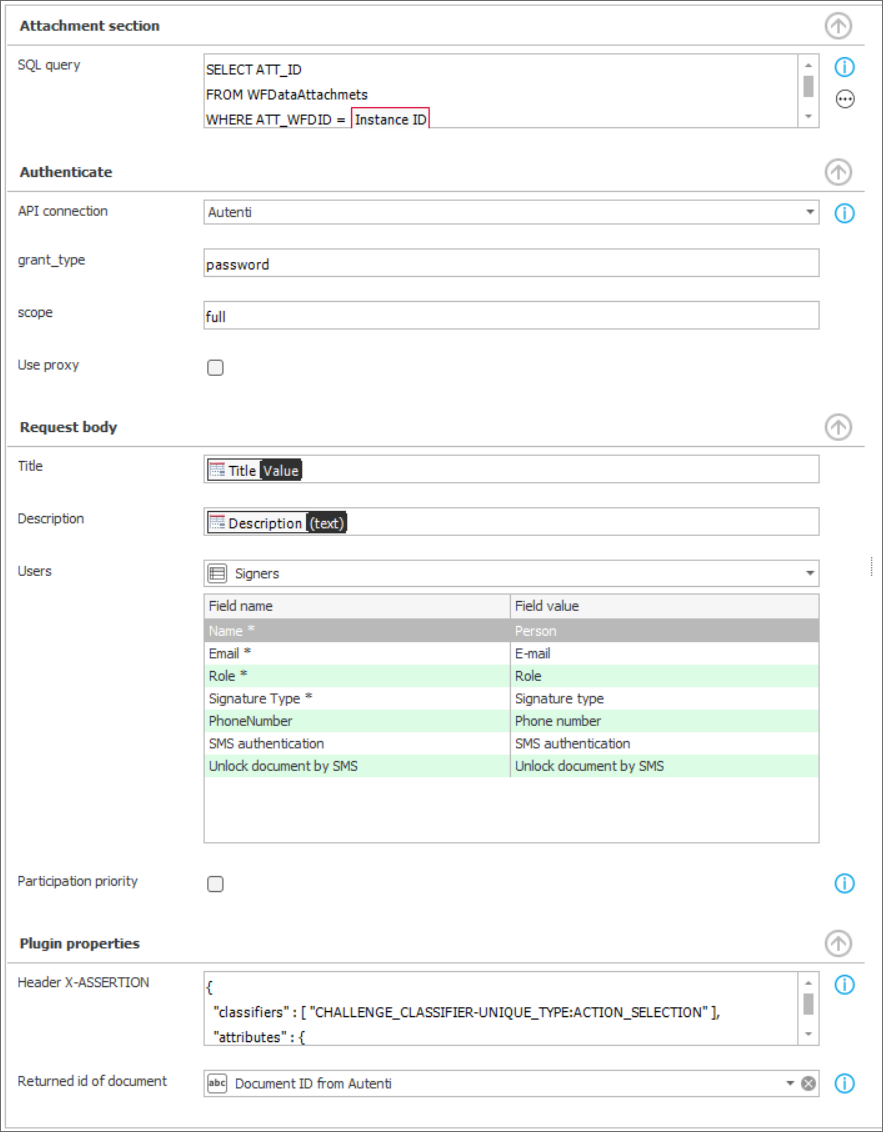
Fig. 7. Configuration of the document sending action
The configuration of each action section is detailed below:

Fig. 8. Attachment selection
SELECT


    ATT_ID


FROM WFDataAttachmets


WHERE


    ATT_WFDID = {WFD_ID}


    AND dbo.ClearWFElemID(ATT_Attribute1) = 1


    AND ATT_IsDeleted = 0
In this field, you must define an SQL query on the WFDataAttachmets table that returns the ID of the attachment to be signed. For this scenario, the query is limited to the current instance and filters attachments from the To be signed category that have not been deleted.
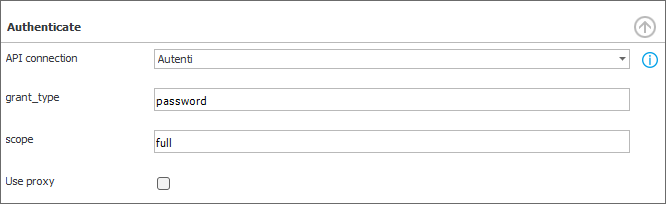
Fig. 9. Authentication configuration
In the Authenticate section, select the previously created connection and set the grant_type parameter for password authentication. The next step is to specify the scope value, which defines the range of permissions granted to the application. In the example configuration, set the scope to full.
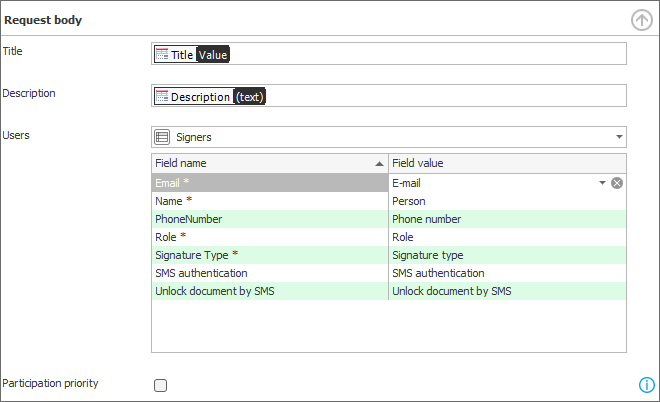
Fig. 10. Query configuration
Below, define the key instances in the Request Body section that specify the data sent to the electronic signature service.
- Title and Description
- Specify the fields containing the title and description of the document to be submitted for signature.
- This information will appear in the body of the email sent to individuals invited to sign the document.
- Users
- Indicate a list of items containing data of individuals who will sign the document. The columns in the item list were covered earlier in this article. Fields marked with an asterisk are mandatory.
- Participation priority
- This field is required when at least one line in the Signers list is assigned the Approver role.
The final section in the SDK action configuration is Plugin properties, where you set the action’s parameters related to the system workflow and logic.
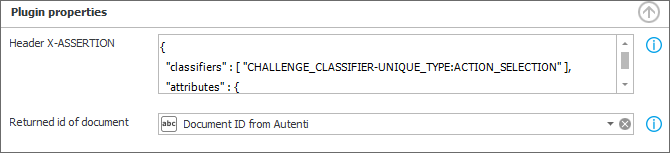
Fig. 11. Plugin properties
{


  "classifiers" : [ "CHALLENGE_CLASSIFIER-UNIQUE_TYPE:ACTION_SELECTION" ],


  "attributes" : {


    "selectedIds" : ["EVENT_CLASSIFIER-UNIQUE_TYPE:DOCUMENT_SENT"]


    }


}
The HEADER X-ASSERTION field automatically inserts the configuration provided through the contextual help option. In the Document ID from Autenti field, specify the user-created technical field where the document’s external ID will be stored.
After configuring the action, proceed to the BPS Portal to test the solution. To begin, create a new item, fill in the Signers list, and then proceed to the Manager approval step.
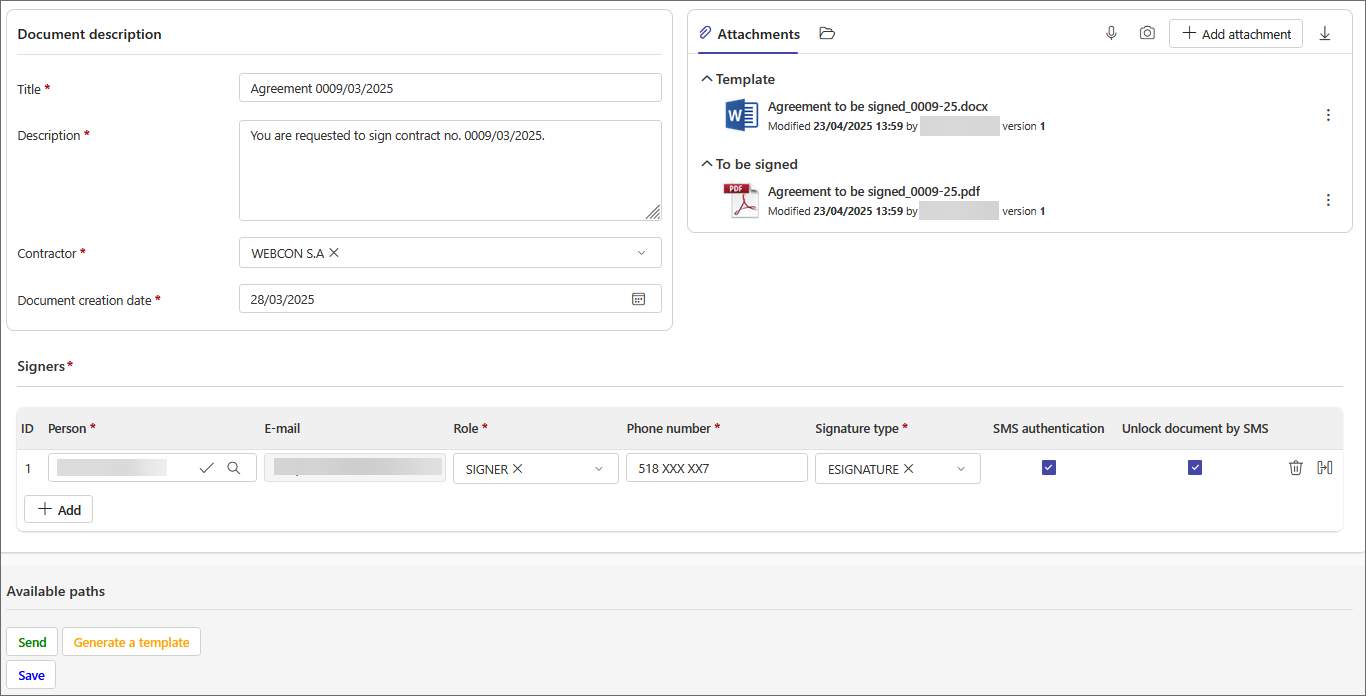
Fig. 12. Form in the Prepare document step
After the supervisor’s approval, the document is sent for signature to the individuals listed in the Signers list, who receive the following email:
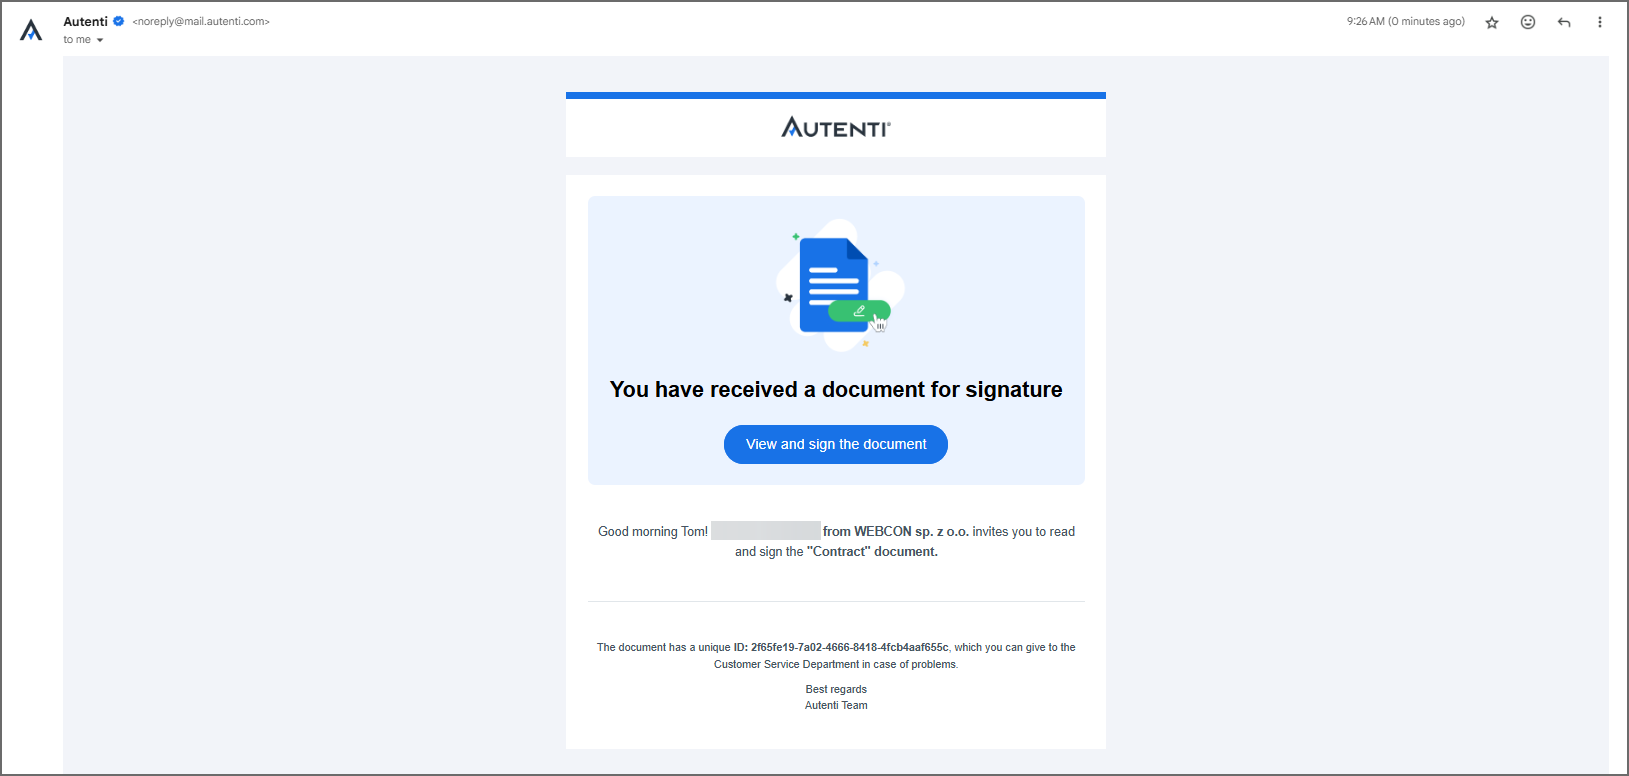
Fig. 13. Content of the email from Autenti
The View and sign the document button is also a hyperlink that leads to the document that is ready to be signed. Clicking the link redirects you to the authorization page, where you need to enter the SMS code to unlock the document. If the Unlock document by SMS option is not selected, the document is displayed immediately, without requiring authorization.
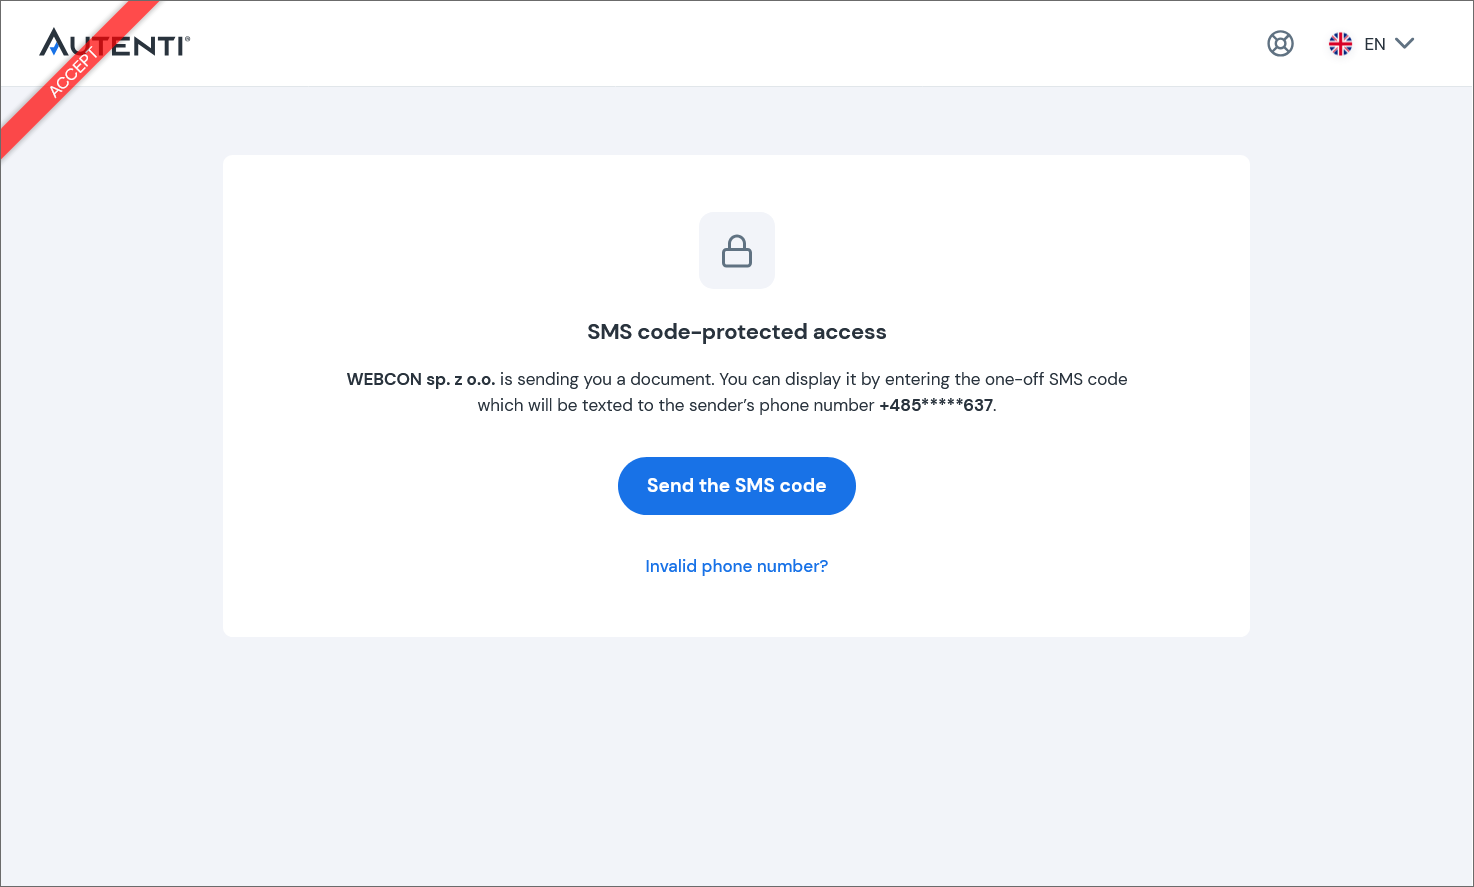
Fig. 14. Document secured with SMS code
After entering the SMS code correctly, the document to be signed will be displayed along with the key details. After reading the document, click the Next button.
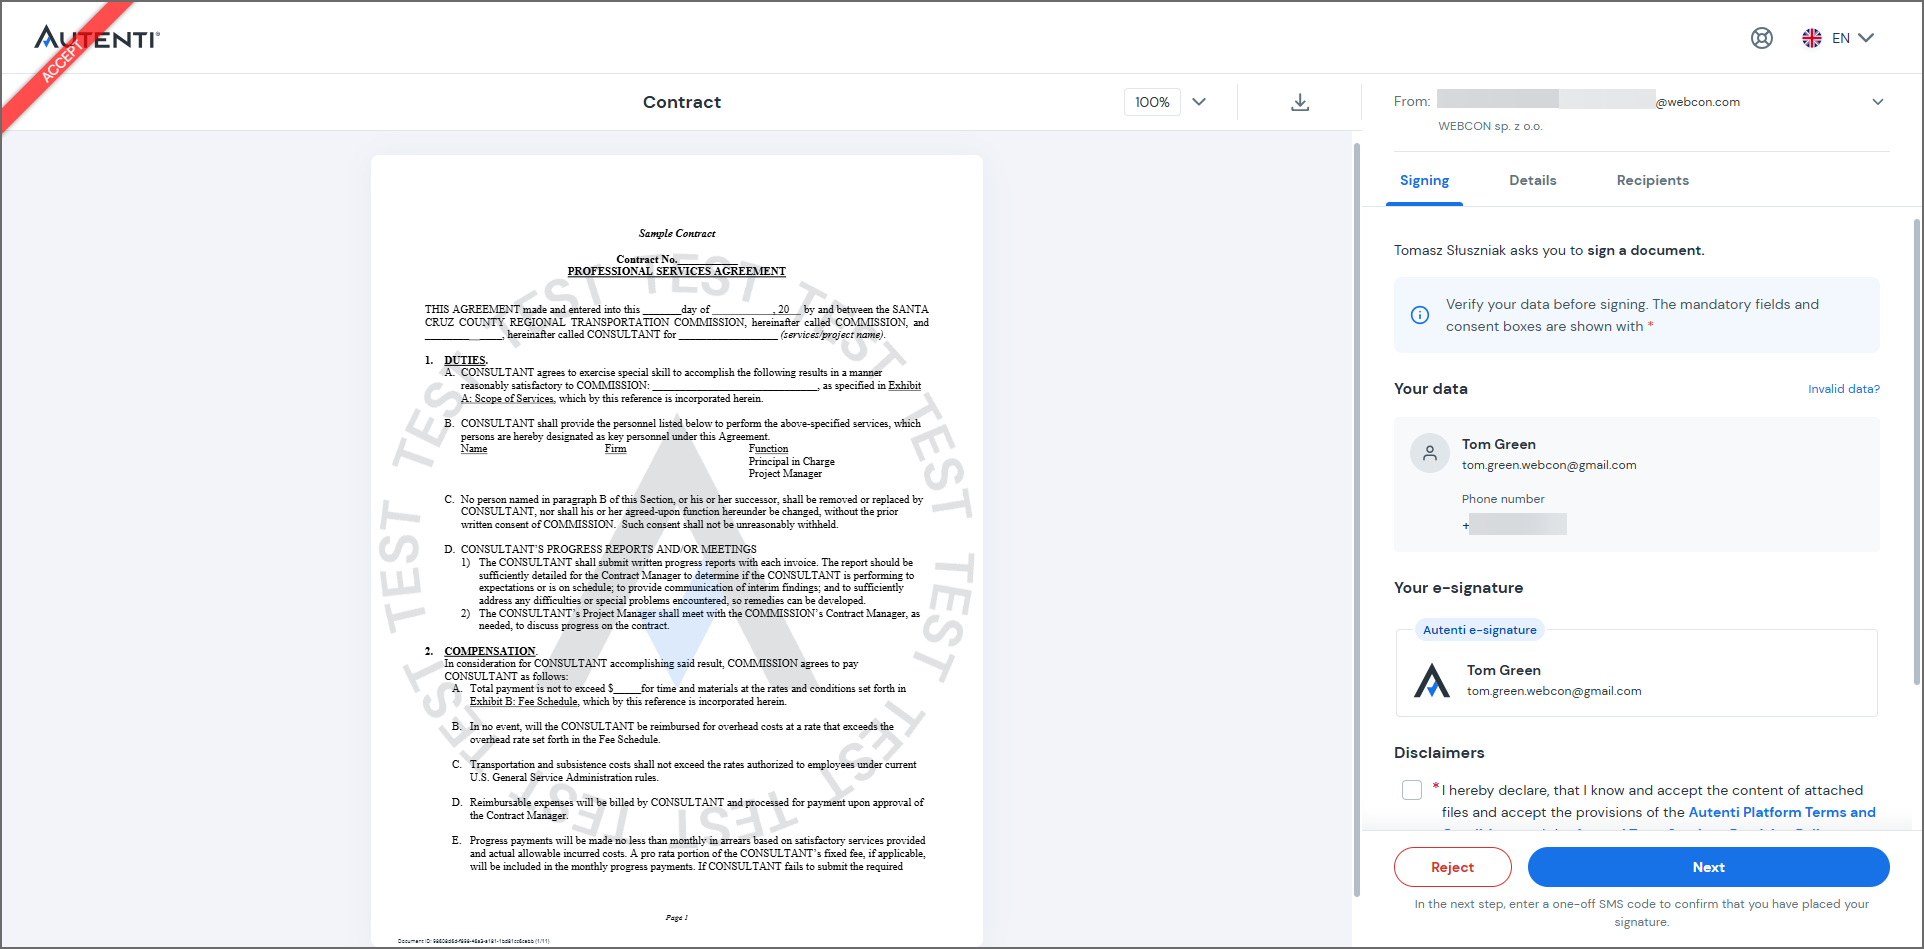
Fig. 15. Document to be signed
After clicking the hyperlink, you’ll be prompted to confirm your signature by entering a one-time code sent to your phone number. Entering a one-time code is required because, when registering the instance in the BPS Portal, additional SMS authentication was enabled for this user.
If this option is not enabled, signing the document requires no additional confirmation – simply click the Sign button to complete the process.
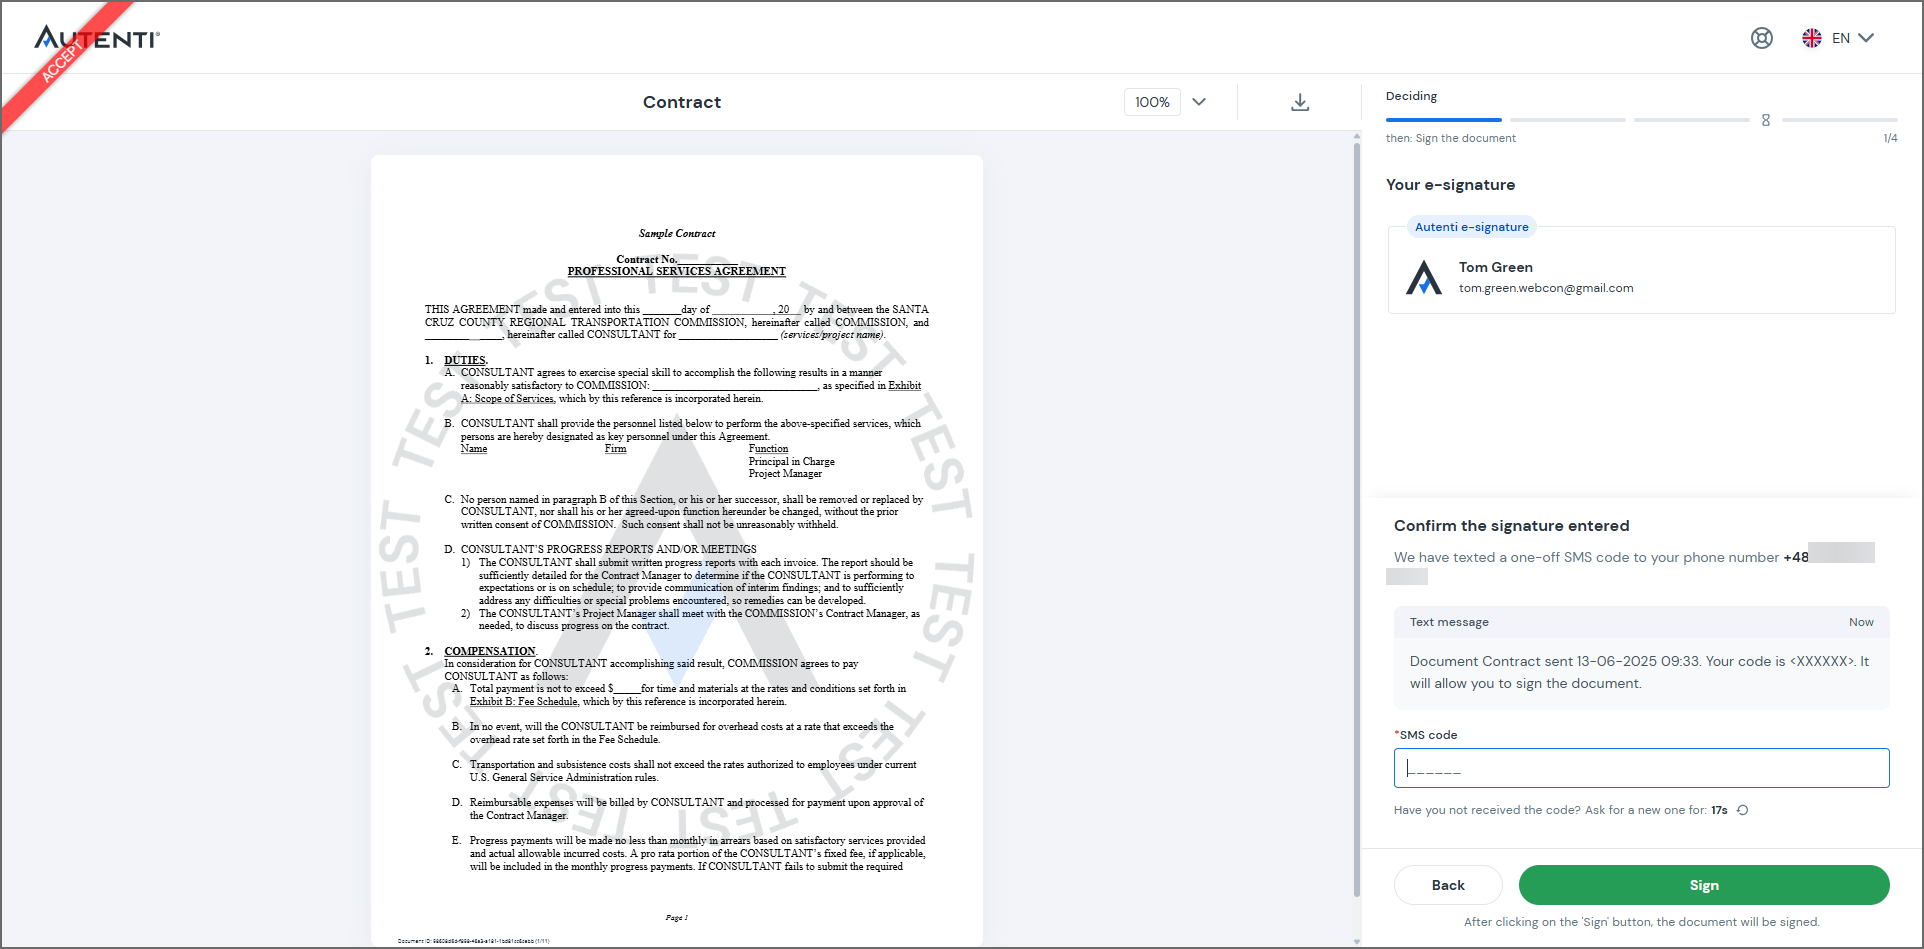
Fig. 16. Document - confirmation of signature
After entering the code, the system will display confirmation details about the document signing.
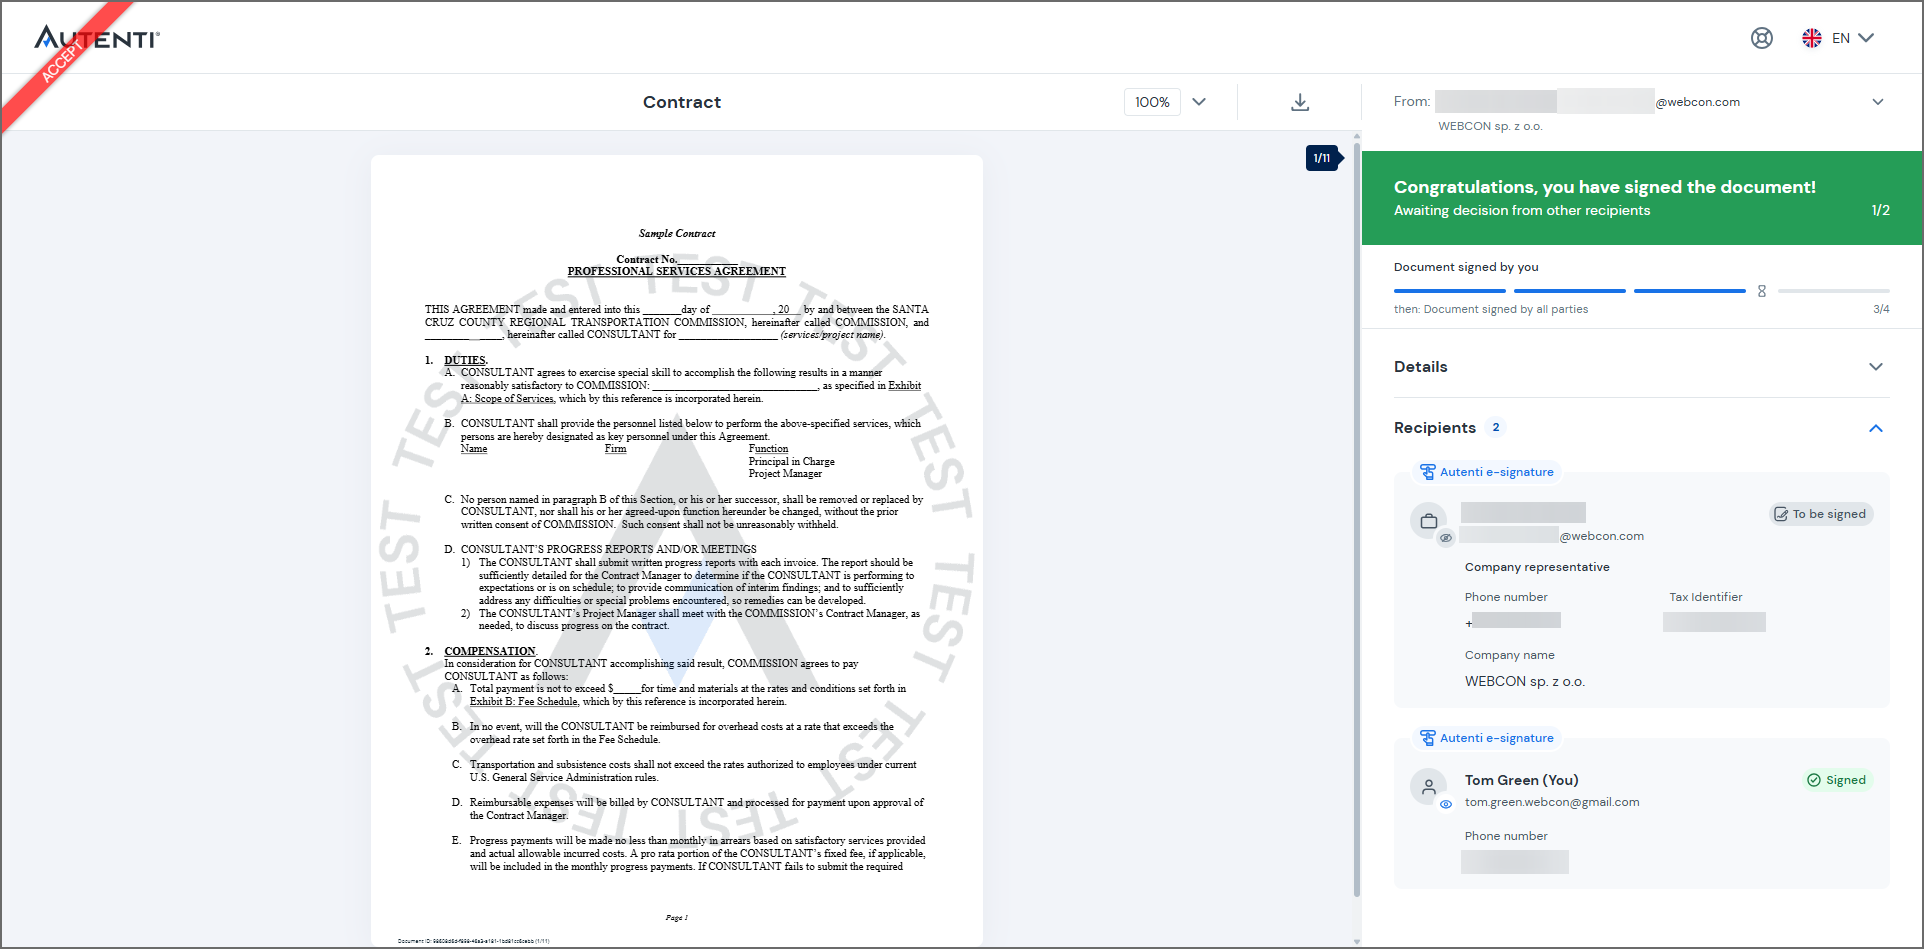
Fig. 17. Signed document screen
A confirmation of the completed document signing, along with a copy of the signed contract, will be sent to all individuals listed as signatories.
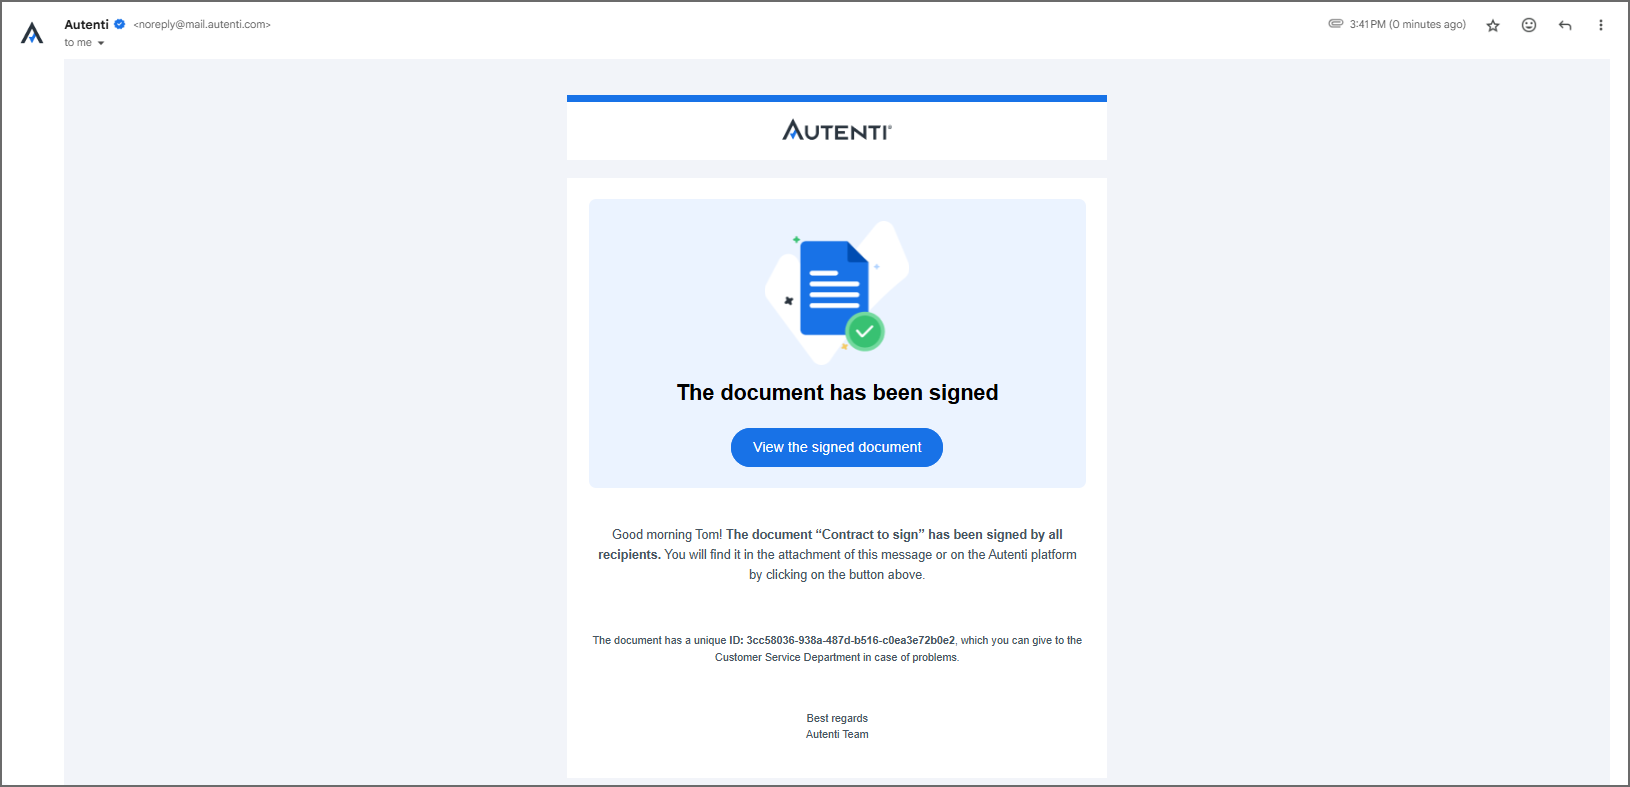
Fig. 18. Return mail
If the document is signed successfully, it will include a certificate and stamp verifying the authenticity of the signature.
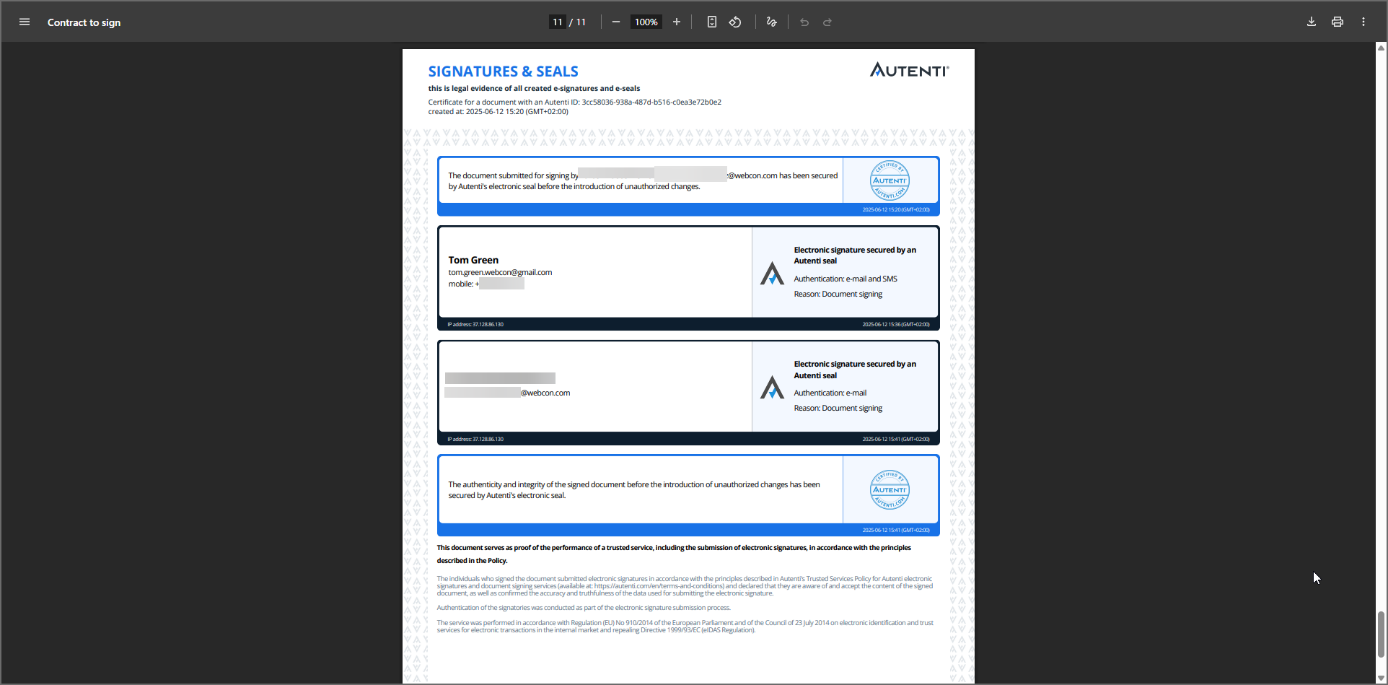
Fig. 19. Autenti signature certificate
When a document is being signed in Autenti, the instance remains in the Awaiting for signatures step. During this period, the document stays within the Autenti system, and its status is not automatically updated in WEBCON BPS. To complete the process, configure an action that checks the signature status and downloads the document once the status changes to COMPLETED. This automation should be added on the Check status path.
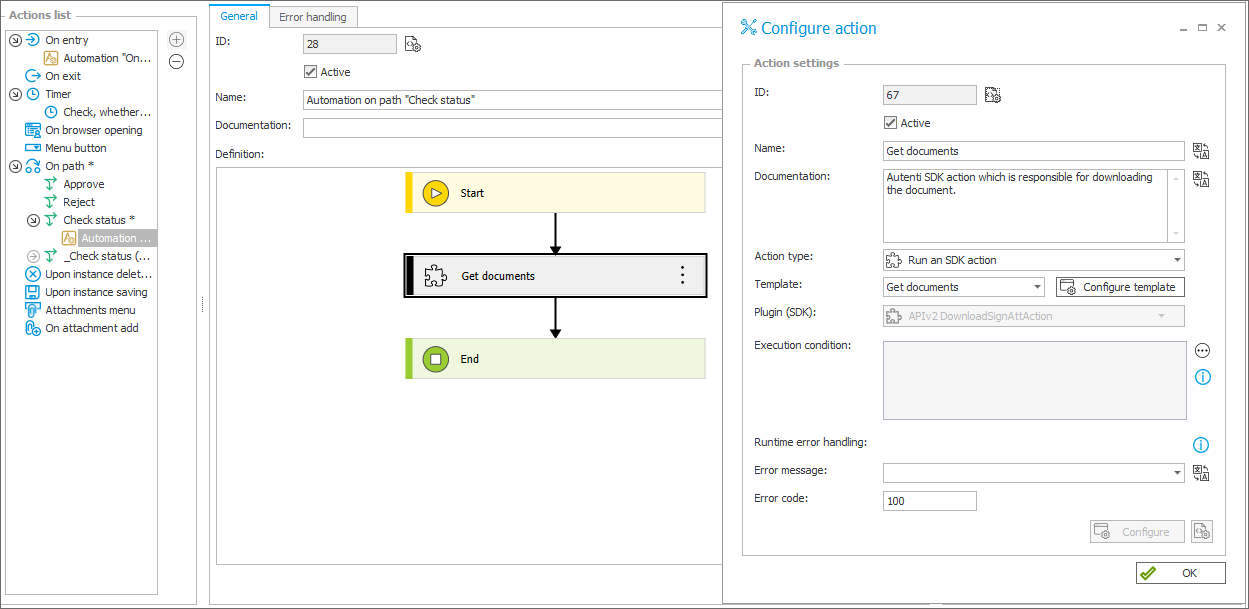
Fig. 20. Document download action preview
The settings in the Authenticate section are similar to those used in the action that sends the document. In the Returned ID of document field, enter the ID that will be returned after the document is downloaded.
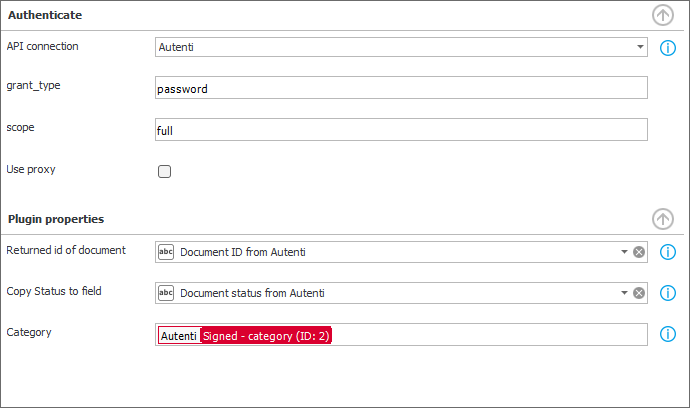
Fig. 21. Document download action configuration
In the Copy Status to field, specify the form field where the downloaded file’s status will be stored. The Category field specifies the category assigned to the downloaded document (in this case, it will be Signed).
The next step is to configure the conditional step Is it signed?, which is preceded by the Check Status path.
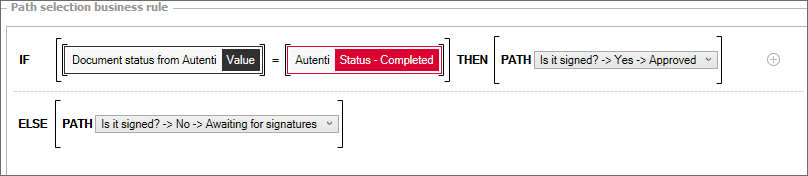
Fig. 22. Configuration of the Is it signed? conditional step
If the document download action results in the value COMPLETED being provided in the Document Status from Autenti form field, the instance is routed to the final step. Otherwise, the item will return to the Awaiting for signatures step. The system can return different statuses:
- PROCESSING – decisions are still pending from some participants,
- COMPLETED – all participants have signed the document,
- REJECTED – at least one participant refused to sign.
In the Awaiting for signatures step, configure a timer function that checks every hour whether the document has been signed.
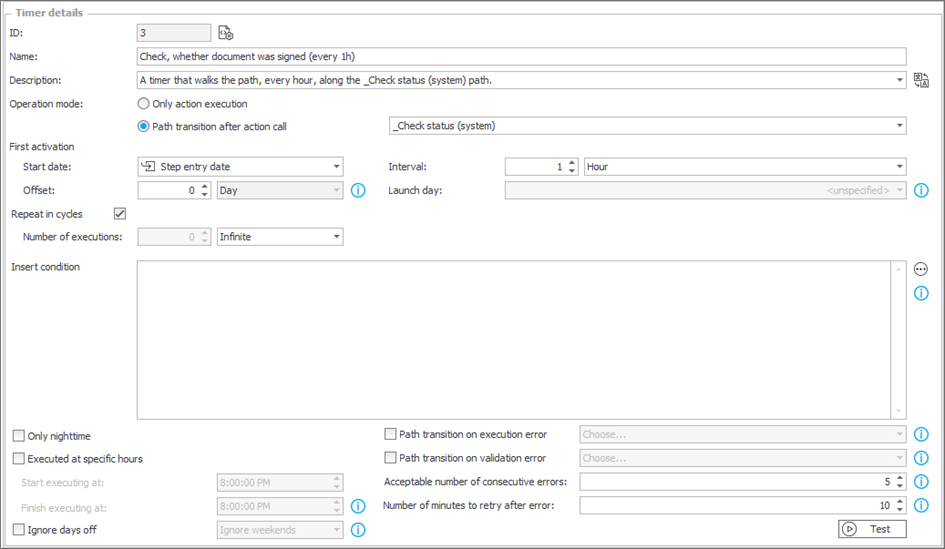
Fig. 23. Timer function configuration
Set the operation mode to Path transition after action call. If no action is defined, the timer function will attempt to move the document to the next step every hour.
After the action is successfully performed, the value COMPLETED appears in the Signature Status from Autenti field, indicating that the signature process has been completed and all participants have signed the document. As a result, the item is forwarded to the final step, and the signed document is saved in the Signed category.
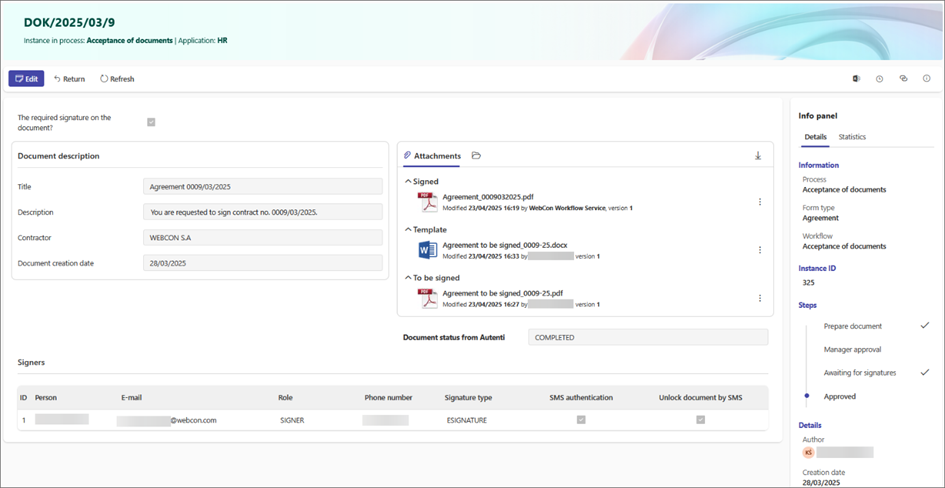
Fig. 24. Element at the final step
Conclusion
The workflow described above serves as a sample implementation of the WEBCON BPS add-on for integration with Autenti.
The source code for all add-ons is available on the official GitHub repository: https://github.com/WEBCON-BPS and is released under the MIT License.
+48 12 443 13 90