Timers in WEBCON BPS
Applies to version: 2025 R1 and above, author: Tomasz Batko, Krystyna Gawryał
Related documentation
A detailed description of the functionalities mentioned herein and their configuration can be found in the following section of the WEBCON BPS Help:
Introduction
Timers are elements that allow you to define the frequency with which the associated actions are performed. Thanks to them, it is possible to define the start time and the possible repetition cycle of such actions.
In WEBCON BPS 2025 R1, numerous changes and improvements have been made to the operation of Timers (previously known as Timeouts). This article describes these changes to the timer configuration and gives examples of how to calculate their start dates.
Configuration changes
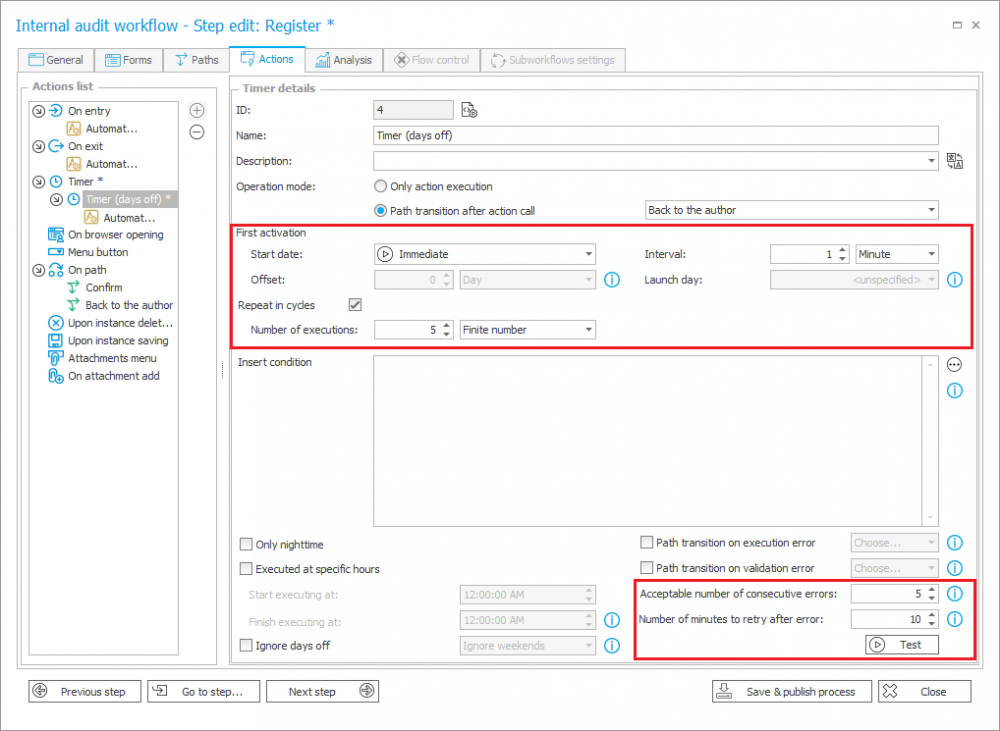
In addition to the updated naming in the system, the changes that Timers have undergone in version 2025 R1 include the expansion and customization of the Timer details configuration window. The various options have been divided into sections: First activation and Repeat in cycles, making timer configuration more intuitive.

It is now possible to define timer parameters so that the first start of the timer (Start date) occurs Immediately after a step is entered, and next timers are executed at a specified Interval.
Another important change was the extension of the configuration associated with the handling of validation/execution errors of timer-related actions. Two additional parameters have been introduced: Acceptable number of consecutive errors (defines the number of consecutive erroneous timer executions that will stop the timer-related actions) and Number of minutes to retry after error (defines the time after which the next timer execution will take place in case of an error).
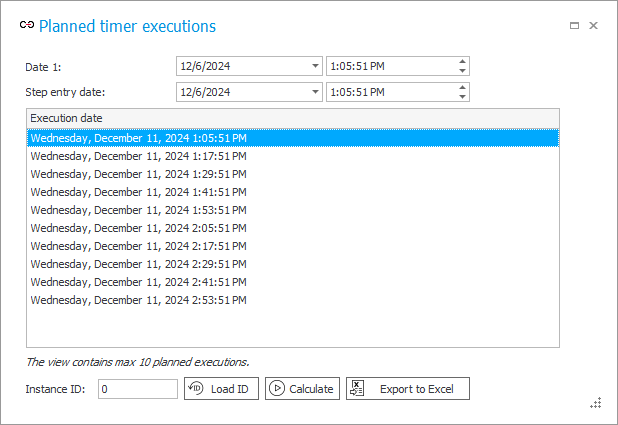
In addition, a Test button has been provided so that you can check (via an additional Planned timer executions window) the scheduled dates on which the timer will be executed.

In the window, you can set any value for a Date and time form field or Step entry date and, by selecting Calculate, you can get an exact list of the dates and times of the configured timer executions, which can then be exported to Excel. Regardless of the Number of timer executions specified, a maximum of 10 entries will be displayed in the window.
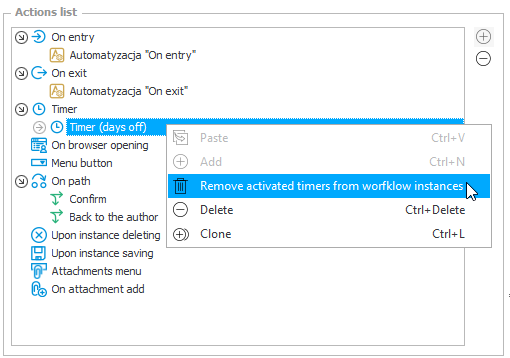
Additionally, it is now possible to remove activated timers from their related workflow instances.

Calculating timer start dates
A wide range of configuration options allows you to define timers whose execution and repetition will correlate exactly with the type of action and related tasks. The rules for calculating timer start dates are described below, with examples of configurations and their results.
Note: the examples presented in this article are for the calendar year 2024 (unless explicitly stated otherwise), but they are universal in nature.
Date of first timer execution
The date on which the timer calculation starts is set according to the following conditions (checked in the specified sequence):
- If the timer is started on a specific date, the date of its first start is the first scheduled activation (calculated from the timer definition) after the Start date and the current date.
- If the Start date contains a reference to the value of a Date and time form field, the first activation date is the value obtained from the form field. If the form field date is a past date, the first activation of the timer is immediate. A timer activation occurs at the start of the cycle.
- If an Offset is defined for the timer, the date of the first activation of the timer will be the start date with the added offset (expressed in days). If the Start date is taken from a form field, it is possible to set a negative Offset. It should be noted that the offset only applies to the first activation of the timer and its subsequent executions strictly follow the Interval set.
- If the Start date is the Step entry date and no Offset is defined, the date of the first timer activation is the first scheduled activation after the start of the cycle, calculated based on the defined Interval. The timer will not be activated on the cycle start date.
- If Immediately is selected for the Start date, the first activation of the timer will occur when the workflow instance enters the step.
Examples
Execution based on the form field date:
Start date: May 1; Current date: May 8; Interval: 5 days;
Timer dates: May 1; May 11; May 16
May 1 is the first scheduled date; the timer will actually be started on May 8 (as soon as it is created)
Execution based on the step entry date:
Start date: May 1; Current date: May 1; Interval: 5 days;
Timer dates: May 6; May 11; May 16
Start date: May 1; Current date: May 8; Interval: 5 days;
Timer dates: May 11; May 16; May 21
Ignore weekends
TYPE: MINUTE, HOUR, DAY
A week is assumed to have 5 (working) days. If the Start date falls on a weekend, it will be moved to the following Monday.
Examples
Execution based on the form field date:
Start date: November 2 (Saturday); Current date: November 4 (Monday); Interval: 5 days;
Ignore weekends: on
Timer dates: November 4 (Monday); November 11 (Monday); November 18 (Monday)
Execution based on the step entry date:
Start date: November 2 (Saturday); Current date: November 4 (Monday); Interval: 5 days;
Ignore weekends: on
Timer dates: November 11 (Monday); November 18 (Monday); November 25 (Monday)
Start date: November 2 (Saturday); Current date: November 2 (Saturday); Interval: 5 days;
Ignore weekends: on
Timer dates: November 4 (Monday); November 11 (Monday); November 18 (Monday)
Start date: July 1 (Monday); Current date: July 1 (Monday); Interval: 7 days;
Ignore weekends: on
Timer dates: July 10 (Wednesday), July 19 (Friday), July 30 (Tuesday), August 8 (Thursday), August 19 (Monday)
TYPE: WEEK, MONTH
If the start date falls on a weekend, it will be moved to the following Monday.
Examples
Start date: November 2 (Saturday); Current date: November 6 (Monday); Interval: 1 week;
Ignore weekends: on
Timer dates: November 11 (Monday); November 18 (Monday); November 25 (Monday)
Start date: July 1 (Monday); Current date: July 1 (Monday); Interval: 1 week;
Ignore weekends: on
Timer dates: July 8 (Monday); July 15 (Monday); July 22 (Monday)
Setting a specific launch day (applies to the week and month types)
Setting the Launch day condition causes the timer activation date to be the first day in sequence after the Start date that meets this condition.
Examples
Start date: June 1 (Saturday); Current date: June 1 (Saturday); Interval: 1 week;
Launch day: Monday
Timer dates: June 3 (Monday), June 10 (Monday), June 17 (Monday)
Start date: June 1 (Saturday); Current date: June 3 (Monday); Interval: 1 week;
Launch day: Monday
Timer dates: June 10 (Monday); June 17 (Monday), June 24 (Monday)
Start date: January 1, 2025; Current date: January 1, 2025; Interval: 1 moth;
Launch day: 31
Timer dates: January 31, February 28, March 31
If Launch day is selected and the Ignore weekends option is checked, the first day that is not a weekend day will be set as the next timer execution date.
Examples
Start date: January 1, 2025 (Wednesday); Current date: January 1, 2025 (Wednesday); Interval: 1 moth;
Launch day: 26
Ignore weekends: on
Timer dates: January 27 (Monday), February 26 (Wednesday), March 26 (Wednesday)
Start date: June 1 (Saturday); Current date: June 1 (Saturday); Interval: 1 week;
Launch day: Sunday
Ignore weekends: on
Timer dates: June 3 (Monday), June 10 (Monday), June 17 (Monday)
Offsetting timer activation
Setting the Offset value increases the timer start date by the specified number of days.
Example
Start date: March 1, 2025; Current date: March 1, 2025; Interval: 1 moth;
Offset: 7 days
Timer dates: March 8, April 8, May 8
If the option to ignore weekends, is selected then the Offset value is calculated taking into account only working days.
Example
Start date: March 1, 2025 (Saturday); Current date: March 1, 2025 (Saturday); Interval: 1 moth
Offset: 7 days
Ignore weekends: on
Timer dates: March 1 (Tuesday); April 8 (Tuesday); May 8 (Thursday)
If the Start date is taken from a Date and time form field, it is possible to set a negative Offset.
Example
Start date: March 10, 2025; Current date: March 10, 2025; Interval: 3 days
Offset: -5 days
Timer dates: March 5, March 8, March 11
Execution at specific hours
TYPE: MINUTE, HOUR
A day is considered to be as many hours as the timer activation period is defined for. If the timer activation time is outside these hours, it will be postponed to the next such period.
Examples
Timer activation hours: 10:00 AM – 3:00 PM, execution based on the form field date
Start date: May 1, 2025, 8:30 AM; Current date: May 1, 2025, 9:00 AM; Interval: 3 hours
Timer dates: May 1, 10:00 AM; May 1, 1:00 PM; May 2, 11:00 AM
Timer activation hours: 10:00 AM – 3:00 PM, execution based on the step entry date
Start date: May 1, 2025, 8:30 AM; Current date: May 1, 2025, 9:00 AM; Interval: 3 hours
Timer dates: May 1, 1:00 PM; May 2, 11:00 AM; May 2, 2:00 PM
TYPE: DAY, WEEK, MONTH
If the timer activation date is outside the defined timer activation times, it will be moved to the next initial timer execution time:
Examples
Timer activation hours: 10:00 AM – 3:00 PM, execution based on the form field date
Start date: May 1, 2025, 4:00 PM; Current date: May 1, 2025, 4:00 PM; Interval: 2 days
Timer dates: May 2, 10:00 AM; May 4, 10:00 AM; May 6, 10:00 AM
Timer activation hours: 10:00 AM – 3:00 PM, execution based on the step entry date
Start date: May 1, 2025, 4:00 PM; Current date: May 1, 2025, 4:00 PM; Interval: 2 days
Timer dates: May 4, 10:00 AM; May 6, 10:00 AM; May 8, 10:00 AM
Summary
Timers are a tool that highly automates business processes implemented using WEBCON BPS. The date and time at which a timer is activated and re-executed can seem difficult to predict. However, in order to take full advantage of this functionality, it is essential to understand the principles on which these values are calculated. The premise of the changes introduced in version 2025 R1 was to make this process easier for the user, and the additional options for testing timers and their scheduled activation are a guarantee of success in this regard.

