Updating WEBCON BPS Search Server in version 2024 (Apache Solr 9.6)
Applies to version: 2024.1 and above; author: Marcin Kapusta
Introduction
In WEBCON BPS 2024 R1, the Search Server component uses a new version of the Apache Solr index to search for data – 9.6.0.
Because of this, updating WEBCON BPS will require additional steps. Most of these steps will be carried out automatically by the installer, nonetheless, some will need to be handled manually by the admin performing the update.
This article contains a list of additional steps, along with instructions on how to carry them out. It also contains information on which steps are automatic, and which need manual intervention.
Step I – Installing and configuring Java on the environment where WEBCON BPS Search Server is installed
WEBCON BPS Search Server uses Apache Solr text search index. This application requires Java to work.
In version 2023 R3 and others, Java was delivered as part of the WEBCON BPS Search Server package. Starting with 2024 R1, WEBCON BPS Search Server no longer contains Java. It is a required prerequisite on the operating system where Search Server will be installed.
Such an approach allows the admin to update Java to the newest version (e.g. because of security updates) without needing to update WEBCON BPS.
Carried out by: environment admin
Step II – Backup copy of user activities
During the Apache Solr update, all indexes will be removed. Data from workflows, navigation, and change requests will be indexed again. However, the recent activities for users will not be reindexed – because this data only exists in the Solr index in the first place.
Because of this, before updating Apache Solr, a backup copy of users’ activities from the last 30 days must be created.
During the update to 2024 R1, the installer will create such a backup copy before updating components, and will save it in the form of csv files in a specified directory.
Carried out by: installer
Step III – Updating Search Server component – deleting Solr indexes and installing new Solr engine instance
When updating WEBCON BPS Search Server, the installer removes the current version of Apache Solr including all indexes, and installs a new version of Apache Solr with empty indexes.
Carried out by: installer (in certain cases by the admin)
Step IV – Importing user activities from the backup copy
After updating WEBCON BPS Search Server and launching Apache Solr, the installer will import activities from the backup copy. This will happen automatically, provided the backup copy was created on the same environment and there is access to it.
After completing the installation and activating the system correctly, the backup copy file may be deleted.
If system components were installed on many machines, the import may require admin intervention – there is guide later in this article.
Carried out by: installer (in certain cases by the admin)
Step V – Indexing search data
After updating all system components, and updating the databases to version 2024 R1, the following things will all be added automatically to the indexing queue: all workflow instances, attachments, navigation elements, and change requests.
This will happen automatically and parallel to other WEBCON BPS WorkFlow Service activity.
Instructions for specific steps
Here are additional guides for individual steps of the installation.
Step I - Installing and configuring Java on the WEBCON BPS Search Server environment
For environments that do not yet have Java, it is best to install Java from OpenJDK distribution.
It is available under Open Source license.
As of publishing this article, the newest version of OpenJDK can be found here: https://jdk.java.net/22/
The installation involves downloading the Windows 64 version of the pack, and extracting it to the chosen directory.
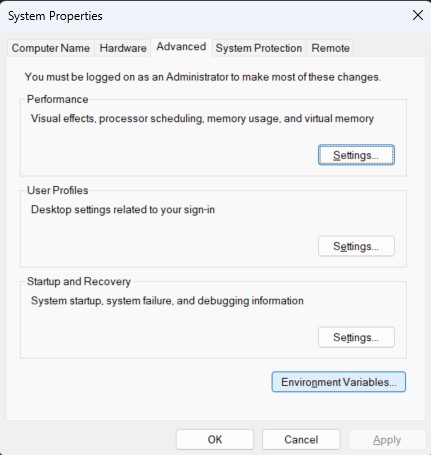
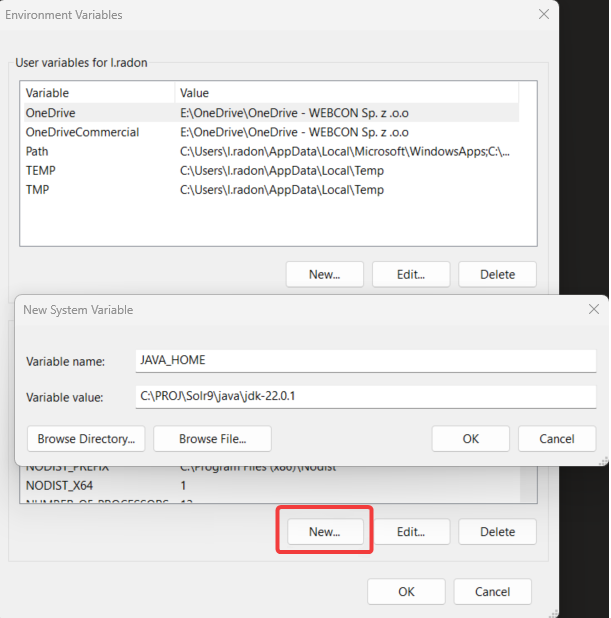
Next, it is necessary to add a JAVA_HOME environmental variable to the system , which points to the main directory containing Java (it must contain bi and lib folders). For example, for OpenJDK 22.0.1 the default path is:
C:PROJjavajdk-22.0.1
The option is found under:
Edit system environment variables -> Environment variables -> System variables -> New


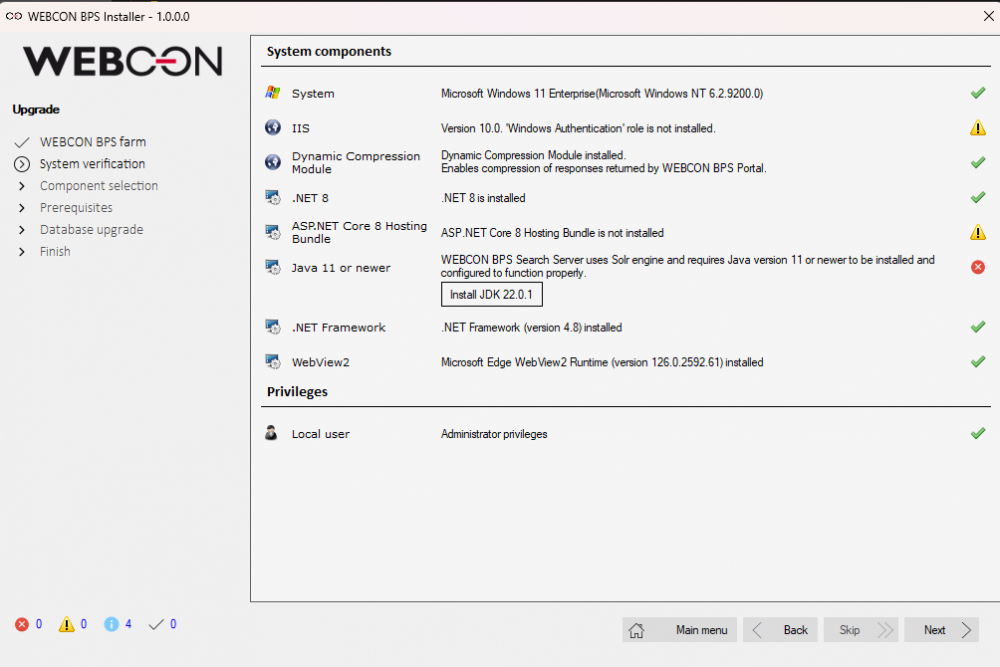
In the installer, during system verification, it is also possible to install Java.

Steps II, III, and IV – Updating WEBCON BPS and creating a backup copy, then restoring the backup after the update.
Before beginning to update WEBCON BPS to version 2024 R1, identify which of the three installation variants is on your environment – and then proceed according to the relevant guide.
Variant 1 – All components on one machine
All basic server components of the WEBCON BPS system:
- WEBCON BPS WorkFlow Service,
- WEBCON BPS Portal,
- WEBCON BPS Search Server
Have been installed on the same machine via WEBCON BPS installer (in a previous version).
When these three components are installed on the same machine (Designer Studio and the database can be separate) the installation process is simplified.
Launch the installer on the machine where the components are located, and simply go through the suggested steps. All steps of the installer will be carried out automatically and do not require additional tools.
Note: An automatic update is guaranteed when updating from version 2023.x or 2022.x. When updating from an earlier version, update to 2023.x or 2022.x first, and then to 2024.1.
Variant 2 – Components on different machines
At least one of the basic server components of the WEBCON BPS system:
- WEBCON BPS WorkFlow Service,
- WEBCON BPS Portal,
- WEBCON BPS Search Server
Has been installed on a different machine than the others. All components are installed with a WEBCON BPS installer.
In such a case, it is not important whether only one component is on a separate machine, or all components are distributed in any combination. The important thing is, that the installer will need to be launched on each separate machine to update all components.
The procedure for this variant is as follows:
- Stop all WEBCON BPS WorkFlow Services
- Update the WEBCON BPS Search Server as the first. Update any other components on the same machine. Update the database.
- Update remaining components in any order on the other machines.
- Start all WEBCON BPS WorkFlow Services
If done correctly, all additional steps related to Apache Solr will be carried out automatically at the time when WEBCON BPS Search Server is being updated.
Note: An automatic update is guaranteed when updating from version 2023.x or 2022.x. When updating from an earlier version, update to 2023.x or 2022.x first, and then to 2024.1.
Variant 3 – Search Server in a container or externally
The installation of WEBCON BPS is based on Docker containers and WEBCON BPS Search Server is installed in a container OR the installation does not use WEBCON BPS Search Server, and the search indexes are installed on a external instance of Apache Solr.
In this scenario, the update of WEBCON BPS Search Server (and by extension, Apache Solr) will not be done via installer.
The installation procedure for this variant includes these steps:
- When first launching the WEBCON BPS 2024.1 installer, before updating any component or the database, a prerequisite will be launched that will create a backup copy of the users’ activities from the Apache Solr index.
- After this backup copy is created, the search indexes (stored in a Docker container or dedicated Apache Solr installation) will no longer be needed.
Prepare the Docker container dedicated for WEBCON BPS Search Server in version 2024.1 or prepare an individual installation of Apache Solr in version 9.6. Next, create WEBCON BPS search indexes in them according to the template provided with the installer. - After updating the databases, in the WEBCON BPS installer on the Search Server configuration step, provide the web address and the user credentials that will be used for communication with the indexes prepared in step 2.
- After updating all components of the WEBCON BPS system and starting the environment, finish off by importing the backup copy of the user activities created before the update.
To assist with the import, use the console tool SolrActivitiesMigrationCli.exe found in the Tools folder of the installer.

