Item list - actions
Applies to version: 2020.3.x and above; author: Józef Cyran
Introduction
The item list is frequently used to store any number of data rows as opposed to other form fields. This functionality makes the actions executed on the item list differ from the standard form field configuration.
Business case: Personnel planning for a project
This article describes the operation of the item list and the configuration of various actions related to them based on the Personnel planning bpm workflow.
The application consists of two processes: the dictionary process (with two steps and used to store the document templates) and the main “Personnel planning” process. This process allows you to define the demand for human resources and assign the specific employees to the project with an automatic valuation and generation of the relevant documents.
The Project manager indicates the project name and the demand for employees from each of the departments – Development, Marketing, and Testing. Then the form is sent to the heads of individual departments – only if the employees from a given department are needed. The final step is assigned back to the Project manager who can review and modify the employee list, generate an Excel file and prepare demand in the Word file.
Fig. 1. The workflow diagram
On the workflow there are three intermediate steps – they direct the form to each department from which the employees are needed.
The table describes the form fields used in the process:
| Form field | Type of form field |
| Project name | Text field |
| Total cost | Floating-point number (technical form field used to generate a Word file) |
| Demand in person-months -> development | Floating-point number |
| Demand in person-months -> testing | Floating-point number |
| Demand in person-months -> marketing | Floating-point number |
| Personnel | Item list with columns as in Fig.2 |
| Personnel -> development | Item list identical to Personnel but with a filter on the data source and visibility only in the delegation step from the Development department |
| Personnel -> marketing | As in the Development department |
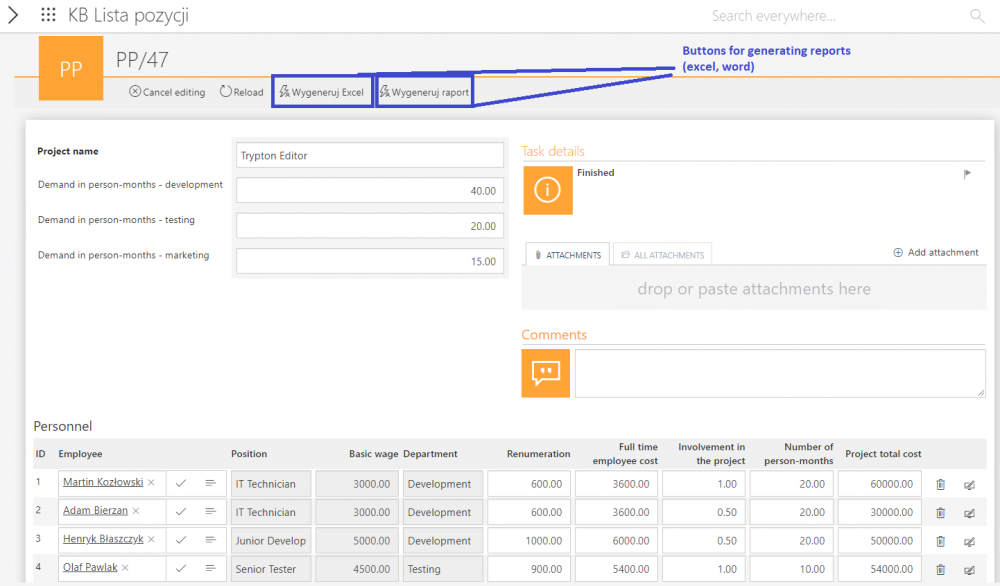
| Personnel -> testing | As in the Development department |
As a data source, a specially prepared table with employees, their departments and salaries has been used. In WEBCON BPS the standard data source about employees is AD or CacheOrganizationStructure – but in this case, the data source with employees is not used to assign tasks because these have been assigned to the department and project managers.
For more information, see Task assignment - business rules.
The use of postbacks and form rules is one method of implementing the automatic column completion based on others. You can use the floating-point number as a form field.
Fig. 2. The conversation factor is 0.2 of the renumeration value, but the manager can modify this value based on the variable tax law and their interpretations
One of the useful functionality is the “Show summary in column footer” option.
Fig. 3. The configuration of the "Project total cost" column
You can use a validation action to make sure that the correct number of months has been entered by the person filling out the form. WEBCON BPS has a built-in check sum function (and copying the sum to a form field – you do not need to use this function). In the item list configuration select the “Totals control” tab, add a row and fill in the checked column, the field with the expected value and actions to be executed.
Fig. 4. The sum column control verifies if the sum has the appropriate value. Copying allows you to enter sum of the selected column entered in Field
Fig. 5. The possible actions
The “Verification only” action means that the user can go through the path only if the sum is equal to the value of the form field entered in Field. Suggestions mean that when adding a new row of the item list, the value will be automatically filled in so that the sum is equal to the value from the form field entered in the Field.
As the project manager decides about the division of person-months between employees, there is no need for suggestions – so you should select the “Verification only” option. We selected the “Number of person-months” as the calculated column as the column and compared them to the “Demand in person-months – development” form field.
Fig. 6. The message displaying when the sum from the “Number of person-months” column does not match the value from the “Demand in person-months – development” form field
Actions
After the correct configuration, create the necessary actions.
The first action is “Adding employees to the project”. People put on the “Personnel – development” list and selected by the manager will be added to the “Personnel” item list. This list includes all delegated employees, and only the project manager will have access and the ability of editing them at the last step.
Fig. 7. The "Chenge items list values" action
The item list can be modified in three ways:
Fig. 8. Change of the item list value
Selecting the “Add new values” option allows you to keep the existing values and add new rows. The “Update values” option allows you to modify the selected columns for the selected rows, The last “Replace values” option is used to clear the entire list and add those that you want to select with a query.
The best option will be “Add new values”. Each department adds people from their item list (Personnel – development) to the main “Personnel” list.
Fig. 9. Change items list values
The column names on the left are the source columns, data will be copied from the “Personnel development” list. On the right are the column names of the target item list – Personnel.
The column names for data returned by a query must be identical to the column names of the item list in which the data is to go. The source column names point to the source data, so their name may not necessarily be the same.
The “Unique value” column is used as the key of the returned table and must be different for each row. This value can be the “Employee” column because it is the choice field and also contains the ID. An example value in the “Employee” column:
9#Marcelina Kowalska
The data source of each item list in this process is JC_Employees where the ID is different for each employee. Thus, may be two Marcelina Kowalska, but they will be stored in the database e.g. as:
9#Marcelina Kowalska
4#MarcelinaKowalska
At the last step, three actions have been created – one that completes the “Total amount” field value and two actions for generating an Excel document.
Excel document generating
The action of generating an Excel file allows you to assign a form field to the cell or item list to the table in the template. The good option is to create the dictionary processes – for more information, see Dictionary processes.
Fig. 10. Attachement section
The SQL query returns the attachment ID because the attachment versions are stored in the database. You must select the current one –for this, add TOP 1 and ORDER BY ATT_TSUUpdate DESC. ATT_WFDID is the instance ID where is the template is located i.e. it is the ID of the only instance in the created template workflow – you find them using Subquery and filtering only the Templates type instances. Since two templates are stored (one for excel and one for docx) a constraint is put to only select those which have the correct name: Att_Name = ‘Personel.xlsx’.
Fig. 11. Mapping the "Personel" item list
In the case of the item list, assigning values from columns to the columns in the target table is automatic – column names in the Excel table must be identical to the column names of the item list used as the source.
The Excel file:
Fig. 12. Personnel.xlsx file used as a template
Fig. 13. The Excel file
Word document generating is similar to Excel with the difference that instead of mapping form fields to the cells (or item list to the table), in MS Word by using the add-in insert the placeholders for form fields or item lists. For more information, see WEBCON BPS add-in for MS Word.
Fig. 14. Personnel - template
In the configuration window, select the form fields which you want to display. Check the Summary row in the appropriate column –“ Project cost”.
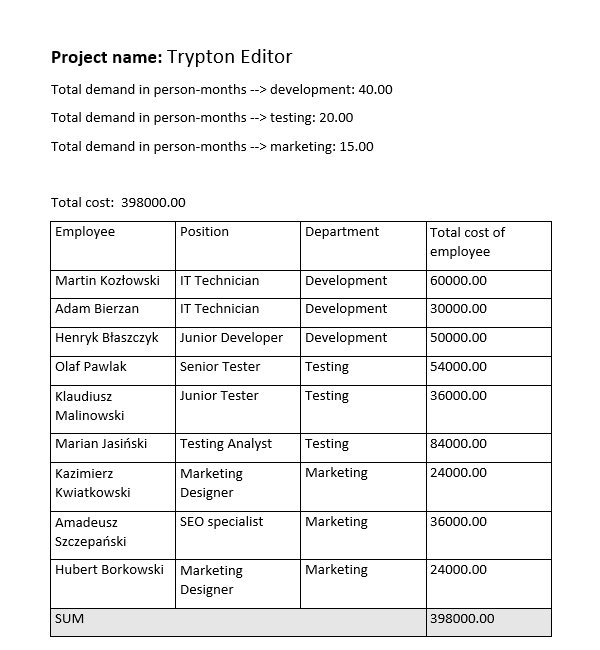
Insert the table using the WEBCON BPS add-in. After generating the document, the table will be completed with as many lines as are included in the “Personnel” list.
Fig. 15. The example Word file generated with the project personnel
Initialization
There is also the ability of automatic initialization of the item list. It can be used in two ways – by manually entering the values with it will be completed or by assigning the columns of the returned table to the item list columns. It works in the same way as with the action described above.
The configuration of the item list has the “Initialization” tab where you can select the method of initialization (static or SQL) and decide whether initialization should be performed only at the start step or at each step except at the end.
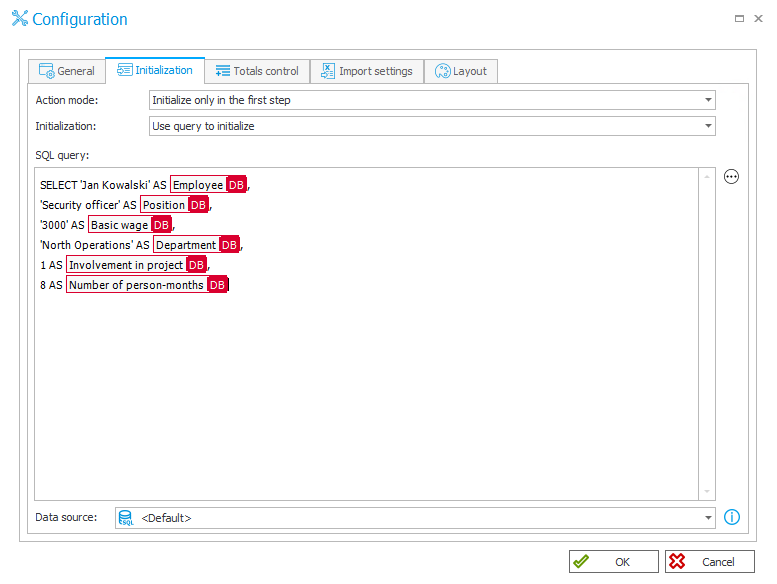
Fig. 16. The initialization process
Fig. 17. Configuration of the initialization
After selecting the SQL initialization, remember that the column names of the returned query are the same as the column names of the item list.
Static initialization is a good solution where the data to be loaded is known and constant. If you need to load data dynamically, select the SQL setting and properly create a query, and the data source (optionally). Loading the data source other than default one takes time when loading the page so it is better to use the default source where possible.
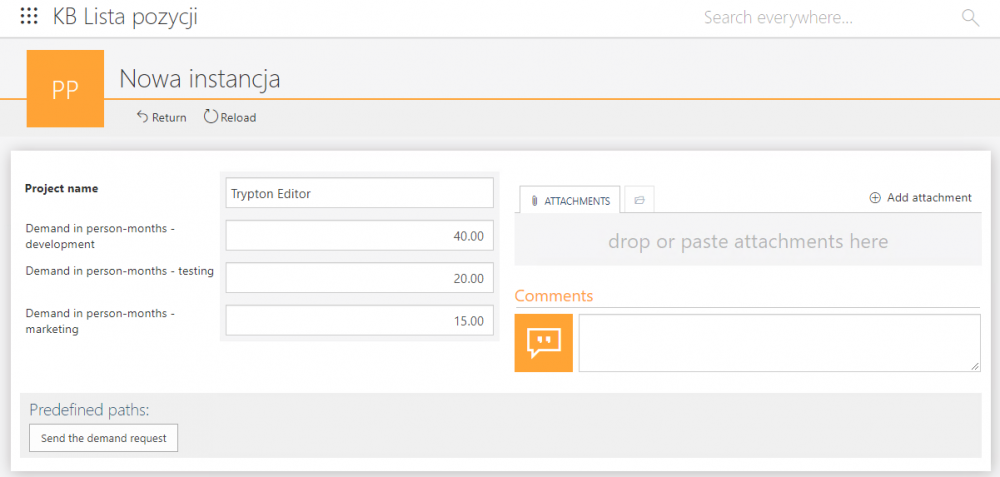
Fig. 18. The "Demand in person-months" step
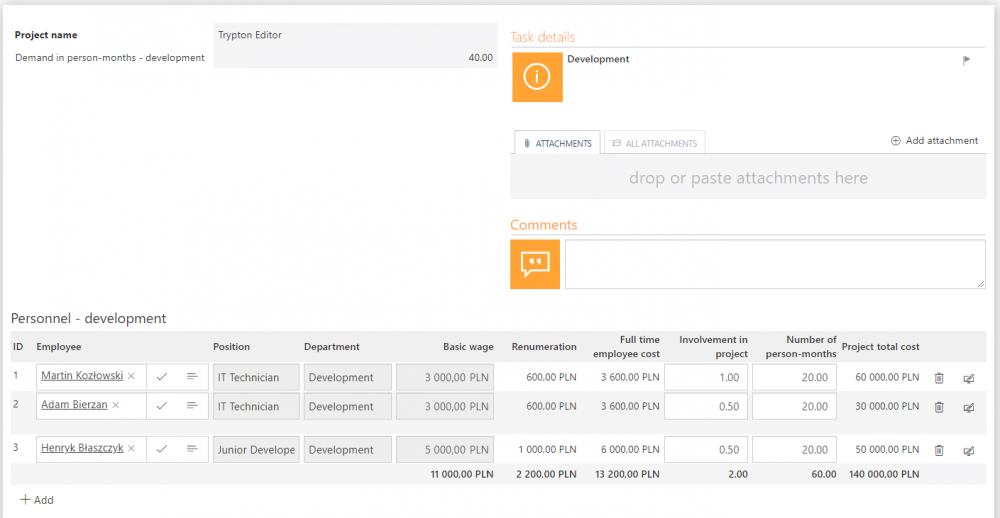
Fig. 19. The "Development" step where the department manager completes the employee list
Fig. 20. The "Final" step where the project manager can review and modify the list of employees and generate documents


