Creating a SharePoint site with a WEBCON BPS action
Applies to version 2020.1.3; author: Michał Kastelik
This article shows you how to automatically create a new SharePoint site with just one click from a WEBCON BPS form. If you want to learn about other out-of-the-box actions that use your SharePoint content in WEBCON BPS, go here.
We will show the configuration on a free WEBCON application that you can download from here: Investments (webcon.com)
Defining the connection
Before starting the action configuration, you must create a connection to the existing SharePoint collection. Connections to SharePoint Online and On-Premises versions from SharePoint 2013 to 2019 are supported.
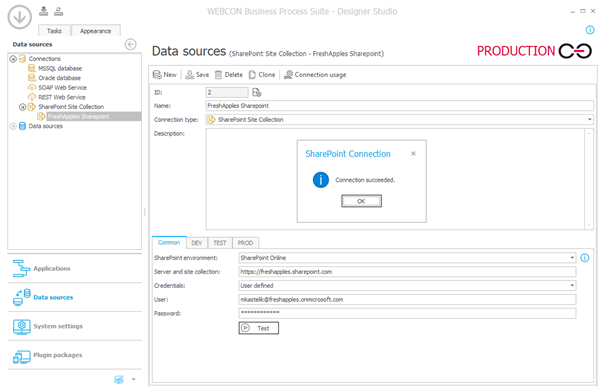
After starting the "Data Sources" module in Designer Studio, expand the Connections tree and go to "Connections to SharePoint" and then create a new connection.
In the configuration window, enter the name of the connection that will be visible in the configuration in the "Name" field. In the settings at the bottom of the window, select:
- SharePoint environment - version of the environment to which we want to create a connection, in the described case it is the "SharePoint Online" environment,
- Server and site collection name - enter the full address of the site collection in this field,
- User / Password - name and password of the user who has the privilege to connect and perform actions, e.g. creating a website
After pressing the "Test" button, the system will check the entered data and establish a connection. Once the configuration is correct, a message will appear as in the screenshot above.
Creating a SharePoint site with an action
After creating the connection to SharePoint, we can start the action configuration. In the described process, we will define action on entry to the step "Investment in progress". It will create a new SharePoint site.
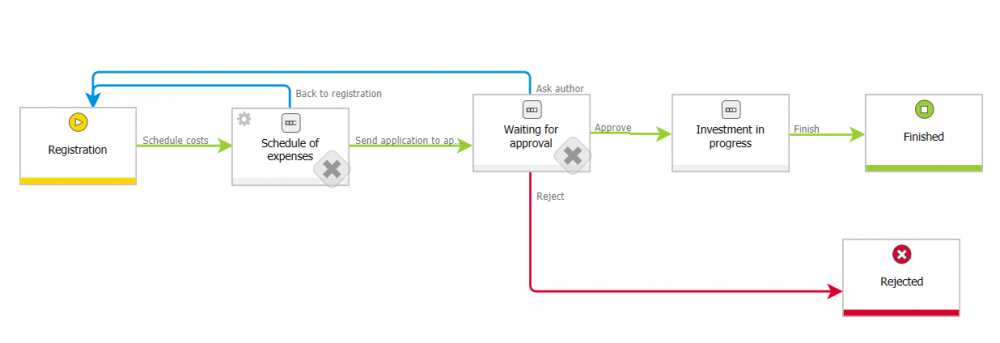
To do it, we will go to the Workflow with this step, right-click on the step’s name and select “Edit”. Now, we should open the “Actions” tab, look to the left where an “Actions list” is and choose “On entry”. To create a new action, right-click click on it and choose “Add” (or use the CTRL + N shortcut). Click on the new action and in the “Action type” on the right expand the folder “SharePoint content” and choose “Create a site” from it.
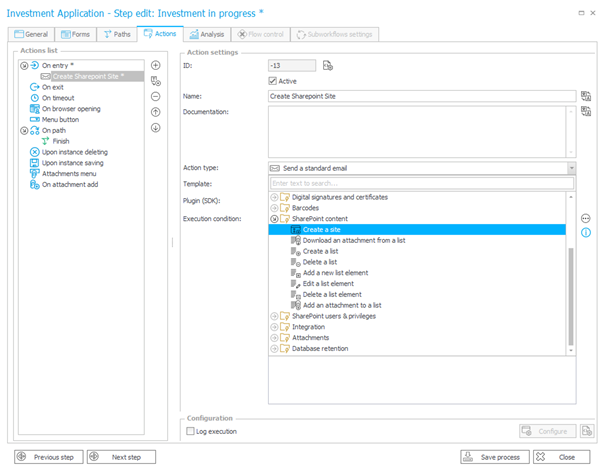
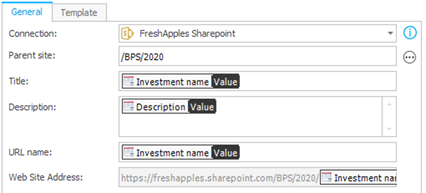
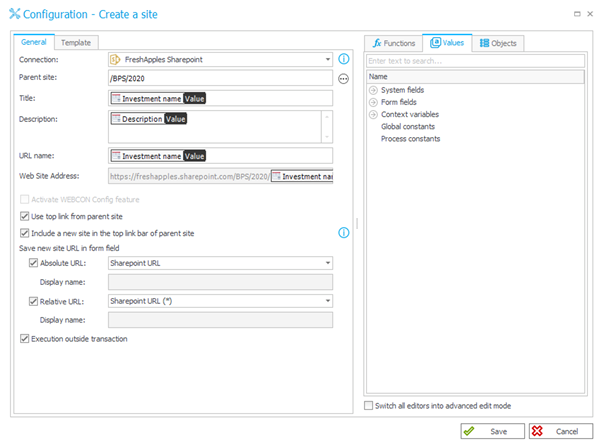
Now, press the "Configure" button at the right bottom of the window. In the “Connection” field, select the previously created SharePoint connection. In the “Parent site”, press three dots (...) next to it and choose the parent site. The action will create a subsite for it. Fill in the “Title” field with the name for the newly created subsite, and consider adding a site description in the “Description” field. In the “URL name” field, enter the name that should be displayed in the website address path.
Below you can see how we have filled in the values. We have used the values from the form to fill in the name, description, and URL name fields. If you want to do the same, click on a white space next to the field you want to fill in (e.g., next to the “Title”). Then, look to the right, click on the “Values” tab, open “Form fields” and find the form field you want to insert. Now, double-click on it and it will be added to the place you have indicated. After saving, the action that creates the SharePoint site is ready for use.
As you remember, this action is triggered on entry to the "Investment in progress" step. Because of that, the SharePoint subsite will be created when the investment is approved and the form goes to the “Investment in progress” step.
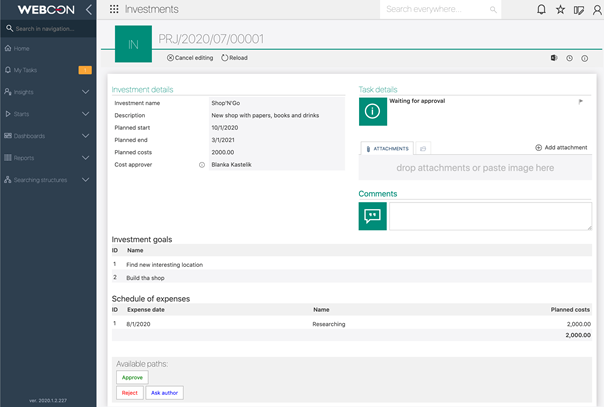
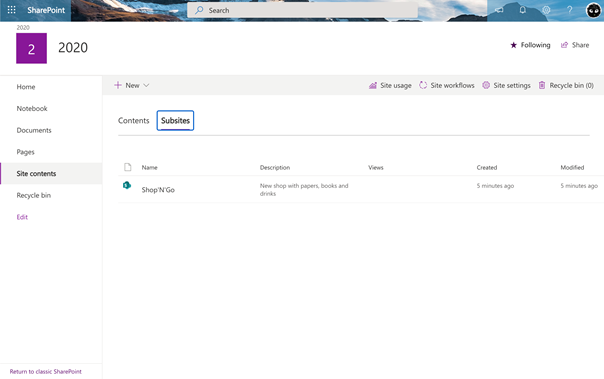
As you can see below, a SharePoint subsite was created and assigned to its parent site we have indicated before.
Continue reading to learn about additional options you may want to use when creating a SharePoint site.
Additional configuration options
Let us go back to the action configuration window (workflows => your chosen workflow => a step at which you add the action). Here, you can save the address of the newly created site in a workflow form field. To do so, tick the box next to an Absolute URL or Relative URL, and choose the form field in which you want to save the link.
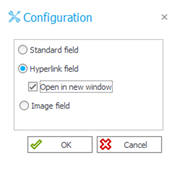
Please note that this form field type has to be set to “Single line of text”. Additionally, you have to open the “Advanced configuration” for this form field and tick “Hyperlink field” (you can also tick “Open in new window” below if you wish).
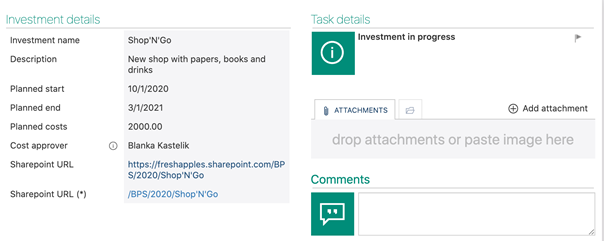
Now, we will explain other additional options you may want to use with the “Create a site” action.
- Activate WEBCON Config feature
When checked, WEBCON BPS functions will be automatically activated for the newly created site. Works in the SharePoint On-Premise environment. - Use top link from parent site
Checking this option copies the link bar from the parent site to the new site that you create. - Include a new site in the top link bar of parent site
Adds the new subsite to the parent site navigation bar. - Execution outside transaction - If you select this option, the action (creating a new SharePoint site) is executed independently of other actions that take place when the element goes to the next step. In other words, the site is created even if other actions are still being executed.
Site templates
In the action configuration window, you can click on the “Template” tab and define what template should be used when creating a new site. Use the “Static” option (checked by default), and choose the site’s language in “Language”. If it is the first time you use this option, press the refresh button (next to this field, on the right). Now, the available templates will be displayed in the drop-down list next to “Template”. Choose one.
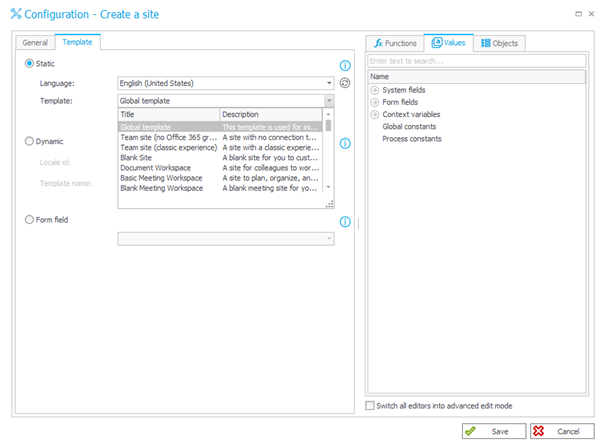
If you are an advanced user, you may want to check the “Dynamic” field to select the template dynamically. Another option is to check “Form field”; it will load the configuration directly from a form field on the form.
If you check the “Dynamic” option, you must manually enter the language identifier and the template name. The language identifier is the Windows culture identifier, e.g. 1045 (Polish culture). The site template name is entered in the format # # <TEMPLATE NAME> for templates added by the user.
If you check the “Form field” option to load the template for the site, the form field you select has to meet two conditions. Firstly, its “Field type” has to be set to “Choice field”. Secondly, its “Data source” should be the template you want to load. To find it, open the drop-down list next to the “Data source” field, expand “Templates” and indicate which template you want to use. This configuration allows the user to choose a site template directly from a WEBCON BPS form.
Summary
You can connect your SharePoint Online environment with WEBCON BPS to obtain a consistent and easy-to-use tool that will allow you to create and expand your business applications. You will need to define the connection only once, and after that you can use WEBCON BPS out-of-the-box actions to quickly achieve your goals.
For example, you can set up new sites or create, edit and delete SharePoint lists and its elements. You can also download attachments from the list or manage user privileges using one of the predefined actions in the "SharePoint user & privileges" actions group. To learn about all those features, go here.
If you check the “Form field” option to load the template for the site, the form field you select has to meet two conditions. Firstly, its “Field type” has to be set to “Choice field”. Secondly, its “Data source” should be the template you want to load. To find it, open the drop-down list next to the “Data source” field, expand “Templates” and indicate which template you want to use. This configuration allows the user to choose a site template directly from a WEBCON BPS form. You can connect your SharePoint Online environment with WEBCON BPS to obtain a consistent and easy-to-use tool that will allow you to create and expand your business applications. You will need to define the connection only once, and after that you can use WEBCON BPS out-of-the-box actions to quickly achieve your goals. For example, you can set up new sites or create, edit and delete SharePoint lists and its elements. You can also download attachments from the list or manage user privileges using one of the predefined actions in the "SharePoint user & privileges" actions group. To learn about all those features, go here: [LINK TO Using SharePoint Online content in WEBCON BPS] [GS1]Szerpła zawsze majkrosoftową pisownią: SharePoint

