From prototype to production-deployed application: Edit mode in WEBCON BPS Portal
Applies to version: 2023.1.x and above; author: Krystyna Gawryał
Introduction
WEBCON BPS has been expanded to include the so-called Edit mode which allows users to view the configuration of processes and edit them in Portal. This feature is dedicated especially to business users who carry out their daily tasks using ready-made applications/processes, often without being able to view their configuration data.
The present article describes the new feature from the point of view of such a business user. The following will cover the full life cycle of an application in a company – from prototyping in WEBCON BPS Designer Desk, through development in WEBCON BPS Designer Studio, to using the final version after deployment in the production environment.
How it works – business case
Application prototype in WEBCON BPS Designer Desk
Person responsible for the implementation of a new process in an enterprise prepared the application prototype "Execution of Investment Projects" in WEBCON BPS Designer Desk. According to the design, this application is to be used by the Principal to complete documentation regarding various stages of investment, and to make adequate settlements.

Fig. 1a. Main panel of the application prototype in WEBCON BPS Designer Desk

Fig. 1b. Workflow design in Designer Desk

Fig. 1c. Form design in Designer Desk
After receiving approval from the superior, an employee generated the relevant documentation, and the application prototype was published in WEBCON BPS Designer Studio.
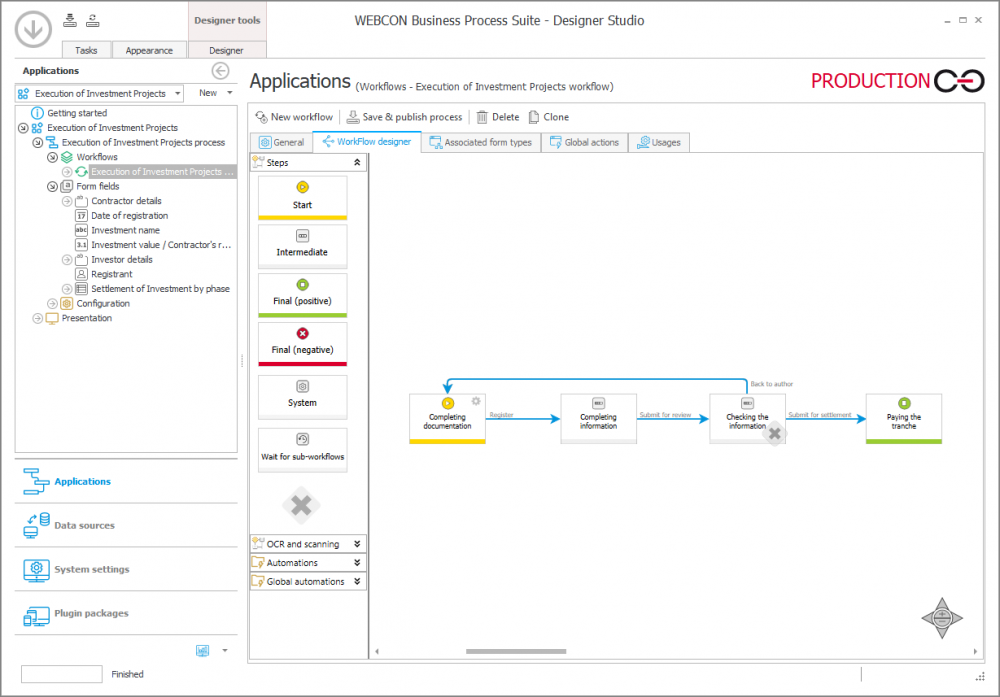
Fig. 2. The "Execution of Investment Projects" application just after being published to Designer Studio
Detailed information on application prototyping and publishing is available in the article WEBCON BPS Designer Desk.
Application development in WEBCON BPS Designer Studio
At this stage, the technical team implements the user's concepts, i.e. prepares the application for production deployment. In other words, developers extend the project by configuring actions, rules, form field visibility and requiredness settings, as well as default values and data sources for it, so as to turn it into a fully working application.
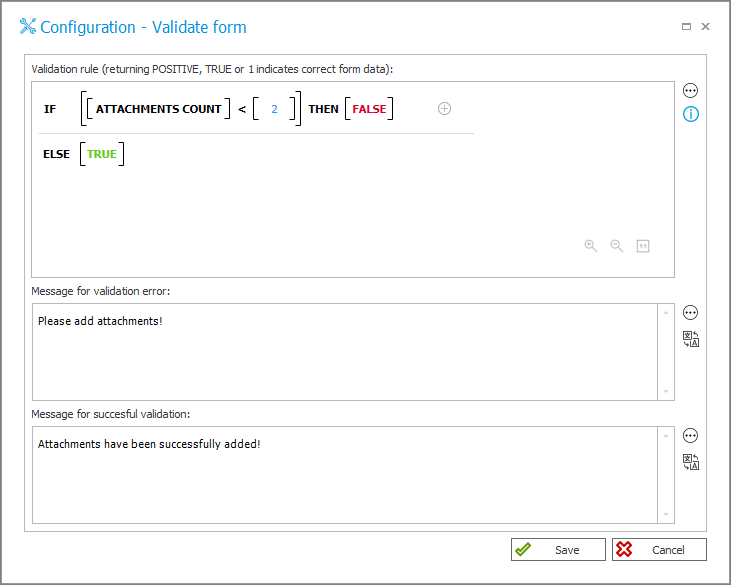
Fig. 3. Configuration of "Check if there is an attachment" action
in WEBCON BPS Designer Studio according to the provided prototype documentation
After performing all necessary tests, providing credentials, and granting privileges, the implementation team releases the application for use in the enterprise.
Using the application and Edit mode
While using the application, one of the employees carrying out tasks with it noticed some inaccuracies. They would like the application to be more user-friendly, which makes it necessary to introduce minor changes to the form, as well as to check the visibility of its fields on the matrix. In addition, they would like the task description in one of the steps to be more precise. Ultimately, the application is also to be used in DACHL countries, where the Principal conducts their business as well, therefore a German-language version of the form is required. All above changes to the process can be made by the employee themselves, using Edit mode in WEBCON BPS Portal.
- Enabling Edit mode
As long as the user has the appropriate privileges, after enabling Edit mode in Portal, they can to some extent change the configuration of the process they use. To do this, they should click on the icon right next to their profile picture and select Enable edit mode.
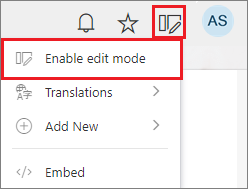
Fig. 4. Enabling Edit mode in Portal
The Processes node will then appear on the left-hand panel, where all processes within or related to the current application will be available, and the user can edit them based on their privileges.
Persons authorized to edit a process in Portal:
- global system administrator,
- application administrator, and
- a user who has been granted the privilege Designer Desk edit in Portal directly in the process configuration.
Expanding the node of a given process displays the workflows belonging to it. In the case of the "Execution of Investment Projects" application, one process and one workflow are available.
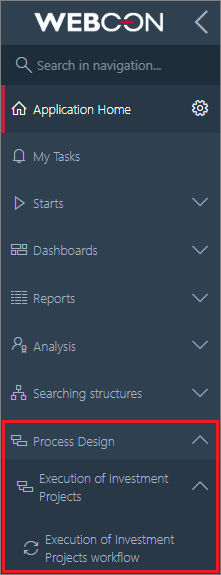
Fig. 5. Process Design node of the „Execution
of Investment Projects” application
After selecting a workflow, a component with the following three tabs appears: Form designer, Workflow designer, and Field matrix.
Designers are similar in appearance to those available in WEBCON BPS Designer Desk. In case the user does not have a personal license to access Designer Desk, all designers will open in read-only mode and the user will be prompted accordingly.
- Form designer
When starting the workflow, the Principal’s employee noticed an error on the form – the "Investment value" field coincides with the "Contractor's remuneration" field (see Fig. 1c.). Since the final value of the investment is not yet known, and the overriding purpose of the workflow is to collect information on the implementation of its individual stages and pay the due tranche to the Contractor, the employee would like this field to refer only to the Contractor's remuneration.
Accordingly, the employee would like to make the appropriate changes to the form. To do so, they should go to the Form designer tab and click on the desired field – a characteristic border will appear around the form field, and then it will be possible to change its name.
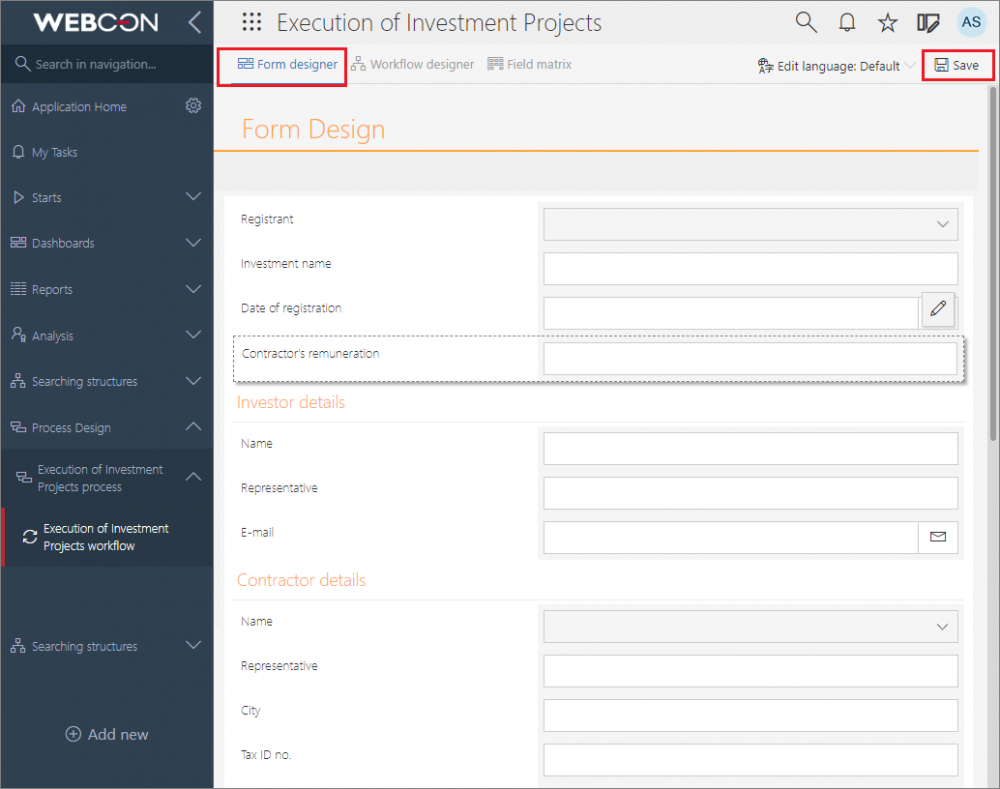
Fig. 6. Modified form field name in Form designer
After making the above changes, form configuration must be saved.
Clicking on the pencil icon will bring up the Properties window, where the user can edit descriptions of the form fields. Here, the user can also enter translations of form field and column names in the configured languages of the system.
The Principal would also like to have a German-language version of the form available. To prepare it, the employee should click on the Edit language: Default option on the top bar and select German (de-DE) from the drop-down menu. All form field names will be grayed out, and the user can enter German-language equivalents in their place.
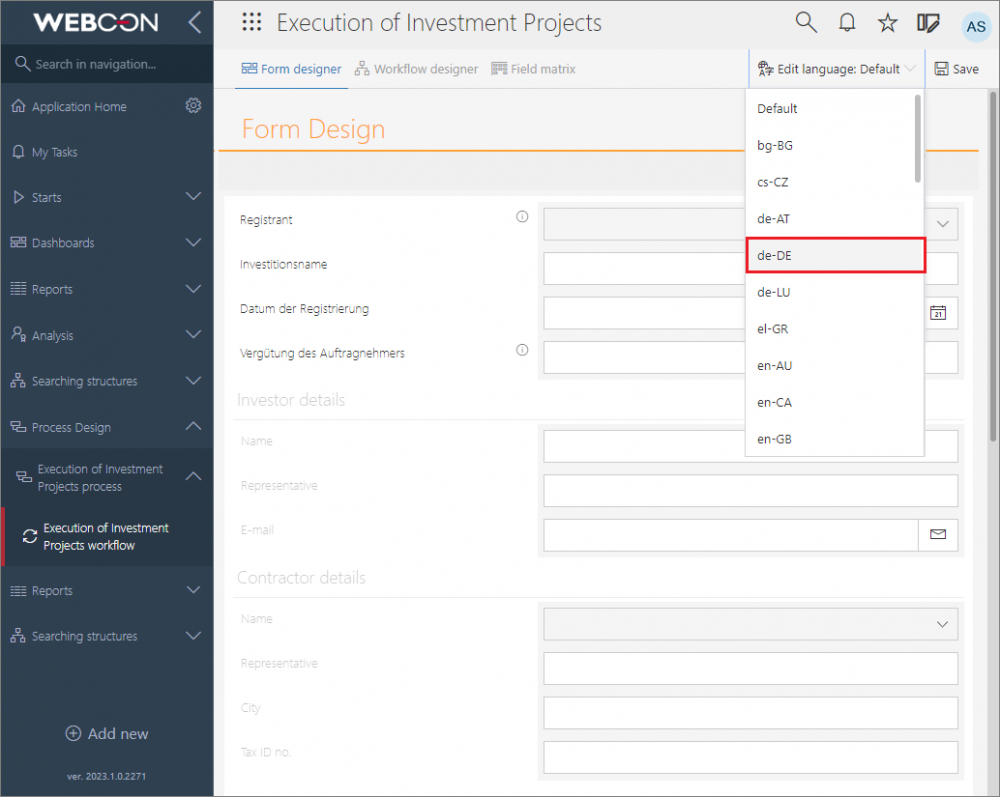
Fig. 7. Changing the language in Form designer
Editing translations of a given form field name is also possible in the Translations window displayed after clicking on the dedicated icon in the field properties.
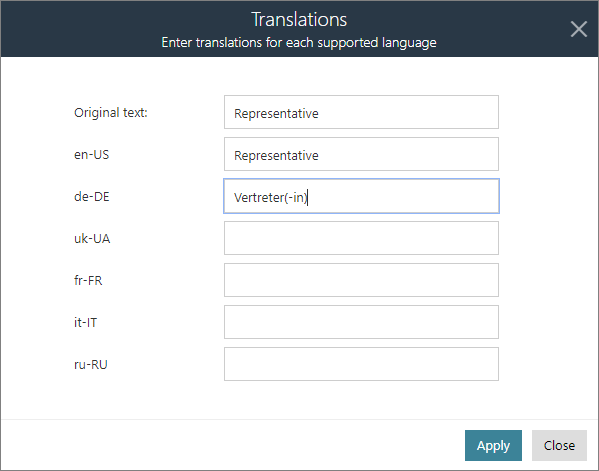
Fig. 8. Adding translations of form fields from properties level
After entering the translations of all form field names, saving the settings, and changing the language in the top menu, the form will be automatically displayed in the selected language.
If the user would like to see the configuration of the default value rules, rules executed when the value is changed, as well as visibility, editability, or requiredness rules, they should go to the form field Advanced settings. The content of this window varies depending on the type of form field / Item list column, and the information therein is available in read-only mode.
- Workflow designer
As mentioned earlier, employee would like to change the description of the "Checking the information" step so that it is more explicit and specifies exactly what task the user is to perform.
To make this change, they should go to the Workflow designer tab and click on the desired step. This will bring up the Properties window where the employee can freely change the descriptions of the available fields, including the name of the step.
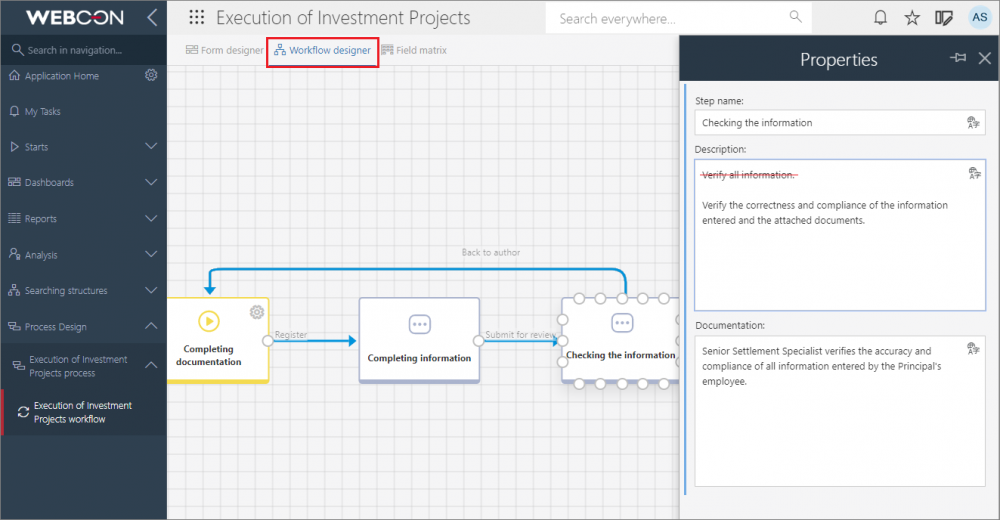
Fig. 9. Changing the description of a step in Workflow designer
After clicking on the Save button available in the upper right corner under the user's profile picture, the workflow configuration will be modified and the changes made will be immediately visible in the production environment.

Fig. 10. Preview of Task details on the form in "Checking the information" step in Portal
The user planned that in the "Completing documentation" step, the system will verify if at least 2 attachments have been added to the form. With Edit mode, they can view the automation that checks whether that condition has been met. All they need to do is click on the cogwheel icon in the top right corner of the step.
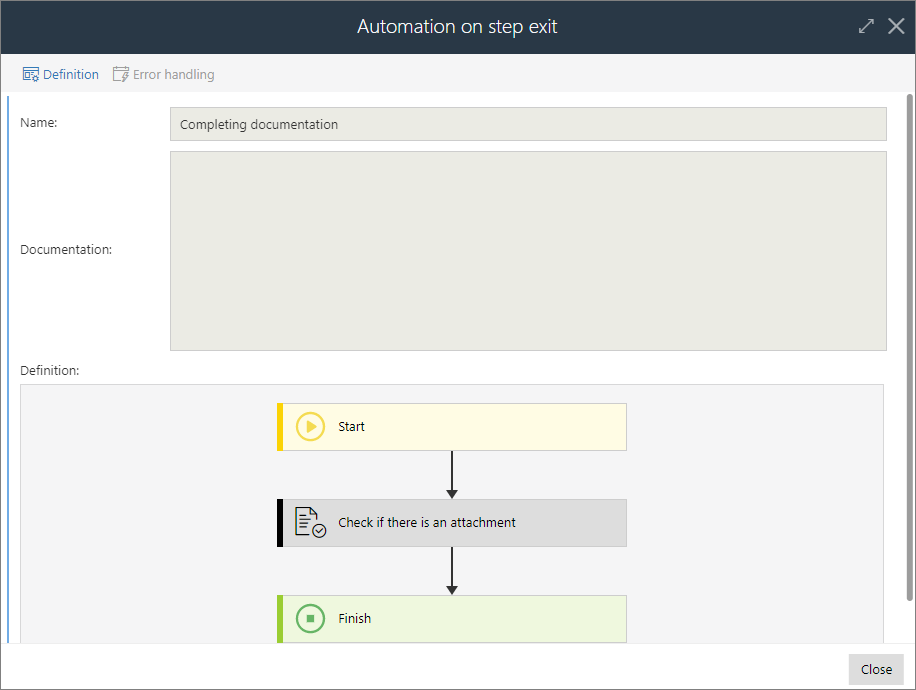
Fig. 11. Preview of the automation defined on the "Completing documentation" step, which includes the form validation action
The Properties window also opens after selecting the workflow path. As with the form field, the user can view its Advanced settings. The Path details window is then displayed, divided into General and Create task tabs, with an available preview of the selected path's configuration – all assigned tasks, defined business rules, and automations.
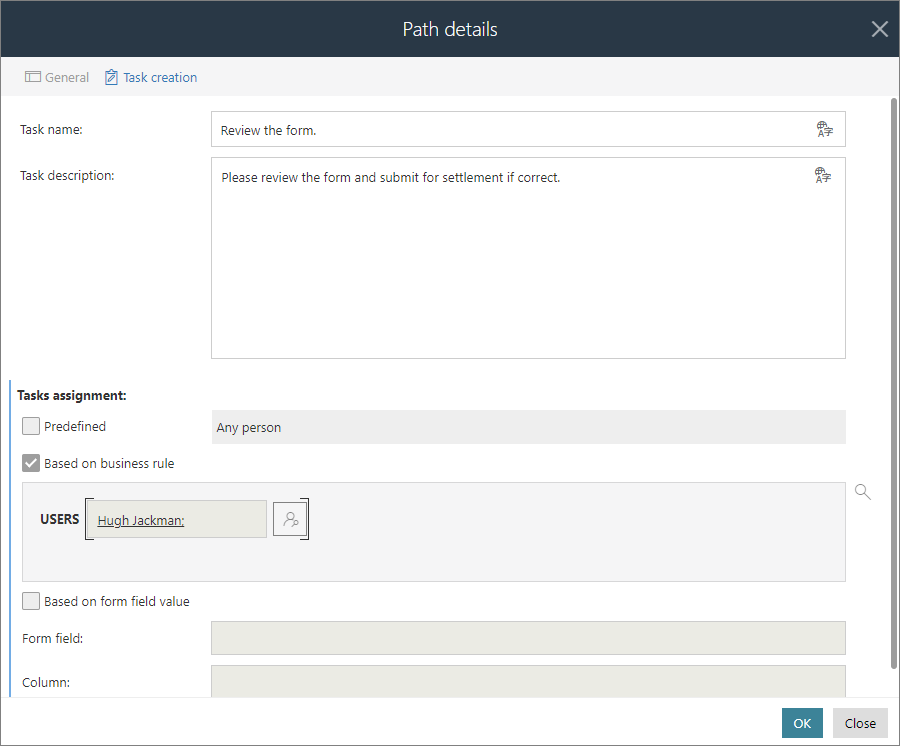
Fig. 12. Preview of the task assigned on the “Submit for review” path
- Field matrix
After enabling Edit mode in Portal, selecting the workflow in the Processes node, and navigating to the Field matrix tab, the authorized employee of the Principal can check the visibility settings of the form fields at individual steps of the “Execution of Investment Projects” workflow. From Portal, the tab is available in read-only mode, but here employee can check the visibility/editability/requiredness configuration of the form fields, and raise any objections in this regard to person authorized to edit the process in WEBCON BPS Designer Studio or to the implementation team.
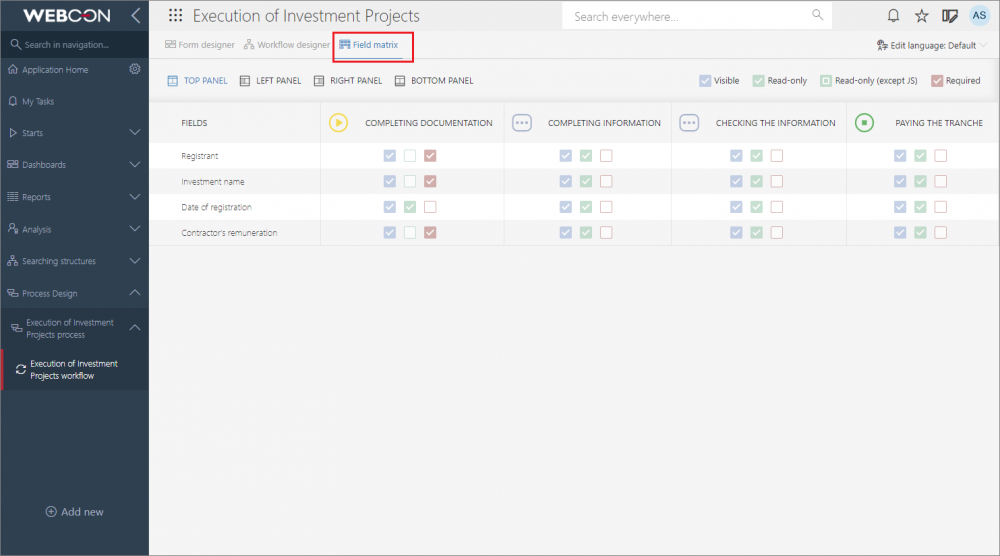
Fig. 13. Field Matrix in Portal
Summary
Edit mode is a new WEBCON BPS feature that allows business users to carry out their tasks, while having insight into the configuration, and the ability to edit some of the components of the processes used. This applies both to prototypes adapted for production and processes that were originally created in Designer Studio.
With the advent of this solution, employees will not only be able to make suggestions and comments on processes, but will also have a real impact on their usability, and thus on the efficiency of their tasks and, in the long run, on the development of the entire company.
In addition, greater awareness of the construction and life cycle of applications will allow the so-called "non-IT users” to make even more effective use of our low-code tool, WEBCON BPS Designer Desk.

