New WEBCON BPS 2023 mobile application
Applies to version: 2023 R3 and above; author: Łukasz Maciaszkiewicz
New WEBCON BPS 2023 mobile application
The WEBCON BPS 2023 mobile application is a component of the WEBCON BPS platform designed for mobile devices. It offers flexible and convenient access to the applications published in Portal from any location, even without direct access to the company’s computer.
This article highlights the key features and functionalities of the new mobile application.
Requirements and Installation
The 2023 version of the application is designed for mobile devices (cell phones, tablets) running Android 10.0 or newer, or iOS 16.0 or newer. To download the application, search for “WEBCON BPS” on Google Play and App Store. You can also download the app by clicking the Mobile application button available in the user menu in Portal.
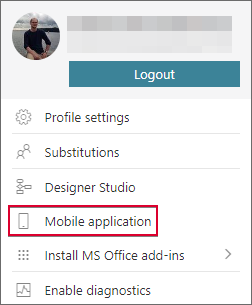
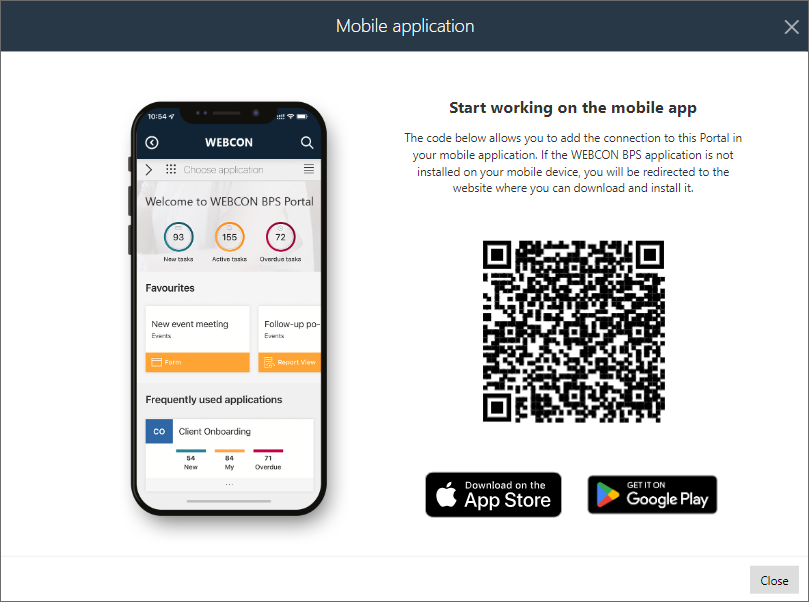
After selecting the aforementioned button, the system displays a QR code for downloading the app. To download the application, press the link provide in the "Don't have the mobile app yet? Download it from the store" section which is available on the page that opens after scanning the code. You will then be automatically redirected to either Google Play or App Store where you can download the application suitable for your operating system.
Configuration of the connection with Portal
After running the correctly installed application, you are redirected to the connection selection window where you can log into your Portal.
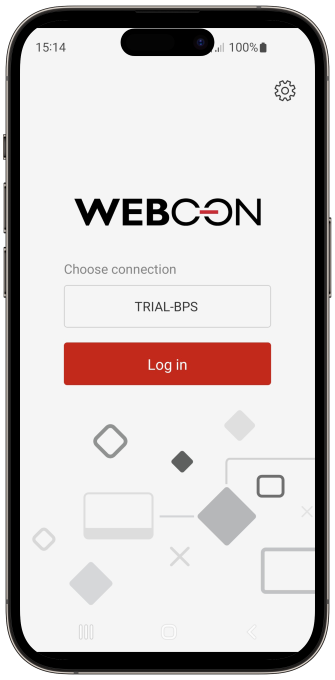
By default, a newly installed application provides a test connection: “TRIAL-BPS”. It offers access to a demonstration environment where you can check the platform functionalities. (The test connection can be removed at any time.) However, to gain access to Portal located at a specific address, you need to configure a respective connection. To do that, click the gear icon in the upper right corner of the mobile application login window to go to the application settings.
The window allows you to configure Portal connections (Edit connections), change system icon (Change the app icon), and gain access to information about the logged errors (Event log), as well as information regarding the licenses used by the mobile application (Licenses).

In the Edit connections window, you can define the connection to your environment by entering manually connection name and Portal address in the configuration. Please note here that such a connection can be added by scanning the QR code available in Portal (user menu → the Mobile application button).
Furthermore, it is possible to secure access to Portal with either a PIN code or biometric protection.
This functionality can be configured in the aforementioned Edit connection window by clicking the PIN security button. After setting up the PIN code, you can enable biometric protection (fingerprint or facial recognition) by selecting the Biometric security button (ensure that biometric functions are enabled on the device).
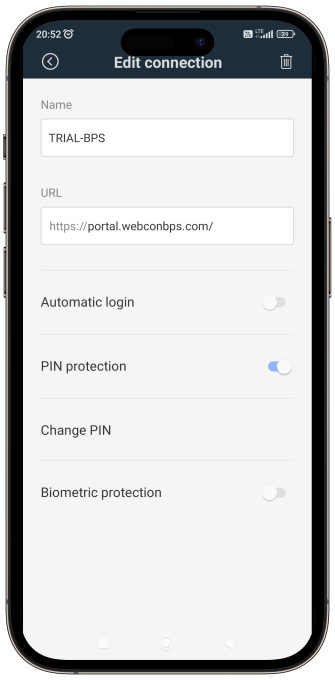
If PIN or biometric protection is enabled, the user will be prompted to enter the PIN code or authenticate using biometrics during the next login.
Interface
After logging in successfully, the Portal main page is opened in the mobile application window.
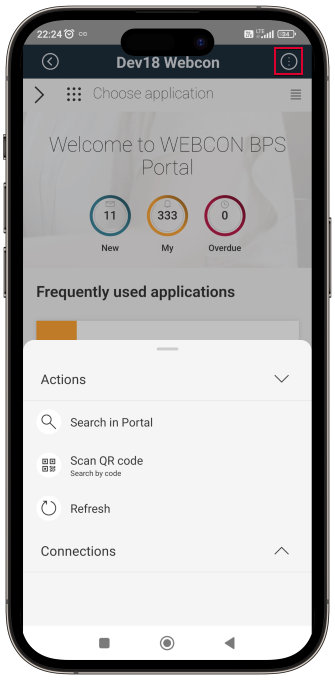
The upper part of the window contains the quick bar. It contains the Return button that displays the previously shown Portal page (or the login window if only one Portal page has been displayed so far) and the quick menu button. Clicking the latter rolls up a menu containing two nodes: Actions and Connections. The Action node lets you search for information in Portal, scan QR codes, and refresh the Portal page, while the Connection node allows you to choose from the available connections and access their edition window.
The user can choose one of the two available themes: dark and light. The themes affect the application interface appearance and color, and are aligned with the display mode (light or dark mode) of the mobile device system. This means that changing the Android or iOS theme will also switch the application theme after it is restarted. (The application themes are configured separately in the application settings.)
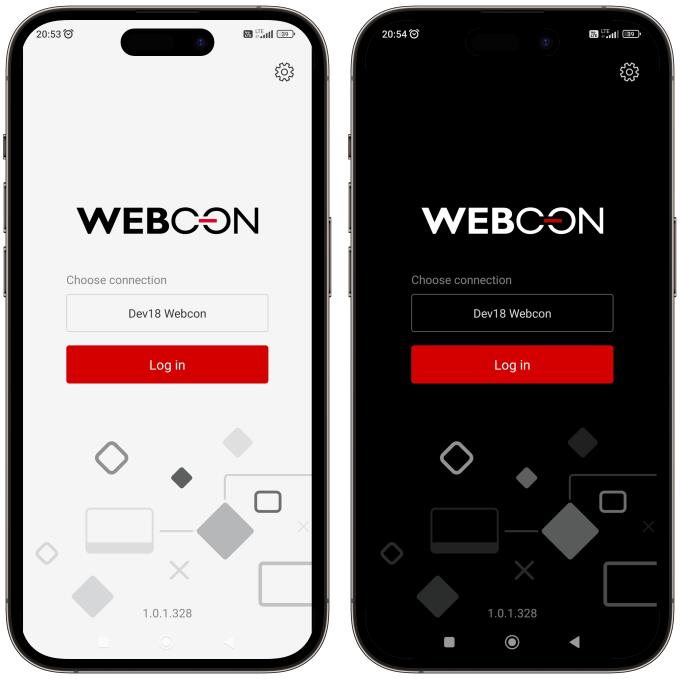
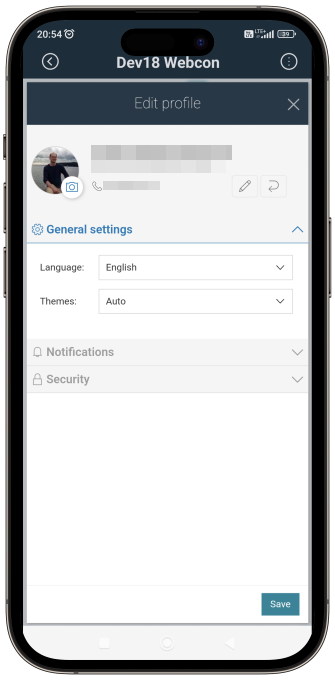
It is worth noting that the application theme can be aligned with the theme configured in Portal. Thanks to this, changing the application theme, e.g. to the dark theme, also triggers the switch to the dark theme in Portal (WEBCON BPS Dark).
To enable this, go to the Portal window in the mobile application and select Auto in the Themes field (User menu → the General settings tab).
QR codes
With its QR support functionalities, the new mobile application significantly reduces the need for manual data entry, helping prevent frequent mistakes caused by typos and incorrect configurations. This chapter introduces some functionalities that can be particularly useful when working with the mobile application, along with guidelines for their configuration.
QR codes scanner in the mobile application
The mobile application features integrated QR codes scanner for reading QR, bar, and DataMatrix codes. You can access the scanner by clicking the Scan QR code button (available in the Edit connections window and quick menu after logging into Portal) and by pressing the QR code icon available in applicable elements of the form (form fields) and Portal (search box). After directing the camera towards the code, the scanner automatically recognizes the code and processes the encoded value appropriately.
Searching by QR codes
Users of the mobile application can search databases in two ways: using the standard method, i.e., by manually entering a query in the search box, or by inputting the QR code value into the search box and initiating the search.
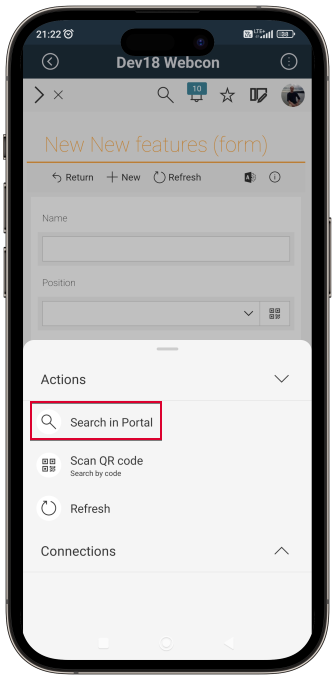
To use the latter, click the QR code icon available in the search box opened after clicking the Search in Portal button available in the quick menu after logging into Portal or in the search box provided in the search subpage.
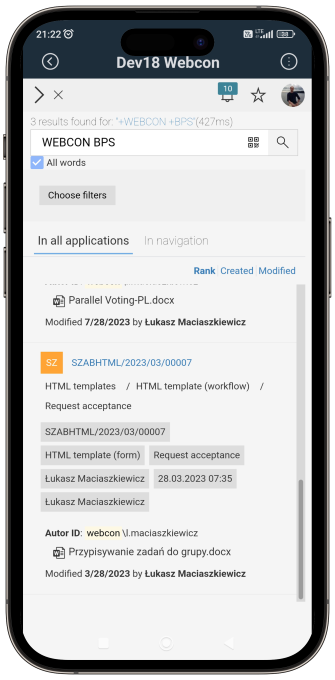
The button opens the QR code scanner that allows you to scan the query value and enter it into the search box. The system starts searching immediately after reading the value stored in the code.
Inserting the value stored in the QR code into a form field or column
The mobile application also enables scanning QR codes and entering their values directly into form fields.
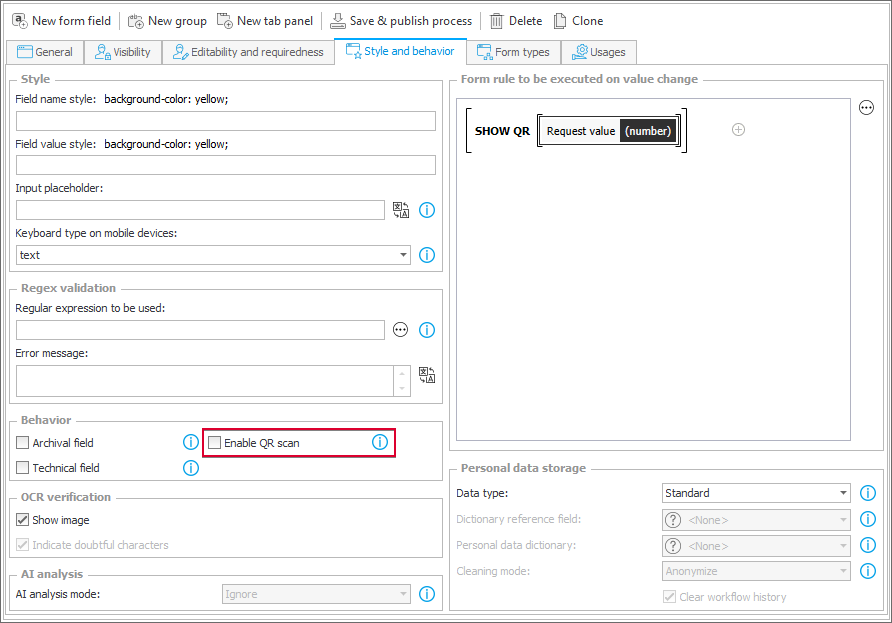
The functionality is available for devices equipped with a camera. To be able to retrieve value from a QR code, you need to configure an applicable form field or column in Designer Studio by selecting the Show QR scan button (the Style and behavior tab → Behavior).
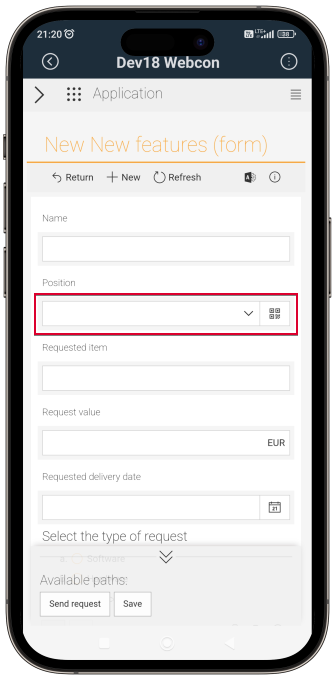
After saving changes and going to the relevant form in Portal, the QR code icon will become visible within the configured form field.
Clicking the icon opens a window that allows you to scan the QR code and input its value into the form field. The code is scanned automatically after directing camera towards it. Once the code is scanned, it is possible to save it (Save), scan it again (Scan again), or cancel scanning (Cancel). If the QR code contains a value incompatible with the form field type, e.g. the user attempts to enter text value into the Integer number form field, an error message is displayed.
You can enable the functionality for most basic form fields (excluding the Picture field) and for the Choice field operating in the Popup search window and Autocomplete mode. In the case of the Item list columns, the QR code scanning is available for the Single line of text, Multiple lines of text, Floating-point number, E-mail, and Choice field (picker) and Autocomplete columns.
It is worth noting that, unlike other form fields, attempting to enter a link to an instance into the Choice field using a QR code would result in the insertion of an identifier for that instance.
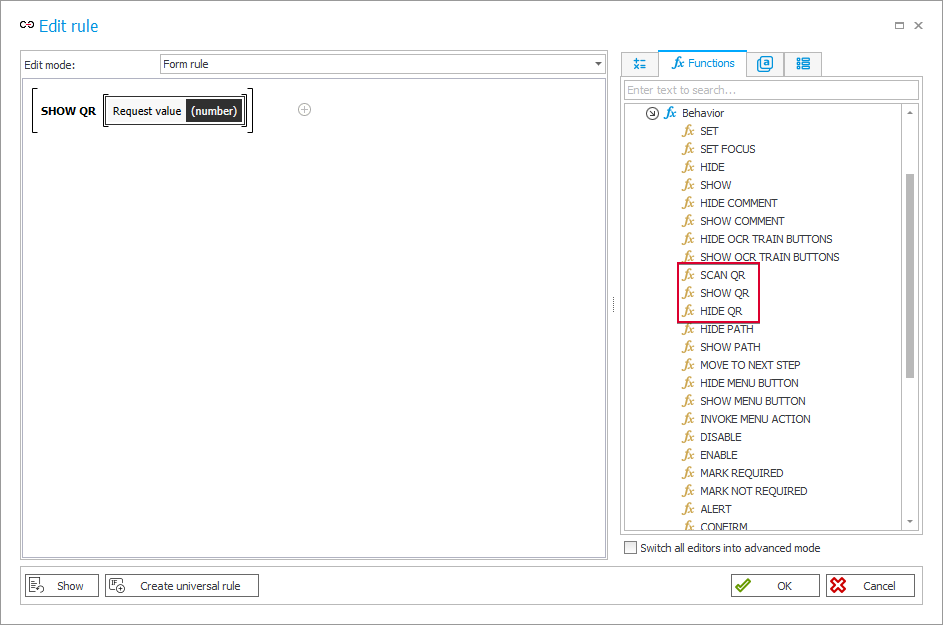
- The SCAN QR, SHOW QR and HIDE QR rules
You can control the input of values into form fields or columns through QR codes using form rules.
The SCAN QR rule enables you to specify a relevant form field or column for which the QR code scanner will be initiated. The rule can be executed when loading the form or when changing the value of a form field.
The SHOW QR and HIDE QR rules show or hide the QR code icon in the form field or column control. (For the Item list columns, it is possible to constrain the rule operation by means of the FOR EACH ROW operator). Similar to the first rule mentioned earlier, the target form field is specified in the block of the rule.
QR code starting a workflow instance and redirecting to an instance
QR codes can also streamline and facilitate starting and opening particular workflow instances. After receiving and scanning a generated QR code, the user can immediately start a particular workflow instance. Furthermore, they can also open specific instances by using a relevant QR code.
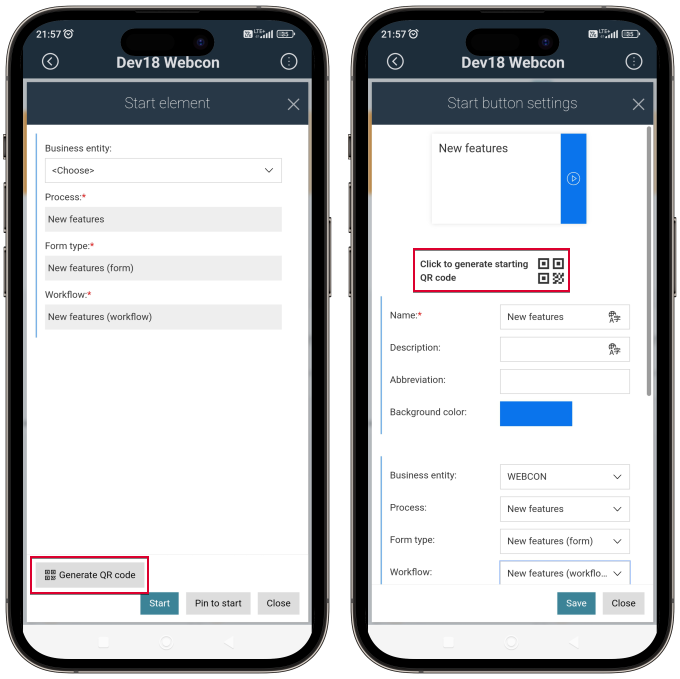
The code for starting a workflow instance can be generated by any user directly in Portal in the edition window of a Start tile that initiates a respective process (the Click to generate starting QR code button), or in the window used for starting an instance (the Generate QR code button in the bottom, left corner).
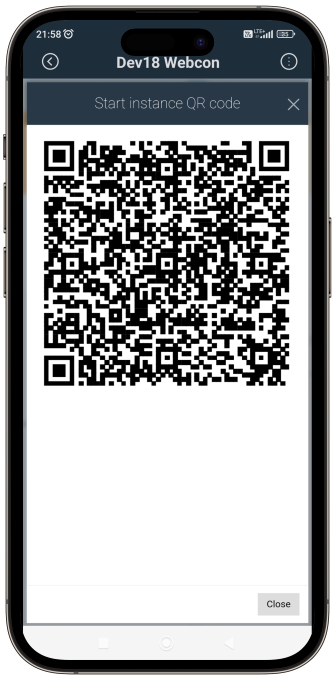
Pressing the button opens a window containing a QR code that you can send to other users, allowing them to quickly initiate a relevant workflow instance, provided that they have the necessary privileges.
Keep in mind that you can open the QR code using either the system-based QR code scanner or the scanner built into the mobile application. In the first situation, after scanning the code, the mobile application or an Internet browser (if the mobile app has not been installed on the device) is opened, and the user is redirected to the Portal page that enables them start the instance. If no relevant connection is available in the application configuration or if a different connection is in use, a message will prompt you to add a connection (if none is detected) or change it (if a connection has been detected but a different one is currently in use).
It is worth to mention that an additional functionality here is the ability to generate a QR code for a specific workflow instance. Such a code is available after clicking the Generate QR code button in the bottom part of the info panel of the instance in Portal, and it can be sent to other users, e.g. as a proof of submitting a request.
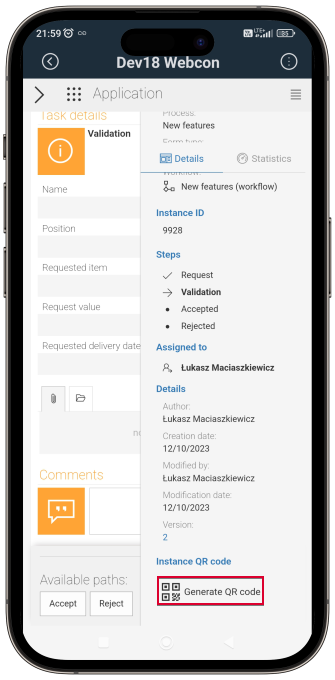
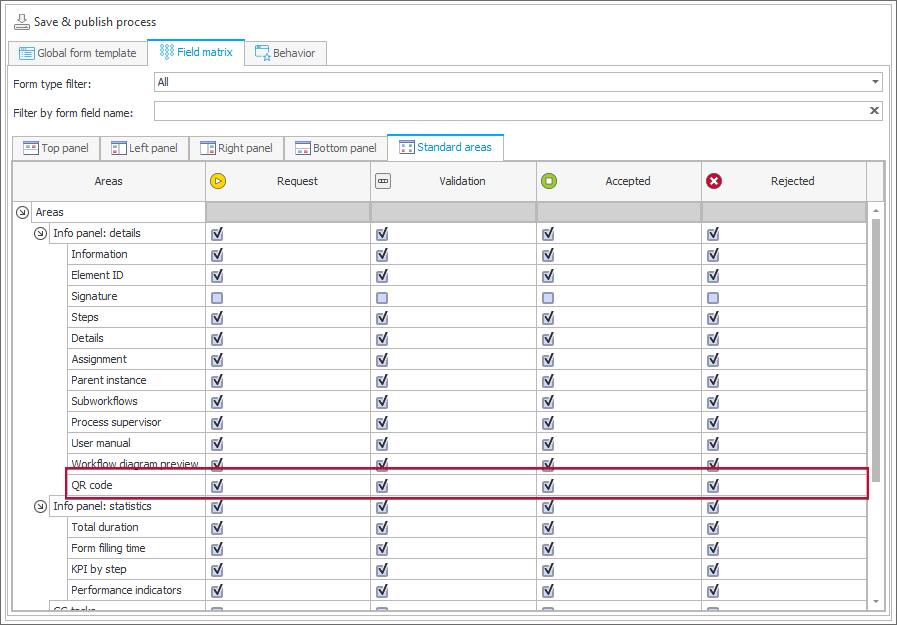
The functionality that enables you to generate QR codes for specific instances can be activated by the BPS application designer in Designer Studio. To do that select the QR code checkbox in the Standard areas tab (Main form → Field matrix).
Capturing photos within the form
By using the mobile application, you can capture and crop photos in the form. Such photos are then added as attachments and can be used in the subsequent workflow steps.
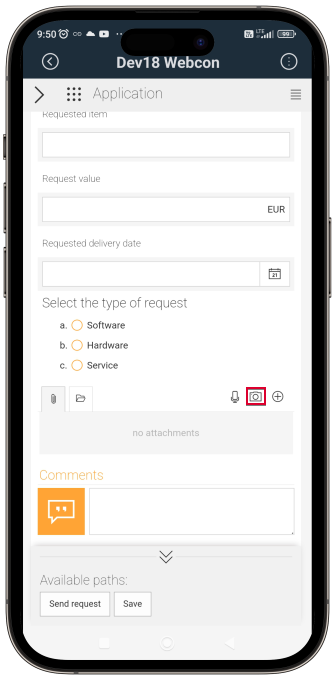
You can access the photo capturing and cropping functionality in the attachments panel in form after clicking the camera icon (![]() ) located next to the Add attachment button [the icon is available if the user has selected the Add and delete checkbox in the attachments panel (the Global form template tab)]. Clicking the icon opens a new window that allows you to capture a photo:
) located next to the Add attachment button [the icon is available if the user has selected the Add and delete checkbox in the attachments panel (the Global form template tab)]. Clicking the icon opens a new window that allows you to capture a photo:
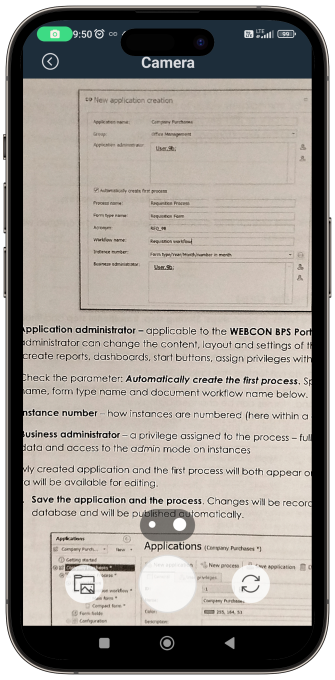
By default, the mobile device's camera is activated upon opening this window (the application must be granted the necessary permissions). Prior to capturing a photo (Take photo), it is possible to select the camera which will be used by the mobile application (Switch camera). Keep in mind here that the user can add an already existing photo from the device’s hard disk by clicking the Add from library button. After adding a photo from the library or taking a new one, the window and its buttons change their appearance. Additionally, the window is covered with grid lines that allow you to crop the photo by dragging and placing them in the target location.
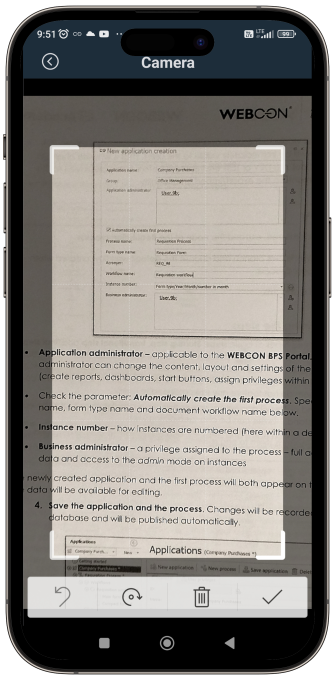
Apart from cropping, you can rotate the photo (Rotate) to position it as desired. The modifications can be reversed to restore the original photo (Undo changes) or completely removed (Delete).
After making the modifications and saving them (Save), the photo file is added to the attachments panel. Please note that by pressing the arrows button (![]() ) you can reveal a bar that allows you to change the file name (Filename) and select the attachment category (the Choose attachment’s category option is available provided that the attachment categories have been configured).
) you can reveal a bar that allows you to change the file name (Filename) and select the attachment category (the Choose attachment’s category option is available provided that the attachment categories have been configured).
Recording voice memos
With the mobile application you can also record voice memos and add them as form attachments. This allows mobile device users to input a large amount of information quickly, eliminating the need to enter it using the mobile device keyboard.
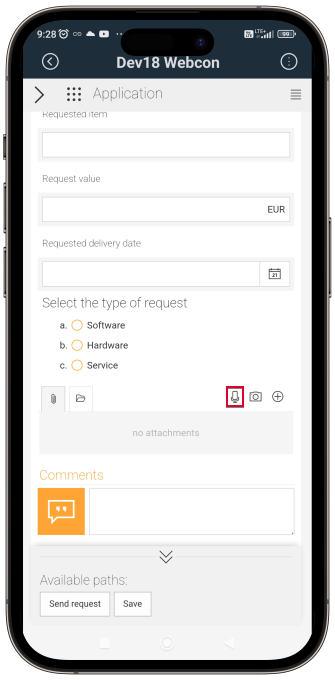
To record a voice memo, press the microphone icon (![]() ) located next to the Add attachment button (the icon is available only if the user has a connected microphone and, as in the case of capturing photos, has selected the Add and delete checkbox).
) located next to the Add attachment button (the icon is available only if the user has a connected microphone and, as in the case of capturing photos, has selected the Add and delete checkbox).
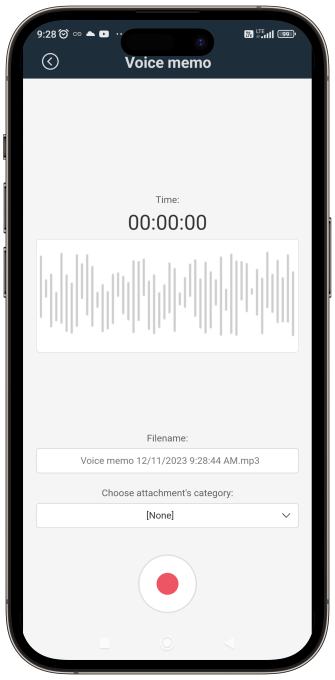
Clicking the icon opens a media player.
In the player window you can start and stop the recording (the Start/Stop recording button), as well as pause and resume it (Pause/Resume recoding) (the names and button icons change depending on whether the recording has been started or not).
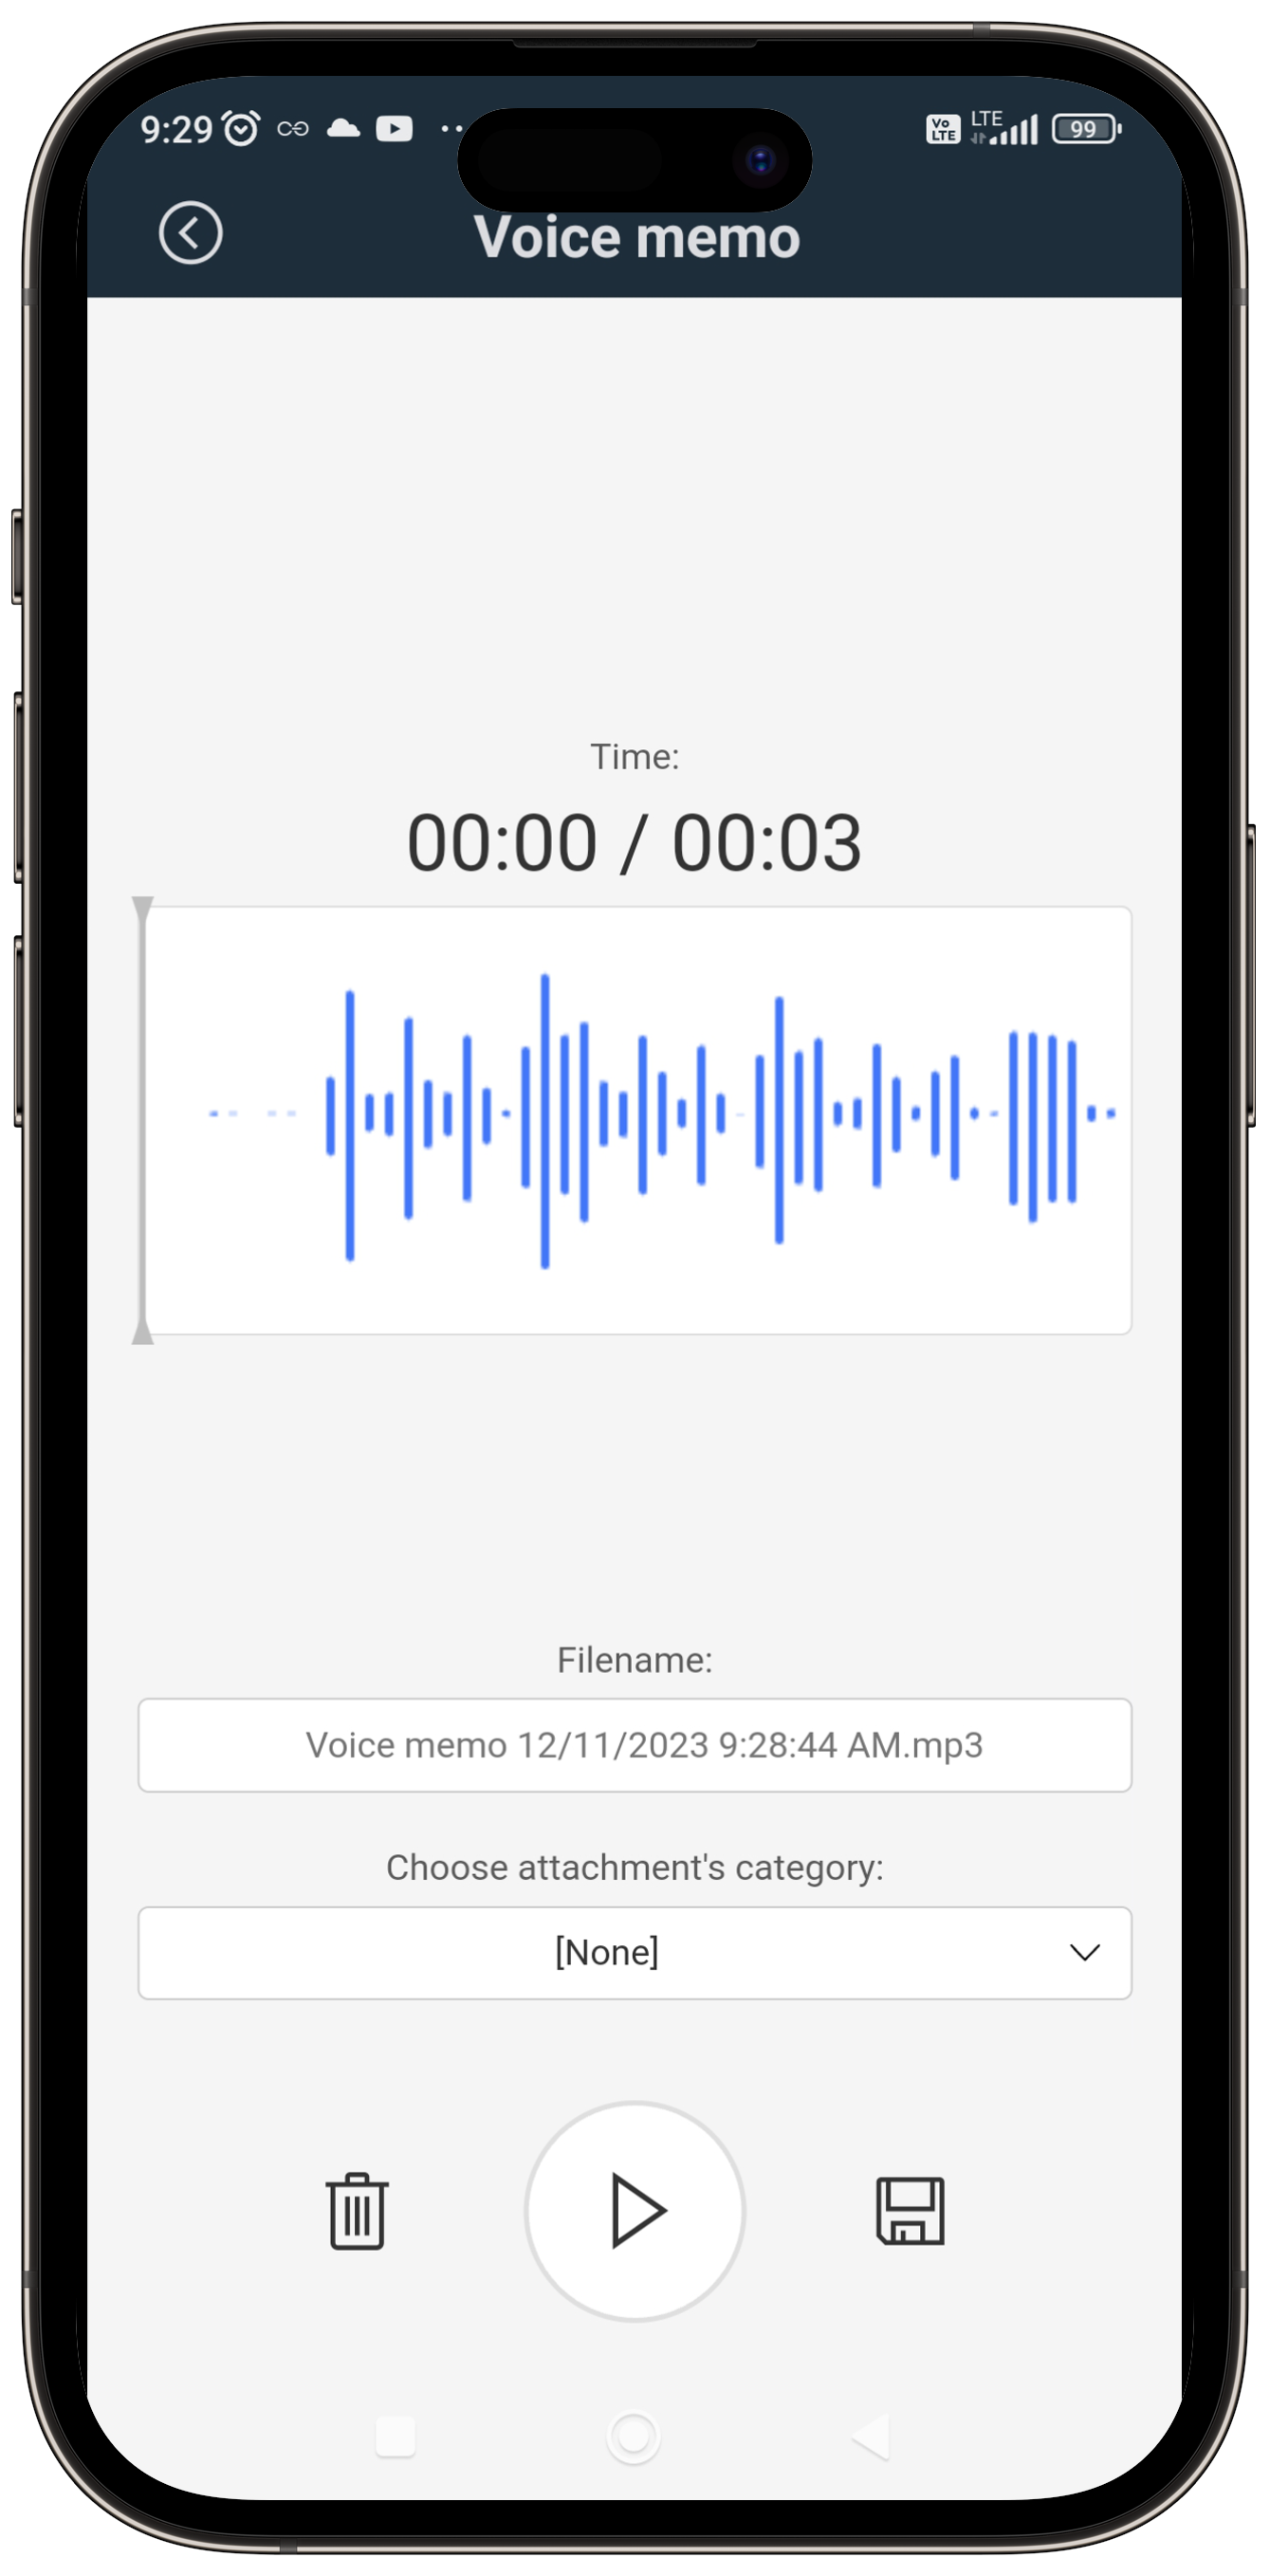
After stopping the recording, it can be played in full or from the location specified on the audio spectrum analyzer (click the desired point on the analyzer). Please note that clicking the recording button again results in deleting the current recording and starting a new one.
Before adding the recording file to the attachments panel (the Add button) it is possible to change its name and select the attachment’s category (the Choose attachment’s category option is available provided that the attachment categories have been configured). Pressing the Close button results in closing the window without saving the recording on the attachment’s list.
Authorizing path transition using the mobile application
The mobile application allows users to authorize path transitions in an easy and convenient way. The functionality is particularly useful for users who execute operations of critical importance, as it ensures that the user is really the person authorized to execute such operation.
The solution is a part of a broader functionality of authorizing path transitions discussed in this [ARTICLE].
To authorize operations using the mobile application, you need to register the device as a trusted one in the user menu in Portal.
Registering a trusted device
The mobile application users can register their mobile device as trusted, which allows them to, e.g. use the mobile application for authorizing operations executed in Portal. You can do this immediately after logging into the application for the first time on the new device or at any later point while using the application on that device.
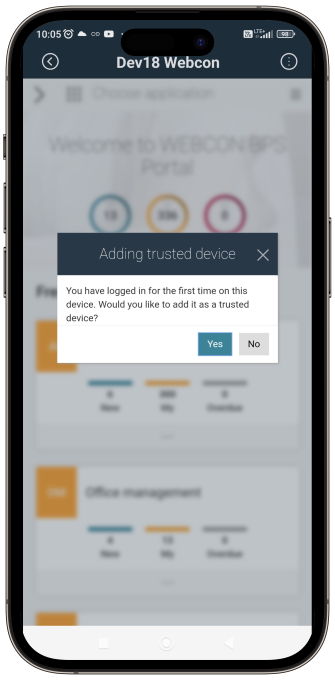
To register your device as trusted, select Yes in the message displayed during the first login to the Portal in the mobile application. Alternatively, you can do that at a later stage, by pressing the Add current device (the Security section) in Profile settings. A window is displayed where you need to specify the device name and press the Verify button.
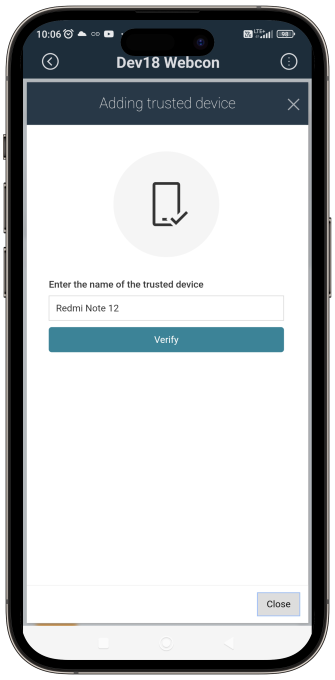
After this operation, a message containing a 6-digit authorization code (token) will be sent to the email address you used to register in WEBCON BPS, or, depending on the configuration, via an SMS message. The authorization code remains active for 4 minutes, but it is possible to prolong this time. It is worth noting that codes of this type are encrypted in the database to prevent unauthorized users from viewing them.
You need to enter the code in the designated field and select the Verify button again.
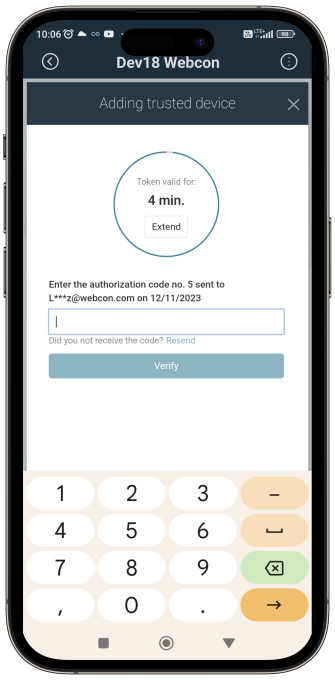
After three unsuccessful attempts to enter the code, the authorization session is locked. In such scenario, you will need to press the Resend button and enter a new authorization code that was delivered to your mailbox.
Successful registration of a trusted device is confirmed by a corresponding message. As a result, the device name and the information since when it has been active are displayed in the Profile settings. Following the registration of a trusted device, the Add current device button becomes inactive.
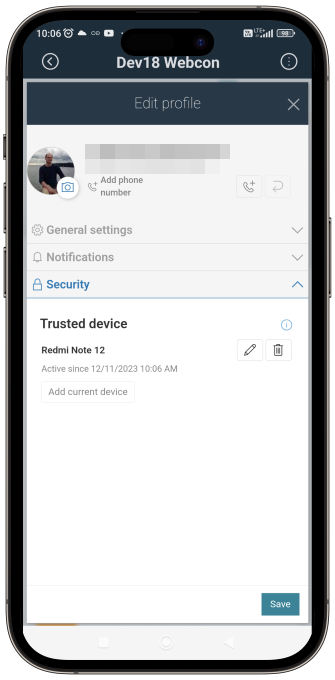
From the mobile app, you can add and edit one trusted device. You can also remove it, which requires authorization similar to adding the device.
Information about trusted device is also available in the Profile device in Profile. However, here you can only edit the device data or remove it as a trusted device.
PUSH notifications
The application supports PUSH notifications that inform about creating new tasks for users. They are displayed within bubbles and, additionally, as a small application icon in the device status bar.
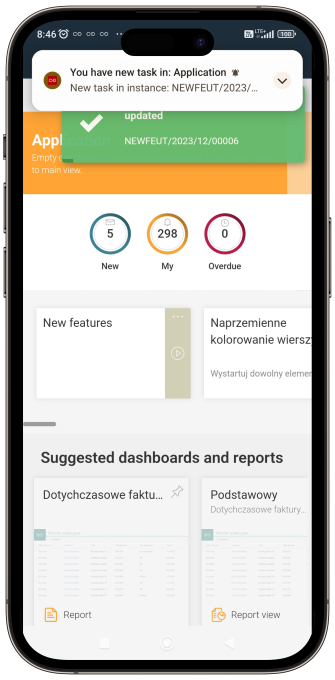
In the iOS system devices, the notifications are displayed additionally as a task counter displayed within the application icon.

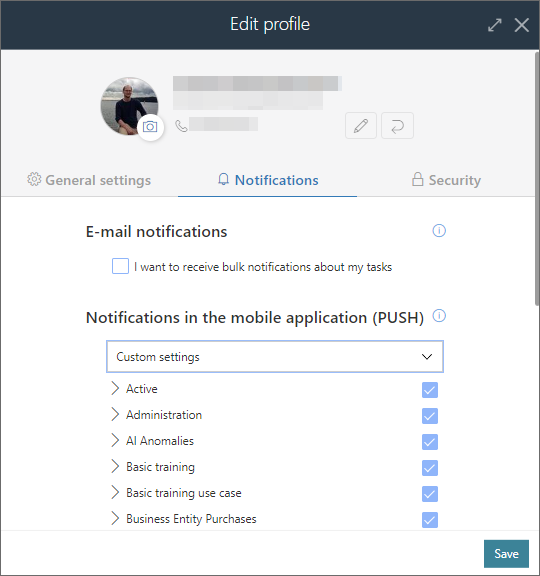
In the Notifications tab within Profile settings, the Notifications in the mobile application (PUSH) option is available. This option allows you to specify the applications from which notifications will be sent. Apart from enabling or disabling PUSH notifications for all applications (Enable all and Disable all respectively), it is possible to disable notifications for particular applications by selecting the Custom settings option. (Those settings do not have any effect on delivering PUSH notifications used for authorizing user operations via the Mobile application method.)
Determining geographical location of an individual
Apart from the aforementioned features, the mobile application also enables the determination of the geographical location of individuals traversing a path. As a result, the administrator of a BPS application gains access to information about the actual location of a particular individual.
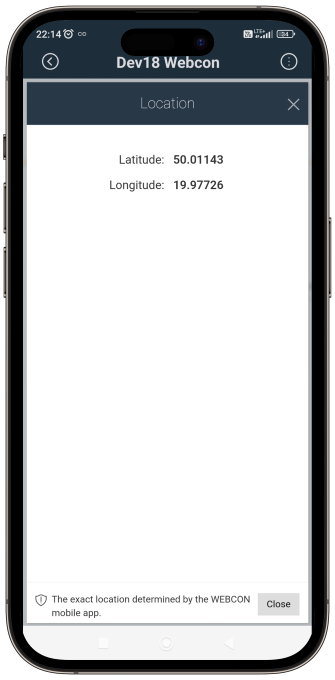
The information about the geographical location of a mobile application user is retrieved at the time of traversing a properly configured path. A user intending to traverse it must grant the mobile application proper permissions to retrieve information about the device location; otherwise, they will not be able to complete it. The information about user location is saved in the instance history. It can be accessed only by individuals authorized to display the instance history in the admin mode (the gear icon). Once you click the path icon in the upper right corner of a newly opened window, a geopositioning icon appears. Clicking it displays a Google map showing a respective location. This allows you to easily determine the location of a given individual at the time of traversing a path.
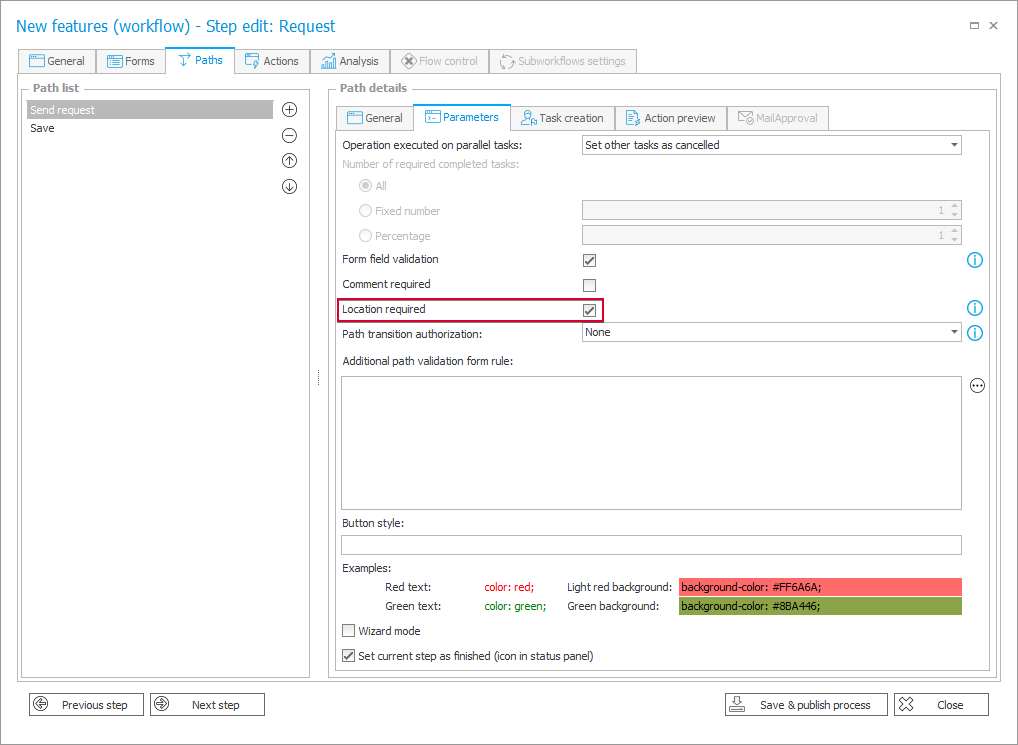
To use the functionality, go to the settings of a selected path in Designer Studio. The Parameters tab includes a Location required checkbox. When checked, the system will prompt for location information during the traversal of a path.
Please note here that the system will require sharing your location only once for traversing a path for multiple instances using the mass action [LINK TO ARTICLE] or quick paths [LINK TO ARTICLE].
Furthermore, if you have already shared your location by traversing the parent workflow, the system will not require it again for subworkflows regardless of their configuration. In the opposite scenario, where the mentioned functionality is not enabled in the parent workflow path but is enabled in the subworkflow path, sharing the location data will be required.
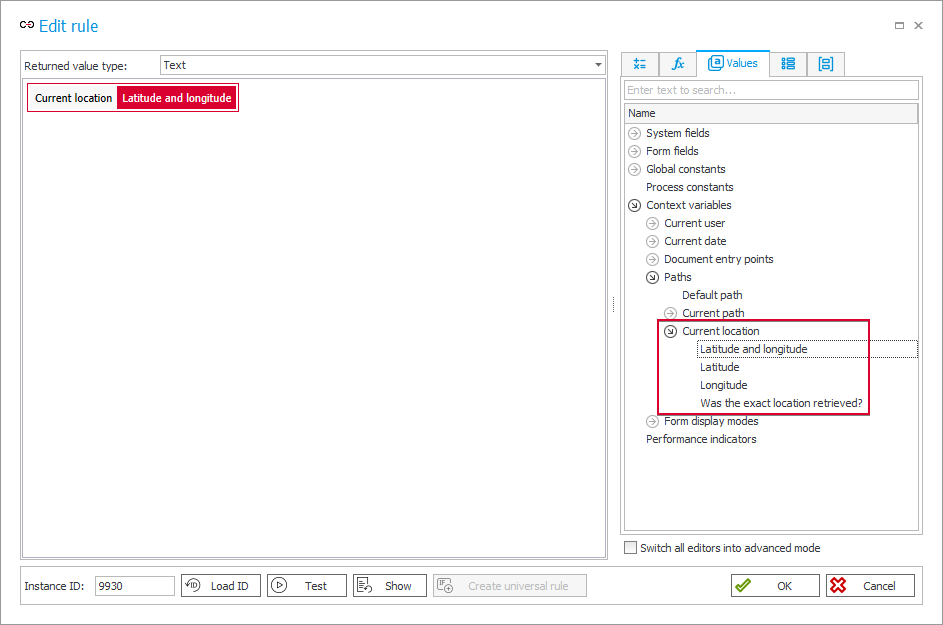
Furthermore, user location data at the time of path traversal can be collected using context variables. Those variables are available in the Location node of the expression editor. There are four such variables available:
– {CURRENT_LOCATION} – information about geographical longitude and latitude,
– {CURRENT_LOCATION_LATITUDE} – information about geographical latitude only,
– {CURRENT_LOCATION_LONGITUDE} – information about geographical longitude only,
– {CURRENT_LOCATION_ISNATIVEAPP} – informs whether the location has been retrieved from the mobile device.
To retrieve information about location using the aforementioned variables, it is necessary to enable the functionality in the path configuration (the Parameters tab → the Location required checkbox) and use them within the context of path transition executed by a user (automatic path transition executed by Service will not trigger retrieval of such data). The information collected using the aforementioned context variables can then be used, e.g. in a properly configured e-mail message sent to the supervisor of a given individual.
Apart from the above-mentioned context variables available for business rules, you can also use the {CURRENT LOCATION} variable in form rules. It allows you to retrieve the GPS location (longitude and latitude) directly from the form without the need for transiting path.
Summary
The WEBCON BPS 2023 mobile application opens up new possibilities for users of the WEBCON BPS platform. By offering access to the Portal applications from almost any location, the application is an ideal solution for field workers who perform their job duties outside the office. Moreover, with modern and intelligent features, the mobile application accelerates and enhances your work, offering the flexibility essential in today's world.

