Using 2019 version of WEBCON BPS Designer Studio on a local machine
Applies to version 2019.1.4.x; Author: Paweł Drab
WEBCON BPS Designer Studio can be launched from a local machine but in order to connect smoothly to both Portal and the database, it requires an environment configuration.
Depending on the chosen type of WEBCON BPS installation:
- with SharePoint,
- StandAlone
and following methods of authentication:
- integrated login,
- SQL login,
The following article is split into four parts – one for each combination of installation and authentication method. Links to specific subsections are found in table 1.
WEBCON BPS Designer Studio always opens in the context of the currently logged in Windows user. This means that when using more than one domain, you should use SQL login to connect to the database.
| Installation type | ||
| Database login method | SharePoint | StandAlone |
| Integrated login | [LINK] | [LINK] |
| SQL login | [LINK] | [LINK] |
Table with links describing connection configurations to the local machine sorted by installation type and authentication method.
WEBCON BPS Designer Studio on a local machine – version with SharePoint and using integrated login to connect to the database.
WEBCON BPS Designer Studio Installation
The first step in the connection configuration is the installation of WEBCON BPS Designer Studio. It is very simple:
- Download the installer compatible with the version of the WEBCON BPS installed on the server,
- Open setup.exe file and choose “Installation or update of WEBCON BPS Designer Studio”,
- The installer will check if there is any version of Designer Studio currently on the machine. If we have a newer version of Designer Studio installed, the installation will end on the next step,
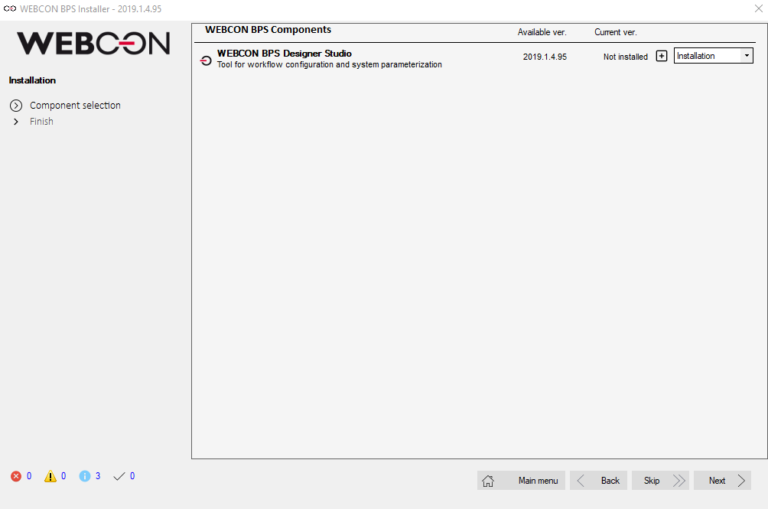
Pic. 1. Checking the version of WEBCON BPS Designer Studio
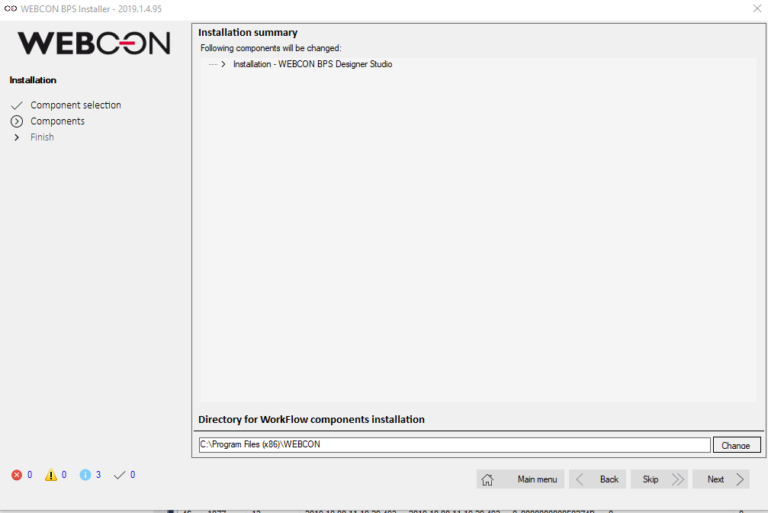
Pic. 2. Choosing the installation folder
Privileges
The user who wants to log in to Designer Studio with unrestricted abilities should have the following privileges:
- They must be a system administrator of the Designer Studio,
- They must have privileges in the ‘configuration’ and ‘content’ SQL databases at least at dbowner level,
- In the case of a SharePoint installation, the user should also be an administrator of the site collection.
Connection with Portal
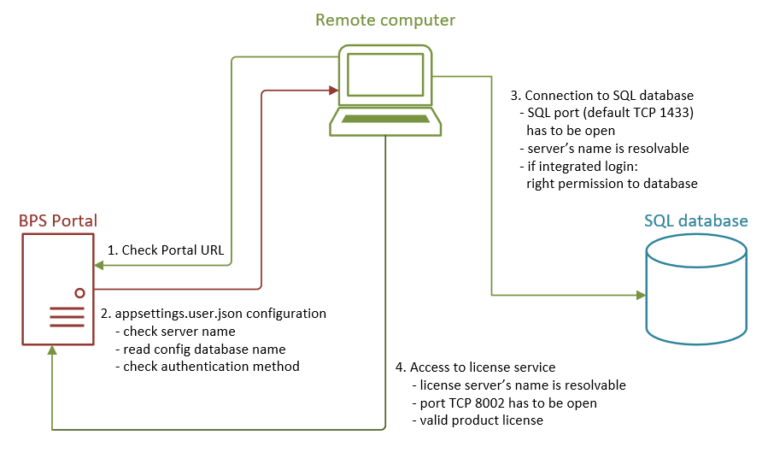
The Designer Studio installation and correct privileges are not enough to connect with Portal. Connection schematics are shown below.
Pic. 3. WEBCON BPS Studio, Portal and database connection schematics
To initiate a connection, Designer Studio sends a request to the server for the Portal URL address – that’s why on the welcome screen it is required to provide the Portal address to which we want to connect. The Portal address can be found in the database (configuration database -> GlobalParameters table) or by launching the installer on the server where WEBCON BPS is installed. Choose “Tools for application management” and then “Portal address configuration” to verify the Portal address.
The server which receives a request from the local Designer Studio installation will send three pieces of information in return. All of them are stored in an appsettings.user.json file which is located in the folder where Portal is installed. The three pieces of information are:
- Database server name,
- Configuration database name,
- Authentication method.
In order to connect to the database server, in the appsettings.user.json file provide the full server name. A DNS entry is required. If we connect to the database using the integrated login, provide the phrase “Integrated Security=True” in the file. Remember that WEBCON BPS Designer Studio is always launched in the context of currently logged-in user. This can be troublesome when using multiple domains. In that case, use SQL login authentication instead.
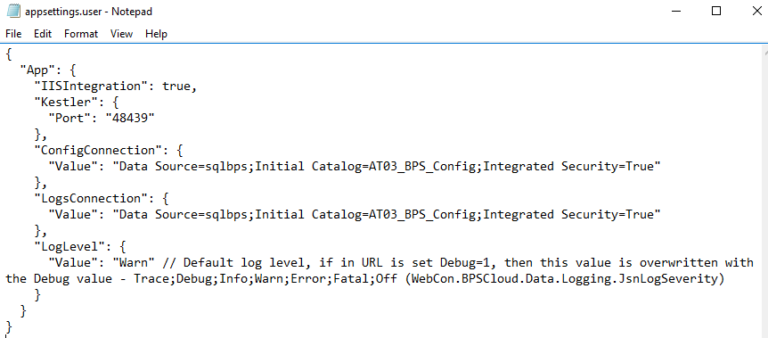
Pic. 4. appsettings.user.json for connection with integrated login authentication
It is very important that Studio has access to the SQL server. To allow it, open the TCP port (by default it’s port 1433).
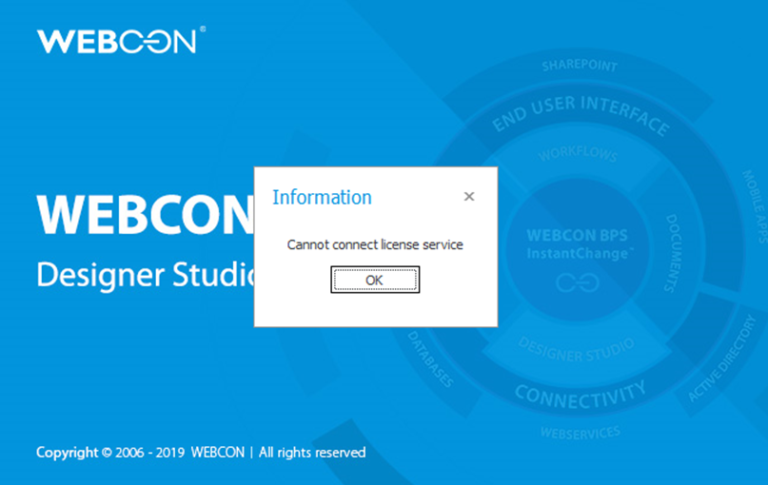
When Designer Studio establishes a connection with the SQL server, it checks the available product licenses. In order to connect with the license service, open the appropriate port (by default it’s TCP 8002). The server name has to be solvable by Designer Studio. If the provided elements are not configured, Designer Studio will inform you that the license server is unavailable.
Pic. 5. Error caused by a closed license server port.
Logging in to WEBCON BPS Designer Studio
We’re almost there! When logging in to Designer Studio for the first time, you will see a window where you must choose the content database that you want to use. For SharePoint installations, select the SharePoint website address associated with WEBCON BPS processes and your preferred log-in method. This time we have the option of using the integrated log-in or by using the user’s login and password.
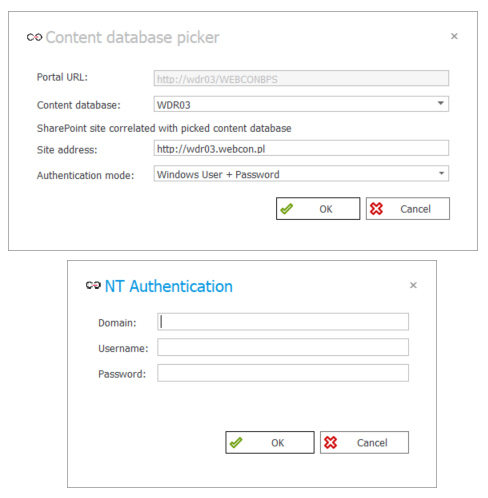
Pic. 6. Choosing content database for SharePoint installation
WEBCON BPS Designer Studio on a local machine – version with SharePoint and using SQL login to connect to the database.
WEBCON BPS Designer Studio Installation
The first step in connection configuration is the installation of WEBCON BPS Designer Studio. It is very simple:
- Download the installer compatible with the version of the WEBCON BPS installed on the server,
- Open setup.exe file and choose “Installation or update of WEBCON BPS Designer Studio”,
- The installer will check if there is any version of Designer Studio currently on the machine. If we have a newer version of Designer Studio installed, the installation will end on the next step,
-
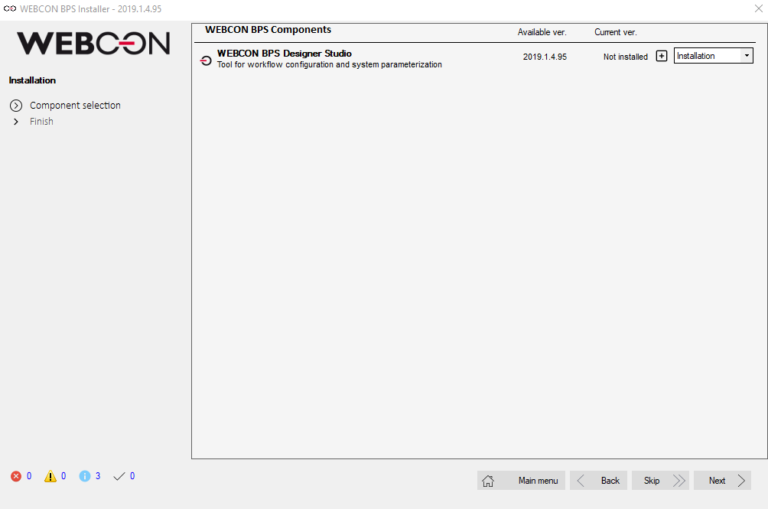
Pic. 7. Checking the version of WEBCON BPS Designer Studio
-
Choose the installation catalog and click „Next” for Studio to be installed on the machine
Privileges
The user who wants to log in to Designer Studio with unrestricted abilities should have the following privileges:
- They must be a system administrator of the Designer Studio,
- In the case of a SharePoint installation, the user should also be an administrator of the site collection.
No additional privileges to the WEBCON BPS databases are required, because logging in to it takes place in the context of the SQL login.
Connection with Portal
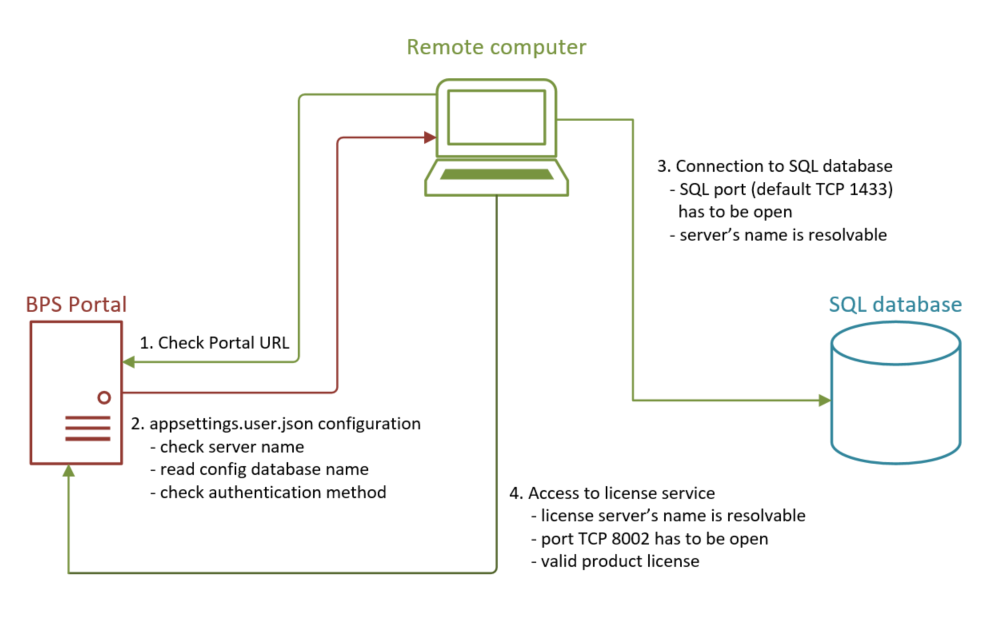
The Designer Studio installation and correct privileges are not enough to connect with Portal. Connection schematics are shown below.
Pic. 3. WEBCON BPS Studio, Portal and database connection schematics
To initiate a connection, Designer Studio sends a request to the server for the Portal URL address – that’s why on the welcome screen it is required to provide the Portal address to which we want to connect. The Portal address can be found in the database (configuration database -> GlobalParameters table) or by launching the installer on the server where WEBCON BPS is installed. Choose “Tools for application management” and then “Portal address configuration” to verify the Portal address.
The server which receives a request from the local Designer Studio installation will send three pieces of information in return. All of them are stored in an appsettings.user.json file which is located in the folder where Portal is installed. The three pieces of information are:
- Database server name,
- Configuration database name,
- Authentication method.
In order to connect to the database server, in the appsettings.user.json file provide the full server name. A DNS entry is required. In place of the default values (“Integrated Security=True”) provide user credentials in whose context the connection with the database will be made („User ID=userLogin;Password=pass123;”).
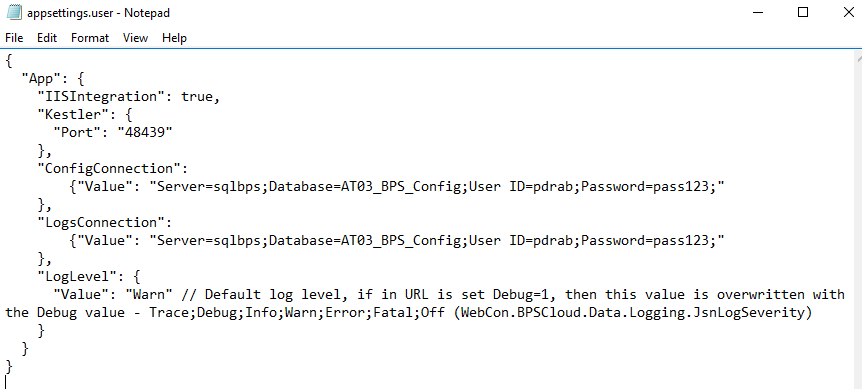
Pic. 4. appsettings.user.json for connection with SQL login
It is very important that Studio has access to the SQL server. To allow it, open the TCP port (by default it’s port 1433).
When Designer Studio establishes a connection with the SQL server, it checks the available product licenses. In order to connect with the license service, open the appropriate port (by default it’s TCP 8002). The server name has to be solvable by Designer Studio. If the provided elements are not configured, Designer Studio will inform you that the license server is unavailable.
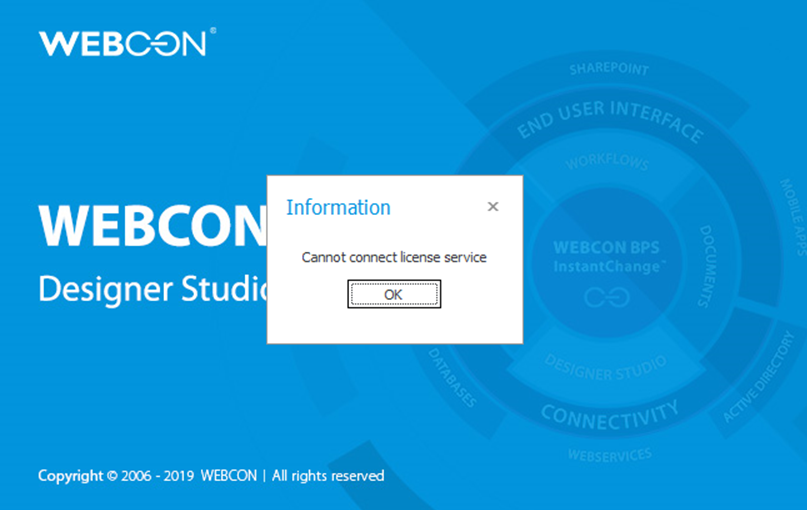
Pic. 5. Error caused by a closed license server port.
Logging in to WEBCON BPS Designer Studio
We’re almost there! When logging in to Designer Studio for the first time, you will see a window where you must choose the content database that you want to use. For SharePoint installations, select the SharePoint website address associated with WEBCON BPS processes and your preferred log-in method. This time we have the option of using the integrated log-in or by using the user’s login and password.
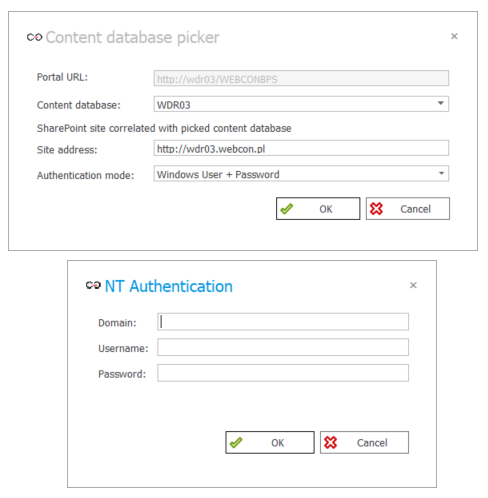
Pic. 6. Choosing content database for SharePoint installation
WEBCON BPS Designer Studio on a local machine – StandAlone version using integrated login to connect to the database.
WEBCON BPS Designer Studio Installation
The first step in connection configuration is the installation of WEBCON BPS Designer Studio. It is very simple:
- Download the installer compatible with the version of the WEBCON BPS installed on the server,
- Open setup.exe file and choose “Installation or update of WEBCON BPS Designer Studio”,
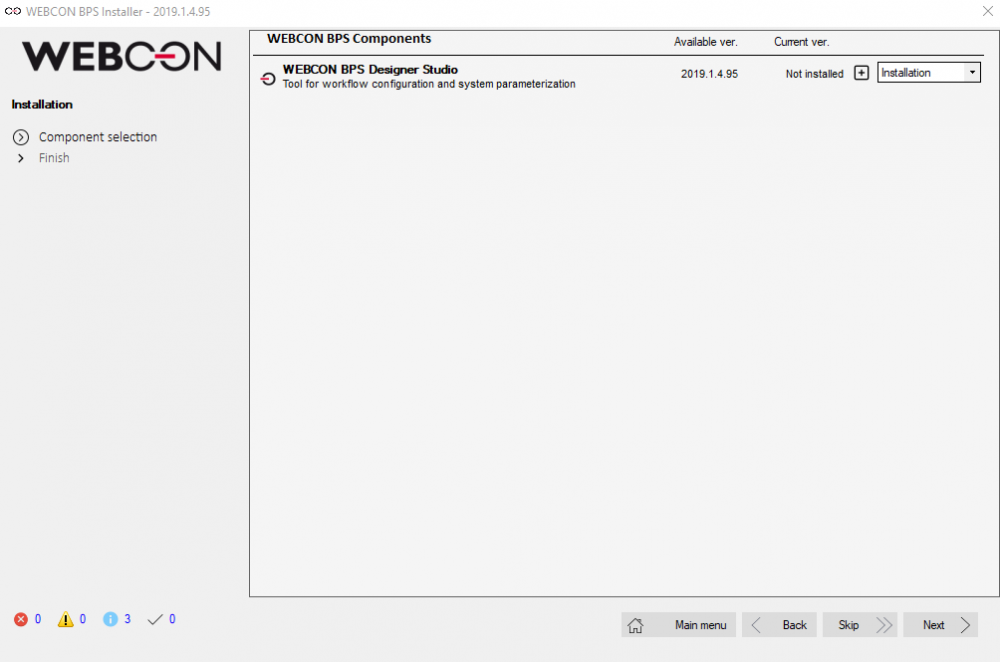
- The installer will check if there is any version of Designer Studio currently on the machine. If we have a newer version of Designer Studio installed, the installation will end on the next step,
-
-
Pic. 7. Checking the version of WEBCON BPS Designer Studio
- Choose the installation catalog and click „Next” for Studio to be installed on the machine
-
Pic. 8. Choosing installation folder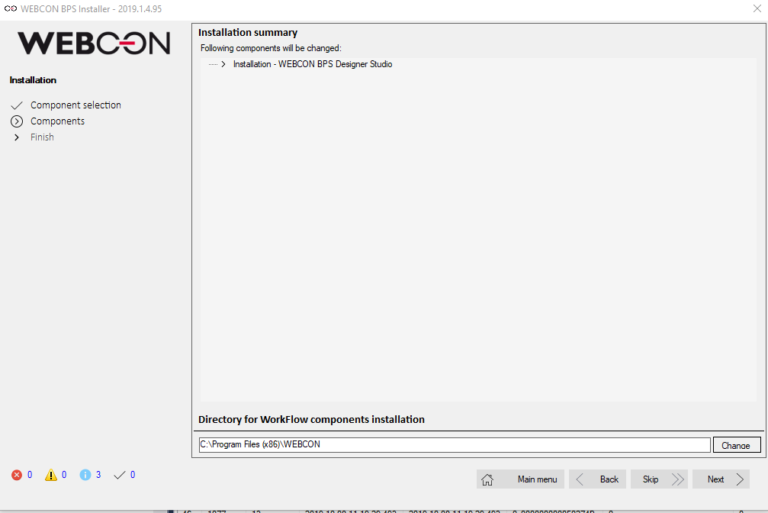
Privileges
The user who wants to log in to Designer Studio with unrestricted abilities should have the following privileges:
- They must be a system administrator of the Designer Studio
- They must have privileges in the ‘configuration’ and ‘content’ SQL databases at least at dbowner level
Connection with Portal
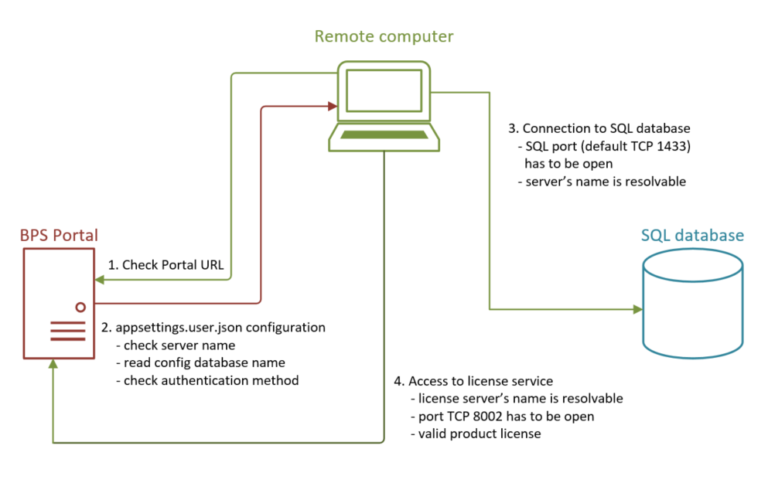
The Designer Studio installation and correct privileges are not enough to connect with Portal. Connection schematics are shown below.
Pic. 9. WEBCON BPS Studio, Portal and database connection schematics
To initiate a connection, Designer Studio sends a request to the server for the Portal URL address – that’s why on the welcome screen it is required to provide the Portal address to which we want to connect. The Portal address can be found in the database (configuration database -> GlobalParameters table) or by launching the installer on the server where WEBCON BPS is installed. Choose “Tools for application management” and then “Portal address configuration” to verify the Portal address.
The server which receives a request from the local Designer Studio installation will send three pieces of information in return. All of them are stored in an appsettings.user.json file which is located in the folder where Portal is installed. The three pieces of information are:
- Database server name,
- Configuration database name,
- Authentication method.
In order to connect to the database server, in the appsettings.user.json file provide the full server name. A DNS entry is required. If we connect to the database using the integrated login, provide the phrase “Integrated Security=True” in the file. Remember that WEBCON BPS Designer Studio is always launched in the context of currently logged-in user. This can be troublesome when using multiple domains. In that case, use SQL login authentication instead.
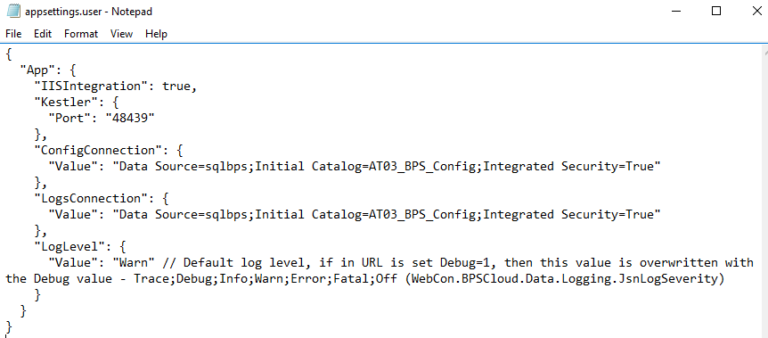
Pic. 10. appsettings.user.json for connection with integrated login authentication
It is very important that Studio has access to the SQL server. To allow it, open the TCP port (by default it’s port 1433).
When Designer Studio establishes a connection with the SQL server, it checks the available product licenses. In order to connect with the license service, open the appropriate port (by default it’s TCP 8002). The server name has to be solvable by Designer Studio. If the provided elements are not configured, Designer Studio will inform you that the license server is unavailable.
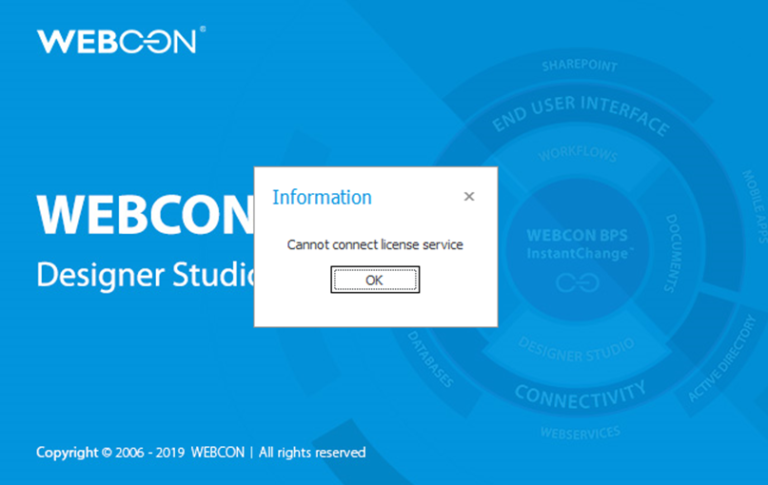
Pic. 11. Error caused by a closed license server port.
Logging in to WEBCON BPS Designer Studio
We’re almost there! When logging in to Designer Studio for the first time, you will see a window where you must choose the content database that you want to use.

Pic. 12. Choosing content database for SharePoint installation
WEBCON BPS Designer Studio on a local machine – StandAlone version with SharePoint and using SQL login to connect to the database.
WEBCON BPS Designer Studio Installation
The first step in connection configuration is the installation of WEBCON BPS Designer Studio. It is very simple:
- Download the installer compatible with the version of the WEBCON BPS installed on the server,
- Open setup.exe file and choose “Installation or update of WEBCON BPS Designer Studio”,
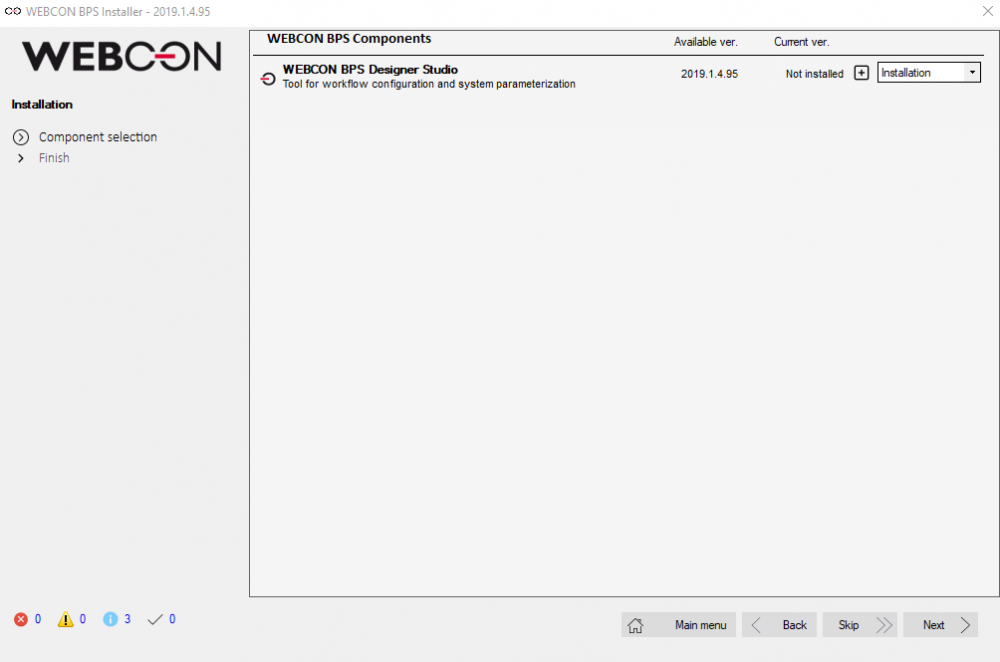
- The installer will check if there is any version of Designer Studio currently on the machine. If we have a newer version of Designer Studio installed, the installation will end on the next step,
-
-
Pic. 13. Checking the version of WEBCON BPS Designer Studio
4. Choose the installation catalog and click „Next” for Studio to be installed on the machine,
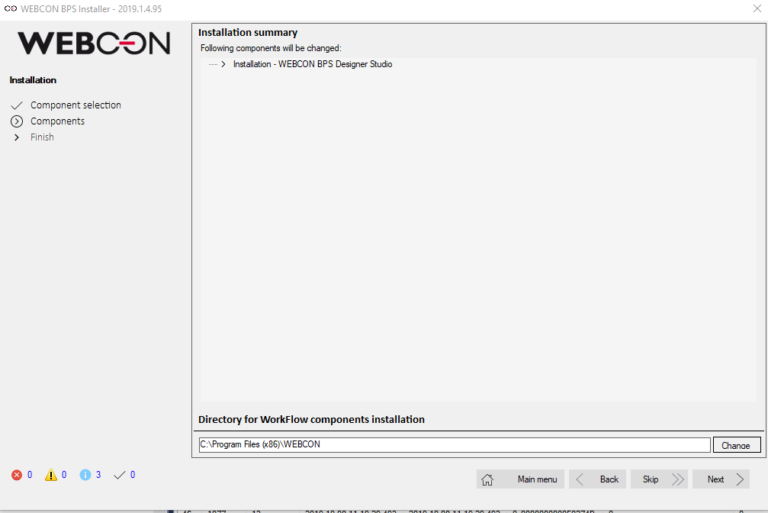
Pic. 14. Choosing installation folder
Privileges
The user who wants to log in to Designer Studio with unrestricted abilities should have the following privileges:
- They must be a system administrator of the Designer Studio.
- They must have privileges in the ‘configuration’ and ‘content’ SQL databases at least at dbowner level.
Connection with Portal
The Designer Studio installation and correct privileges are not enough to connect with Portal. Connection schematics are shown below.
Pic. 15. WEBCON BPS Studio, Portal and database connection schematics
To initiate a connection, Designer Studio sends a request to the server for the Portal URL address – that’s why on the welcome screen it is required to provide the Portal address to which we want to connect. The Portal address can be found in the database (configuration database -> GlobalParameters table) or by launching the installer on the server where WEBCON BPS is installed. Choose “Tools for application management” and then “Portal address configuration” to verify the Portal address.
The server which receives a request from the local Designer Studio installation will send three pieces of information in return. All of them are stored in an appsettings.user.json file which is located in the folder where Portal is installed. The three pieces of information are:
- Database server name,
- Configuration database name,
- Authentication method.
In order to connect to the database server, in the appsettings.user.json file provide the full server name. A DNS entry is required. In place of the default values (“Integrated Security=True”) provide user credentials in whose context the connection with the database will be made („User ID=userLogin;Password=pass123;”).

Pic. 16. appsettings.user.json for connection with integrated login authentication
It is very important that Studio has access to the SQL server. To allow it, open the TCP port (by default it’s port 1433).
When Designer Studio establishes a connection with the SQL server, it checks the available product licenses. In order to connect with the license service, open the appropriate port (by default it’s TCP 8002). The server name has to be solvable by Designer Studio. If the provided elements are not configured, Designer Studio will inform you that the license server is unavailable.

Pic. 17. Error caused by a closed license server port
Logging in to WEBCON BPS Designer Studio
We’re almost there! When logging in to Designer Studio for the first time, you will see a window where you must choose the content database that you want to use.

Pic. 18. Choosing content database for StandAlone installation
WEBCON BPS Designer Studio on a local machine - StandAlone version with SharePoint and using SQL login to connect to the database
WEBCON BPS Designer Studio installation
The first step in connection configuration is the installation of WEBCON BPS Designer Studio. It is very simple:
- Download the installer compatible with the version of the WEBCON BPS installed on the server,
- Open setup.exe file and choose “Installation or update of WEBCON BPS Designer Studio”,
- The installer will check if there is any version of Designer Studio currently on the machine. If we have a newer version of Designer Studio installed, the installation will end on the next step,

Pic. 19. Checking the version of WEBCON BPS Designer Studio
4. Choose the installation catalog and clock "Next" for studio to be installed on the machine

Pic. 20. Choosing installation folder
Privileges
The user who wants to log in to Designer Studio with unrestricted abilities must be a system administrator of the Designer Studio. No additional privileges to the WEBCON BPS databases are required, because logging in to it takes place in the context of the SQL login.
Connection with Portal
The Designer Studio installation and correct privileges are not enough to connect with Portal. Connection schematics are shown below.

Pic. 21. WEBCON BPS Studio, Portal and database connection schemiatics
To initiate a connection, Designer Studio sends a request to the server for the Portal URL address – that’s why on the welcome screen it is required to provide the Portal address to which we want to connect. The Portal address can be found in the database (configuration database -> GlobalParameters table) or by launching the installer on the server where WEBCON BPS is installed. Choose “Tools for application management” and then “Portal address configuration” to verify the Portal address.
The server which receives a request from the local Designer Studio installation will send three pieces of information in return. All of them are stored in an appsettings.user.json file which is located in the folder where Portal is installed. The three pieces of information are:
- Database server name,
- Configuration database name,
- Authentication method.
In order to connect to the database server, in the appsettings.user.json file provide the full server name. A DNS entry is required. In place of the default values (“Integrated Security=True”) provide user credentials in whose context the connection with the database will be made („User ID=userLogin;Password=pass123;”).
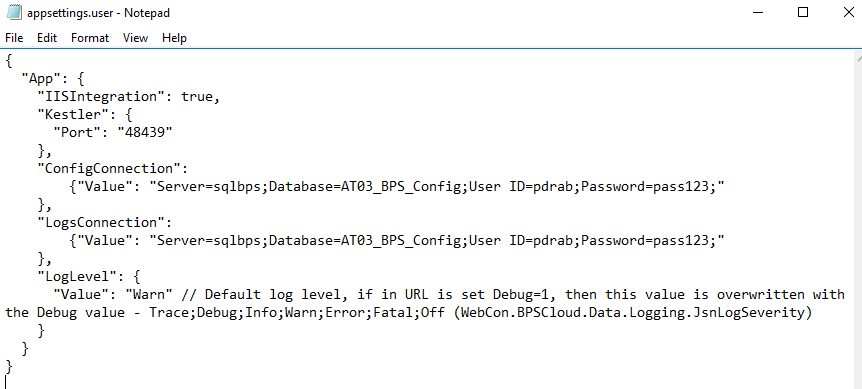
Pic. 22. appseting.user.json for connection with integrated login authentication
It is very important that Studio has access to the SQL server. To allow it, open the TCP port (by default it’s port 1433).
When Designer Studio establishes a connection with the SQL server, it checks the available product licenses. In order to connect with the license service, open the appropriate port (by default it’s TCP 8002). The server name has to be solvable by Designer Studio. If the provided elements are not configured, Designer Studio will inform you that the license server is unavailable.

Pic. 23. Error caused by a closed license server port
Logging in to WEBCON BPS Designer Studio
We’re almost there! When logging in to Designer Studio for the first time, you will see a window where you must choose the content database that you want to use.

Pic. 24. Choosing connect database for StandAlone installation

