Creating, deleting, and editing individual users in WEBCON BPS
Applies to version 2020.1.3 ; author: Dawid Golonka
Introduction
This article describes how you can create, delete, and edit individual users in WEBCON BPS, using a standalone installation (one that operates without SharePoint). These features have been introduced with version 2020.1.3 of the program. You can also use BPS groups to manage users. To read more about it, go here: The "Create/Delete BPS group" action (webcon.com)
Workflow description
In this article, we show user management BPS actions on an example in which there are three separate forms; each of them triggers a different BPS user action. One form is used when you want to create a new user, another is used to delete them, and the last form type is used for editing an existing user. The workflow with each of the three forms can be launched from Portal.
All these forms use the same workflow. The first step allows submitting a form for creating, deleting, or editing the user. Once submitted, it is sent for acceptance to the Approver. If the Approver accepts, the action requested in the form (create, delete or edit the user) is performed on the “Accept” path that goes from the “Acceptance” step to the “Actions done” step.

In our example, we have configured all three actions on the “Accept” path. This is where we check three conditions in the following order:
- Is it the form type ID for creating the user? If yes, create a user.
- Is it the form type ID for deleting the user? If yes, delete the user.
- Is it the form type ID for editing the user? If yes, edit the user.
When a condition is met, the workflow performs the actions we have associated with it (create, delete, edit). The other actions are not executed.
Below you can see the configuration for the “Accept” path on the “Acceptance” step:

Now, we will show you how you can configure this workflow.
Creating a BPS user
Look at the form for creating users we have prepared:

The “Registering person” and “Date” fields are automatically filled in. For the form fields included in the "Personal data" group, you must manually enter the data needed to create an account. The fields that must be completed are:
- BPS ID (user ID),
- Full name,
- E-mail.
The other fields are optional; you can set up a BPS account without filling them in. The Approver is selected using a form field of the "Person or group" type (in the “Picker fields” folder). In the attachments section, in the "User photo" category, a graphic file with the user's photo has been attached. The requirements for graphic files are described later on when we discuss the action’s configuration.
When this form is sent by hitting the “Send to acceptance” button, it goes to the "Acceptance" step where the Approver accepts the request or rejects it. This is what the form looks like for the Approver:

If the Approver hits the "Accept" button, the requested action should be performed on the "Accept" path going out of the "Acceptance" step.
To configure it, go to the Designer Studio, go to your workflow, and on the right (under "Workflow steps," in the "General" tab opened by default), right-click on the right step and select "Edit." In our example, we open the "Acceptance" step because the action for creating the user is configured on the path that goes out of this step.
Now, choose the "Actions" tab, look at the "Actions list" on the left, select "On path," and choose the path on which you want to place the action (in the example, it is the “Accept” path). Now, use the shortcut CTRL + N or right-click on the path’s name and choose “Add” to create a new action.
In the "Action settings" on the right, fill in the "Name" field (e.g., "Create BPS User"), and in the "Action type," select "Create BPS user" from the "BPS Users and groups" folder. Then, introduce the condition in the “Execution condition” below.
In our example, the condition checks if the form type ID matches the form type's name. See it on the screenshot below:
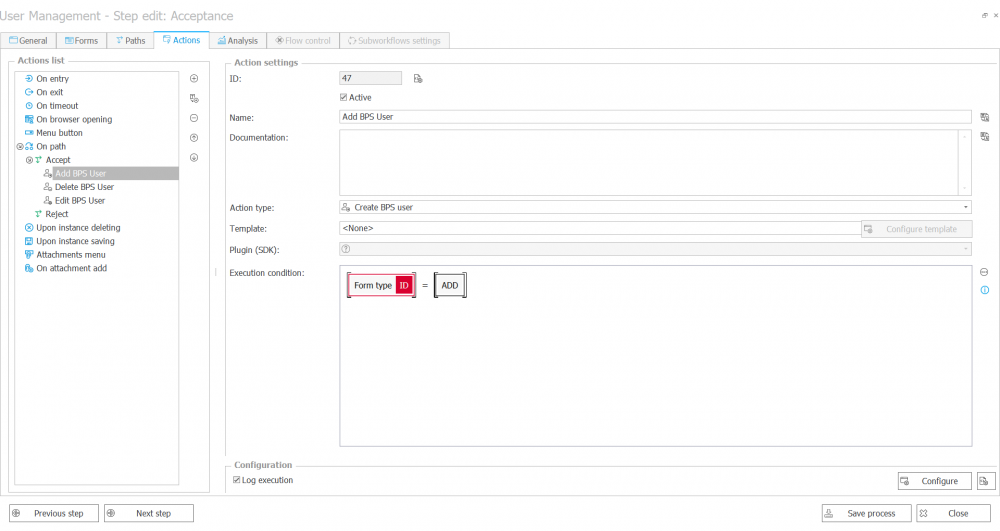
Once you have introduced the execution condition, press the “Configure” button at the bottom right to finish this action's configuration.
"Create BPS user" configuration.
Below you can see a sample configuration for this action:
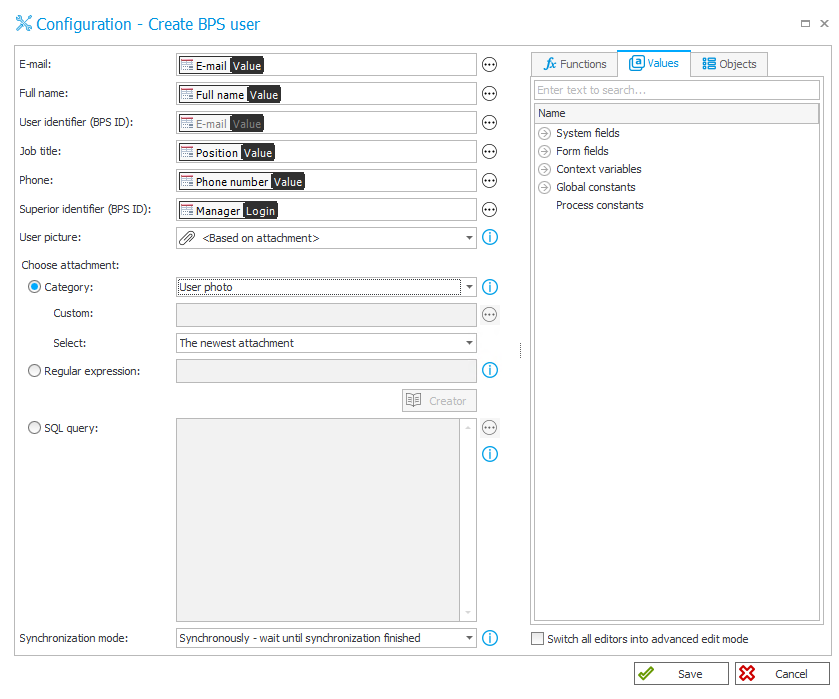
In the configuration window, there are several options:
- E-mail address,
- Full name,
- User identifier (BPS ID) – enter the identifier (in the UPN format, e.g., tom.green@webcon.com) for the account you are creating. The system automatically prompts you to enter in this field the same value as in the "E-mail" field. If you do so, the user BPS ID will conform to the UPN format.
- Job title,
- Phone,
- Supervisor identifier (BPS ID) - in the example, we have used the person's login indicated on the form as the superior.
- User picture - you can create a photo based on the attachment from the form. In our example, we have configured the action to place the user picture in a category named "User photo." However, you can also use a regular expression or SQL query to indicate where it should be placed. The photos created must be saved in an appropriate format (JPG, BMP, PNG, GIF), have a size not larger than 10 KB, and their resolution cannot exceed 96x96 pixels.
At the bottom of the configuration window, you can select the “Synchronization mode”:
- Synchronously - the action will be performed after the user data synchronization is completed. Enable this mode when subsequent actions use the newly entered data.
- Asynchronously - the action is performed independently of the user data synchronization, meaning it does not wait for it to be finished.
Now, let us demonstrate where you can verify if a new user was created correctly. Go to “System settings” (in the left panel), expand "Global parameters," and click on the "BPS users list." Here you can check if the user was created in the system.
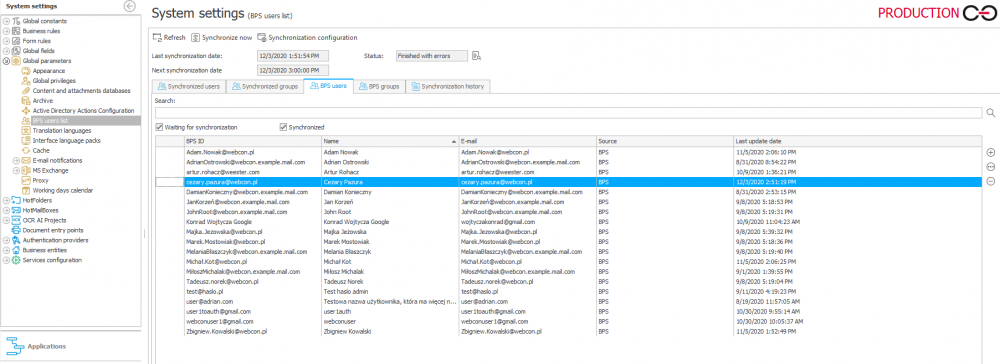
To check if the user has a photo, right-click on the row with his data and select "User preview" (see the window that opens below).

Editing user account
This part of the article describes how to edit a BPS user. First, see the form that we have created for this purpose:
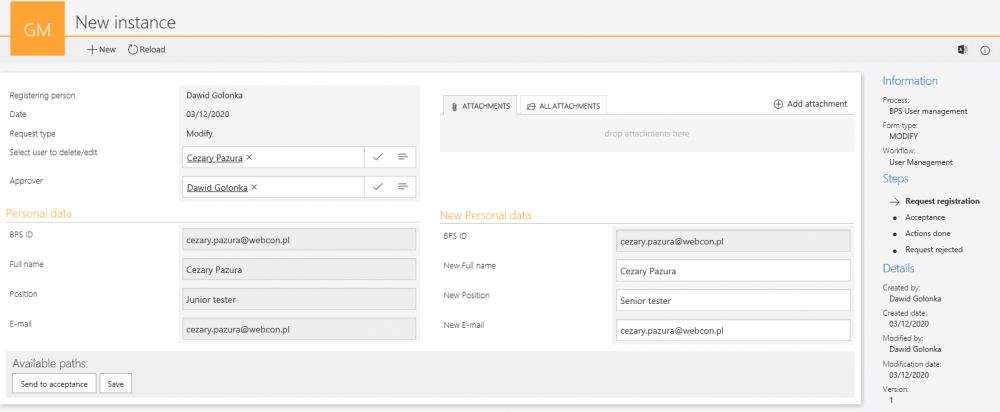
When you start the form, select the user you want to edit (field “Select user to delete/modify”). After selecting the user, their data will be loaded to the “Personal data” group on the left. It will be in a read-only format.
The same data appears in the group on the right. However, here you can edit the user’s account info. Please note that you can edit only the data that was entered when the account was created (you can see it on the left under “Personal data”).
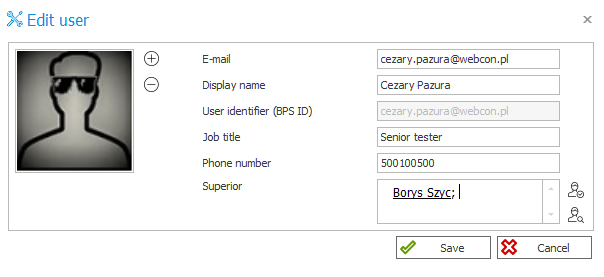
In our example, it is the user’s name and surname, their job position and e-mail address. Now, we can update this info. We will change the person’s position from "Junior Tester" to "Senior Tester" and click the button "Send to acceptance."
Now, the form is in the "Acceptance" step, and it looks like this:

As you can see in Figure 10, the Approver can compare the original user data (under "Personal data") with the edited data (under the "New Personal data"). If the Approver decides to accept the change, they hit the "Accept" button, and the user data should be modified.
However, first, you need to configure the "Edit BPS User" action. To do so, go to the Designer Studio, go to your workflow, and on the right (under "Workflow steps," in the "General" tab opened by default), right-click on the step and select "Edit." In our example, it is the "Acceptance" step because the action for editing the user is configured on the path that goes out of this step.
Now, choose the "Actions" tab, look at the "Actions list" on the left, select "On path," and choose the path on which you want to place the action (in the example, it is the "Accept" path). Now, use the shortcut CTRL + N or right-click on the path's name and choose "Add" to create a new action.
In the “Action settings” on the right, fill in the “Name” field (e.g., “Edit BPS User"), and in the "Action type," select "Edit BPS user” from the “BPS Users and groups” folder. Then, introduce the condition in the “Execution condition” below.
In our example, the condition checks if the form type ID matches the form type's name. See it on the screenshot below:
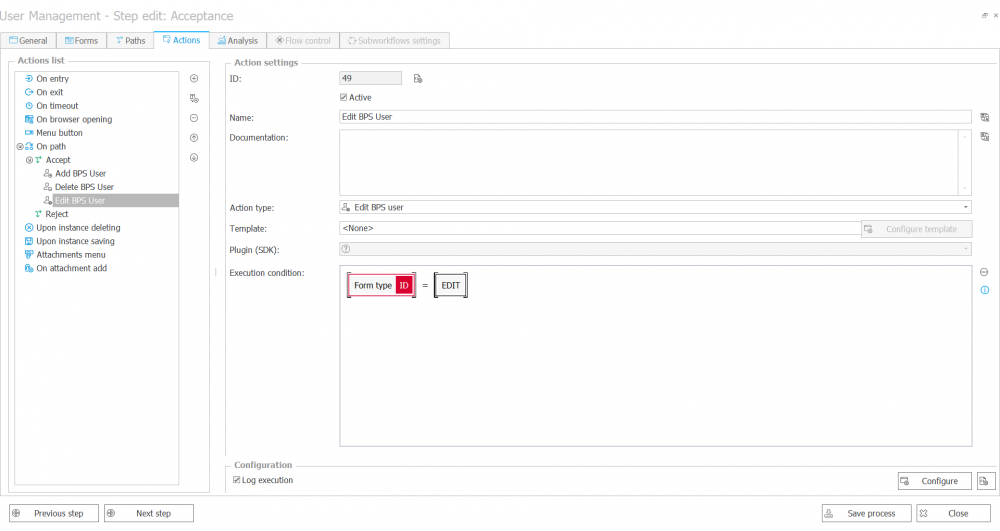
Once you have set the execution condition, hit the "Configure" button at the bottom right to finish this action's configuration.
Configuration of the action "Edit BPS user"
First, look at the screenshot from the configuration we have used in our example:

In the configuration window, indicate the user's identifier (BPS ID) to be modified (in UNP format). As shown on the screenshot, you can enter the ID manually or use the value of a form field for choosing the user. For the action to be performed correctly, user login (UPN format, e.g., tom.green@webcon.com) must be selected.
Then, select which values can be overwritten by checking the box next to their fields. For example, check the box next to the “E-mail” to indicate it should be possible to edit it.
At the bottom of the panel, you can choose the synchronization mode. After the user data has been updated, an independent synchronization operation is required. User data synchronization may take several seconds, and until it is completed, user data is not available in the system.
The "Synchronization Mode" (at the bottom of the window) decides if the action should be executed after the synchronization is finished (“Synchronously”), or if it can be performed before that (“Asynchronously”). Leave it in the default mode or change it if you have a reason to do so.
Now, the configuration is complete. When the Approver accepts the request for editing the user's data, the form will go to the Final step, and the user data will be updated. The form looks like this at the Final step:

You can check if the user’s data is correctly edited by going to the “BPS users list," right-clicking on the row with the user's data and selecting "User preview." If you have a problem finding it, please go back to the "Create BPS user" configuration, where we have shown it in detail.
Configuration of the action "Delete BPS user"
First, look at the screenshot of the form we are using for deleting a BPS user:

As you can see, you can select a user whose account should be deleted. After doing so, the user's basic data is loaded into the “Personal data” group on the left. Now, select the Approver for the request and hit the “Send to acceptance” button.
The form will go to the “Acceptance” step. If the Approver accepts the request, the BPS user will be deleted. At the final step (request accepted), the form looks like this:

You can verify if the user’s account has been deleted correctly. To do so, go to "System settings" (in the left panel), expand "Global parameters," and click on the "BPS users list." Here you can check if the user’s account was removed.

We have shown you how we delete users in our example, but we have not explained how to configure the “Delete BPS User” action yet. As with previous actions, open the Designer Studio, go to your workflow, and on the right (under “Workflow steps”) right-click on the step and select "Edit." In our example, we edit the “Acceptance” step because the action for deleting the user is configured on the path that goes out of this step.
Now, choose the “Actions” tab, look at the “Actions list” on the left, select “On path” and choose the path on which you want to place the action (in the example, it is the “Accept” path). Now, use the shortcut CTRL + N or right-click on the path’s name and choose “Add” to create a new action.
In the “Action settings” on the right, fill in the “Name” field (e.g., “Delete BPS User"), and in the "Action type," select "Delete BPS user” from the “BPS Users and groups” folder. Then, introduce the condition in the “Execution condition” below.
In our example, the condition checks if the form type ID matches the form type's name. See it on the screenshot below:
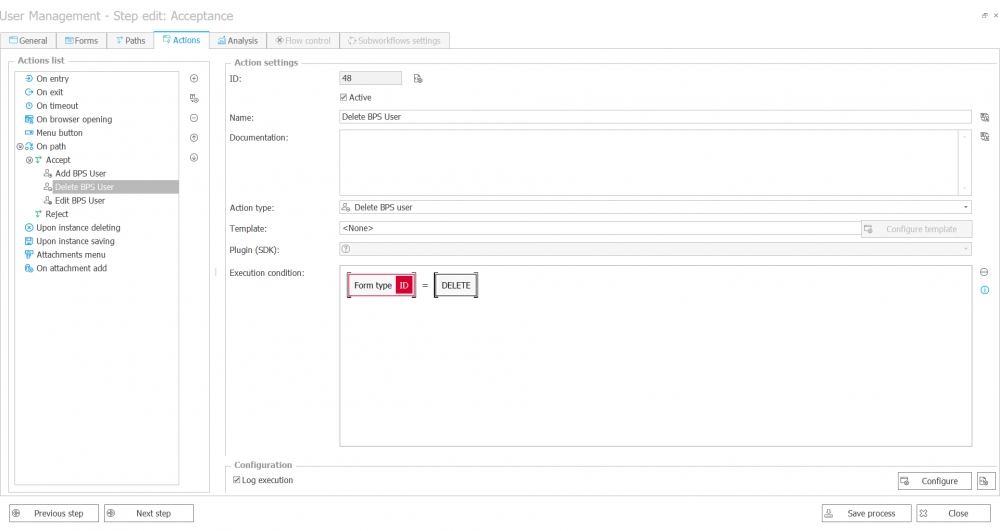
Now, hit the “Configure” button to finish the configuration. You will see this window:

Here, you only need to indicate the User identifier (BPS ID) of the user to be deleted. It must be in the UPN format (e.g., tom.green@webcon.com). This value can be entered manually or taken from a form field that allows selecting the user to be removed.
At the bottom of the configuration window, you can select the “Synchronization mode”:
- "Synchronously" - the action will be performed after the user data synchronization is completed. Enable this mode when subsequent actions use the newly entered data.
- “Asynchronously” - the action is performed independently of the user data synchronization, meaning it does not wait for it to be finished.
When you indicate the user to be deleted and, optionally, change the synchronization mode, your configuration is complete.
Summary
You can set up a simple workflow for creating, editing, and removing BPS users' accounts as the one shown in this article. If you add to it actions for managing BPS groups, you will create a platform for user administration and facilitate your administrator’s work.
To learn more about BPS groups, consult these two articles:
If you already have a list of BPS users in Excel and need to import it, see this article: Importing BPS user from an Excel file (webcon.com).

