Security - Built in features
Applies to version: 2023.1.3 and above
Introduction
The security of a WEBCON BPS system is influenced by two things: the infrastructure of the installation, and the configuration options within the system itself. In this article, we will focus on the latter – options that can be found in Designer Studio that can be used to control the system’s accessibility.
Security bulletin – vulnerabilities
The development of WEBCON BPS involves a multitude of external components, libraries, and frameworks that undergo security audits. Known vulnerabilities that affect any of the used components, or the system itself, are catalogued on the Security bulletin page on Community.
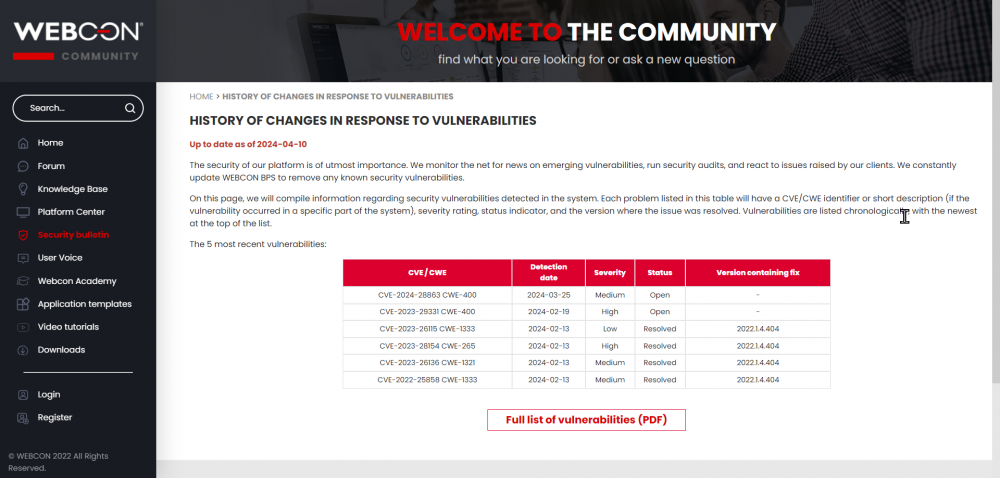
The list includes CVE/CWE identifiers, or a short description in cases where the vulnerability originated in WEBCON BPS.
Global Parameters – options in the System settings
Most options related to security are found under the Security (1) node of the Global parameters in the System settings. Some additional options are also found in the Global parameters (2) node itself (In older versions of the system, where a separate Security node doesn’t exist yet, security options are found in this main node).
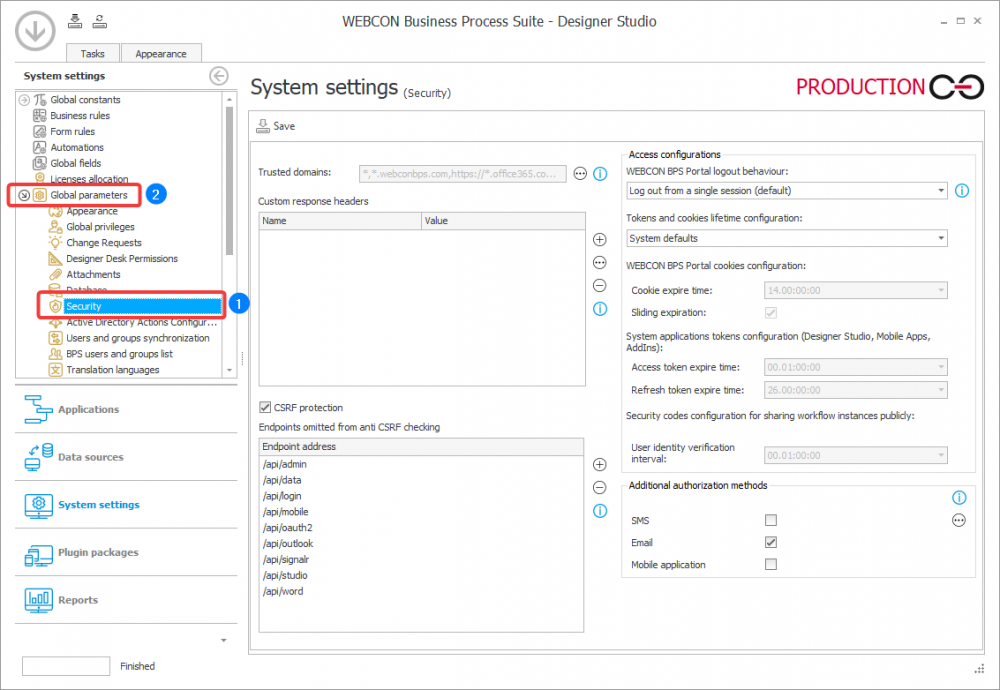
These options are used to adjust the behavior of the system to match the security standards and good practices employed by the given company.
Trusted domains
To display WEBCON BPS Portal elements on other sites, they must be added here.
WEBCON BPS Portal elements embedded on sites in domains not included in the trusted domain list will not be shown in the browser.
This feature is not available in Internet Explorer.
WEBCON BPS Portal content will always be shown in this browser, even if the site domain on which the elements are embedded is not added to the trusted domains.
In order to embed Portal in Microsoft Teams and Microsoft Outlook, add the following domains to the trusted domain list:
- https://*.office365.com
- https://*.office.com
- https://*.microsoft.com
Note: If Content-Security-Policy headers are configured and added to the frame-ancestors section set, the list of trusted domains will be added to domains defined in this header. The exception is the “*” entry, which is ignored.
Custom response headers
Custom headers listed here will be added to every response in WEBCON BPS Portal. This can be used to match your own specific security policies, especially if Portal is going to be available in the public net.
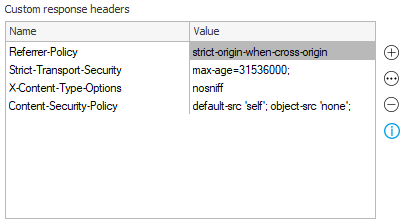
The Content-Security-Policy header will be merged with trusted domains.
An example of configuration can be found in the article: HTTP headers in WEBCON BPS.
CSRF Protection
Protection against CSRF (Cross Site Request Forgery, XSRF) works by checking the Origin and Referrer headers in POST invocations from the user’s browser.
A correct configuration should protect all endpoints where a user is authenticated based on cookies provided by the browser.
As for headers which are omitted – this is for when endpoints rely on token authentication. This list of exceptions here should contain all such endpoints.
Logout options in Portal
By default, we have one logout button which logs out of one session. We can add a second button to make it possible to log out of all sessions OR change the default button to log out from all sessions.
- Log out from a single session (default): the user menu includes the Logout button which enables logging out of a single user session.
- Log out from all sessions: the user menu includes both the Logout button for logging out of a single user session and the Global logout button for logging out of all user sessions across all devices.
- Force logging out from all sessions: the user menu includes only the Global logout button which enables logging out of all user sessions across all devices.
Token, Cookie, and Public link
We can control the lifespan of refresh and access tokens, cookies, and the length of the session that is made available via public link.
Of course, System defaults will be used by default, if we switch this to User defined we will be able to fully control these values to adhere to our security policies and good practices.
- Cookies expire after 14 days by default.
- Sliding expiration automatically extends the cookie’s expiration time. If selected, the expiration time is extended when the WEBCON BPS Portal is accessed after half of the cookie’s lifetime has elapsed. In such a case, a new cookie is issued, valid for the duration specified in the Cookie expire time parameter. If not selected, the cookie’s expiration time is not extended..
- The access token expiration time default value is 1 hour.
- The refresh token expiration time default value is 26 days.
- User identity verification interval is the time after which it is necessary to reauthorize access to an instance gained by opening the received link. The full writeup of this feature can be found here: Public link.
Additional authorization methods
The configuration enables you to designate the methods of additional authorization that the end user can leverage when the additional authorization (path transition authorization, authorization to access confidential form data) has been enabled in the process configuration. It is mandatory to have at least one active additional authorization method.
The full writeup for this feature can be found here: Path authorization.
- SMS – a one-time authorization code will be sent to the phone number of the end user performing the activity that requires additional authorization. The phone number to receive the code via SMS is specified in the user’s profile. The user must enter the authorization code in the form window to confirm their identity and proceed with their work. If no phone number is provided for the user, they won't be able to authorize through this channel.
- Email – a one-time authorization code will be sent to the email address of the end user performing the activity that requires additional authorization. The user must enter the authorization code in the form window to confirm their identity and proceed with their work.
- Mobile application – a push notification will be sent to the device on which the mobile application is installed to confirm the identity of the end user performing the activity that requires additional authorization. To use this method of additional authorization, the user must have installed the latest version of the mobile application and added their device to trusted devices, as configured in the user’s profile.
Required mobile application security level
If our users enjoy the mobile app, we can force them to set up a PIN. The app will periodically ask the user to set up a PIN and encourage them to add the app as a trusted device (used in the authorization feature mentioned above).
Full writeup of the mobile app and its features can be found here: Mobile app.
Application design
Apart from all the options in the Global parameters, there is a number of features and approaches when designing processes, workflows, and data sources to make our system configuration “airtight”.
Part of good process design is planning out what resources and data should be available to each user – not only to complete tasks in workflows, but also in reporting tools like Reports and Dashboards. If we limit what the user can see to only the most crucial data, it will not only look neater but also protects sensitive data.
Compartmentalization of workflows
The most fundamental way to control what our users will see and have access to is through the various levels of privilege settings. To make this easier, it is generally a good idea to divide business processes into a number of workflows that can (but don’t have to) be interconnected. Such smaller workflows are much easier to manage through privileges and task assignment.
We can plan workflows around the data that will be used in it – if we have actors involved in process, and we would like them to have access to only a specific subset of data from an element of that process, we can create a subworkflow form them, and pass to it only necessary information.
This will allow more people to participate in a more robust process, but they will not necessarily have access to every piece of information that circulates in the process. The users will be “corralled” of to their own subworkflow instance, their participation can be limited to this instance only - they will not be able to peak at data from the parent workflow or go digging in its instance history.
The community site has multiple articles on how to use subworkflows in practical scenarios.
Assigning privileges and licenses
Although licenses can be assigned manually through Designer Studio, it is generally a good practice to automate this via workflow. This will reduce the chance for human error, not to mention making it more comfortable.
Workflows are designed around the Add/Remove privileges action (and usually involve some form of group and/or AD management actions) and can also include license assignment. Such processes are widely referred to as “Onboarding” processes and are a staple feature of many HR-oriented applications.

DEV-TEST-PROD Import-Export
On the topic of avoiding human error, it is a good practice to modify the Production environment exclusively via the Export-Import mechanism.
It is currently also possible to import with API.
With these packages, we also have a convenient “backup” of the previous versions of our applications, should we need to return to them.
E-mail contents
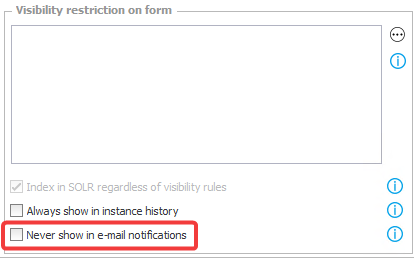
We can strictly control what is sent in e-mails (standard and custom). There is an interesting option in the configuration of form fields: Never show in e-mail notifications. It’s worth noting that technical fields also won’t be included in e-mails.
In the template configuration on a process, and in the action that sends a custom e-mail, you can control what links will be included in the message. Hiding unnecessary links is useful especially for e-mails that are being sent outside the company.

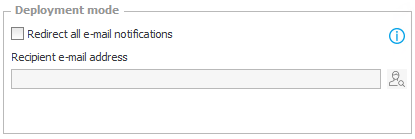
When are processes are being worked on or tested, we can redirect all e-mails from them by using deployment mode (there is also a global version of this).
Data sources
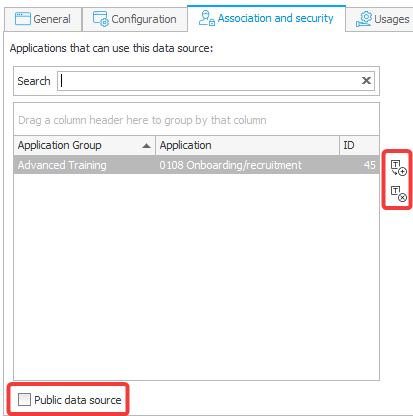
In the configuration of connections and data sources, we have access to several options that can control who has access to what data. The global admin will see all sources and connections, while application admins will only see sources and connections that are Associated with their respective application (or are Public).
GDPR
2017 brought with it new regulations and new features in WEBCON BPS. There are a number of features pertaining to marking, tracking, and finally anonymizing or deleting personal data propagated in the system.

