Applies to version: 2020.1.x and above; author: Konrad Wojtycza
Introduction
WEBCON BPS can be used as an efficient document management system. This article describes how to use barcodes to scan PDF files and paper documents and have them automatically added to your WEBCON workflows' instances.
Common business scenarios for using barcodes include:
- Having a PDF document or a paper document and scanning its barcode to relate it with an existing workflow instance.
- Scanning the barcode on an attachment added to the HotFolder to start a workflow automatically.
An example of barcode use would be the contract conclusion process. To process the contracts prepared by the contractor in WEBCON BPS, you may need to print the PDF files to sign the documents. After signing them, you can scan the barcodes on the documents. The service recognizes the contract with the barcode located in the HotFolder and attaches it to the appropriate workflow instance based on its barcode. Read this article for configuration details.
Configuration of the “Add a barcode” action
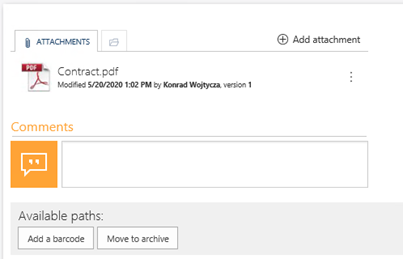
First, add the contract you received to a workflow instance. If the document is not in PDF format, scan it first. Then, use WEBCON BPS Designer Studio to add a barcode to this document.
Fig. 1. A workflow instance containing the contract from the client
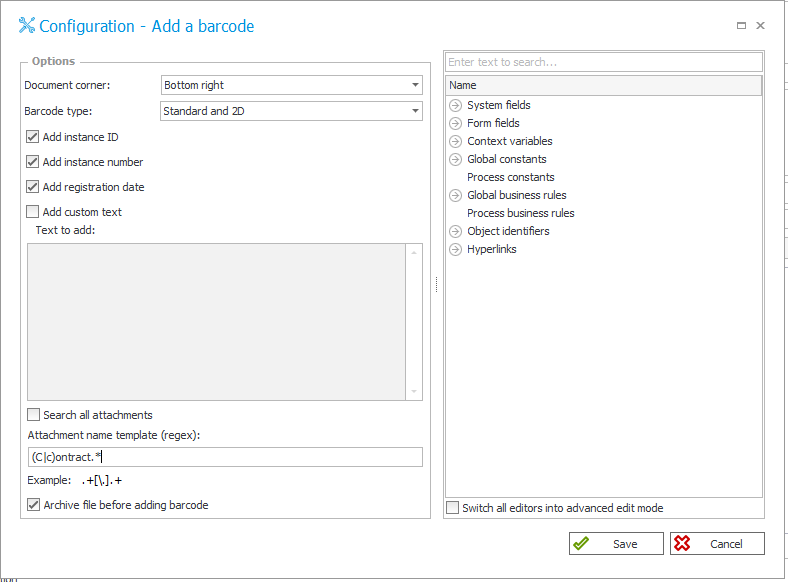
Adding the barcode is a standard action available in Designer Studio. The screenshot below presents the configuration you need:
Fig. 2. The configuration of the “Add a barcode” action
- Document corner – choose where you want to add the barcode.
- Barcode type – choose the type of the barcode you want: standard, code 2D, standard and code 2D.
- Check the boxes next to add Instance ID, instance number, and registration date.
- Custom text – check this box if you need to add a custom text.
To define to which attachments the barcode should be added, uncheck the “Search all attachments” field. Then, define the attachments in the “Attachment name template” field. The name template you enter should be defined by using a regular expression e.g., an expression that selects the documents with a name beginning with the “Contract” or “contract” phrase.
The “Archive file before adding barcode” option allows you to archive the file without adding the barcode. In this situation, after adding the barcode in the attachment table (WFDataAttachments), an additional row will be added.
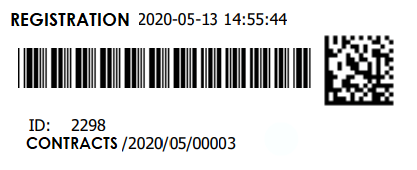
After going through the “Add a barcode” path, on the PDF document, a barcode will appear in the document's corner you have selected before.
Fig. 3. Added barcode
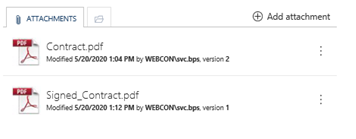
When you sign the printed contract and scan its barcode, the document (stored in the HotFolder) will be processed. The system will recognize its barcode and add the document to the workflow instance from which you have downloaded this document.
Fig. 4. The attachment containing the signed contract added to the workflow instance
When you look at Figure 4, you can see the file named "Signed_Contract.pdf." The “Signed_” part was added to the scanned document by using the “Attachment name of created template” field in the HotFolder configuration.


